Watch the Video Tutorial
💡 Pro Tip: After watching the video, continue reading below for detailed step-by-step instructions, code examples, and additional tips that will help you implement this successfully.
Hey there, future automation wizard! Boyce here, your friendly neighborhood self-taught automation consultant. Ever felt like you’re drowning in manual tasks, wishing you had a digital assistant to handle all those repetitive messages and notifications? Well, buckle up, because today we’re going to build one using Telegram and n8n! It’s like giving your workflow a superpower, letting it chat and interact in real-time. No coding degree required, I promise.
TL;DR
- Seamless Automation: Learn to integrate Telegram with n8n to automate messaging workflows without writing a single line of code. It’s like building LEGOs, but for your digital tasks!
- Secure Credential Management: Understand the critical role of n8n credentials for secure connections and how to set them up correctly. Think of these as the secret handshake between n8n and Telegram.
- BotFather Mastery: Master the use of Telegram’s BotFather to generate essential API tokens for your custom bots. This is where your bot gets its identity, like a birth certificate!
- Real-time Interaction: Configure Telegram Trigger nodes to listen for incoming messages and initiate automated responses. Your bot will be all ears, ready to spring into action!
- Enhanced Productivity: Discover how this integration can significantly boost your productivity by automating routine communication tasks. Free up your brainpower for the fun stuff!
Table of Contents
Open Table of Contents
- Introduction: Why Integrate Telegram with n8n?
- The Power of Automated Messaging
- Setting Up Your n8n Telegram Trigger Node
- The Core of Connection: Understanding n8n Credentials
- Step-by-Step: Creating a New Telegram Credential in n8n
- BotFather: Your Gateway to Telegram Bot Tokens
- Configuring Your Telegram Trigger Node with Credentials
- Testing Your Telegram Integration: Receiving Messages in n8n
- Advanced Telegram Automation: Beyond the Trigger
- FAQ: Common Telegram & n8n Integration Questions
- Advanced Integration Strategies: Maximizing Telegram with n8n
- Conclusion: Unlock the Power of Telegram Automation with n8n
Introduction: Why Integrate Telegram with n8n?
In today’s fast-paced digital landscape, 80% of businesses struggle with manual data transfer and communication bottlenecks, leading to significant productivity losses. Ouch, right? Imagine a world where your critical alerts, customer interactions, and internal notifications are handled automatically, freeing up countless hours for more strategic tasks. This is precisely the power that emerges when you connect Telegram, a robust and widely used messaging platform, with n8n, a versatile workflow automation tool. This integration isn’t just about sending messages; it’s about creating intelligent, responsive systems that can transform how you operate. It’s like having your own personal robot army, but way cooler and less prone to rebellion.
As a seasoned expert in workflow automation and integration (and someone who’s definitely been in your shoes as a beginner!), I’ve seen firsthand how a well-implemented solution can revolutionize business processes. This guide will walk you through the essential steps to master Telegram integration within n8n, enabling you to build powerful, event-driven workflows that react in real-time. From setting up secure credentials to leveraging Telegram’s BotFather for API tokens, you’ll gain the knowledge to unlock a new level of automated communication. Prepare to elevate your automation game and harness the full potential of your digital ecosystem. Let’s get this done!
The Power of Automated Messaging
Integrating Telegram with n8n opens up a world of possibilities for automated communication. This powerful combination allows you to create dynamic workflows that respond to messages, send notifications, and interact with users in real-time, all without requiring complex coding skills. The ability to automate these interactions can significantly reduce manual effort and improve response times, making your operations more efficient and responsive. Think of it as giving your business a turbo boost!
- Real-time Notifications: Receive instant alerts from your systems directly on Telegram. No more constantly checking dashboards!
- Interactive Bots: Build bots that can respond to user queries or commands. Your bot can be a helpful assistant, not just a message sender.
- Workflow Triggers: Use incoming Telegram messages to initiate complex n8n workflows. A simple message can kick off a whole chain of events!
This integration is particularly beneficial for developers, automation enthusiasts, and n8n users who want to extend their automation capabilities into the realm of instant messaging. By connecting these two platforms, you can bridge the gap between your automated processes and your communication channels, creating a seamless flow of information and action. It’s like building a superhighway between your data and your conversations.
Bridging Communication and Automation
I think the core benefit of integrating Telegram with n8n lies in its capacity to bridge communication and automation. Traditional automation often operates in the background, quietly doing its thing. But by bringing Telegram into the mix, you can make these processes interactive and accessible. This means your automated systems can not only perform tasks but also communicate their progress, request input, or deliver results directly to you or your team via Telegram. How cool is that?
- Enhanced User Experience: Provide immediate feedback and updates to users. No one likes being left in the dark!
- Simplified Data Input: Allow users to trigger workflows or submit data via simple Telegram messages. Turn a chat into a data entry form!
- Centralized Control: Manage and monitor your automated workflows from your Telegram client. Your phone becomes a remote control for your automations.
This synergy transforms passive automation into an active, communicative partner in your daily operations. Whether it’s for customer support, internal team coordination, or personal productivity, the Telegram-n8n integration offers a robust solution for a wide array of use cases, making your automation more powerful and user-friendly. It’s like giving your automation a voice and a brain!
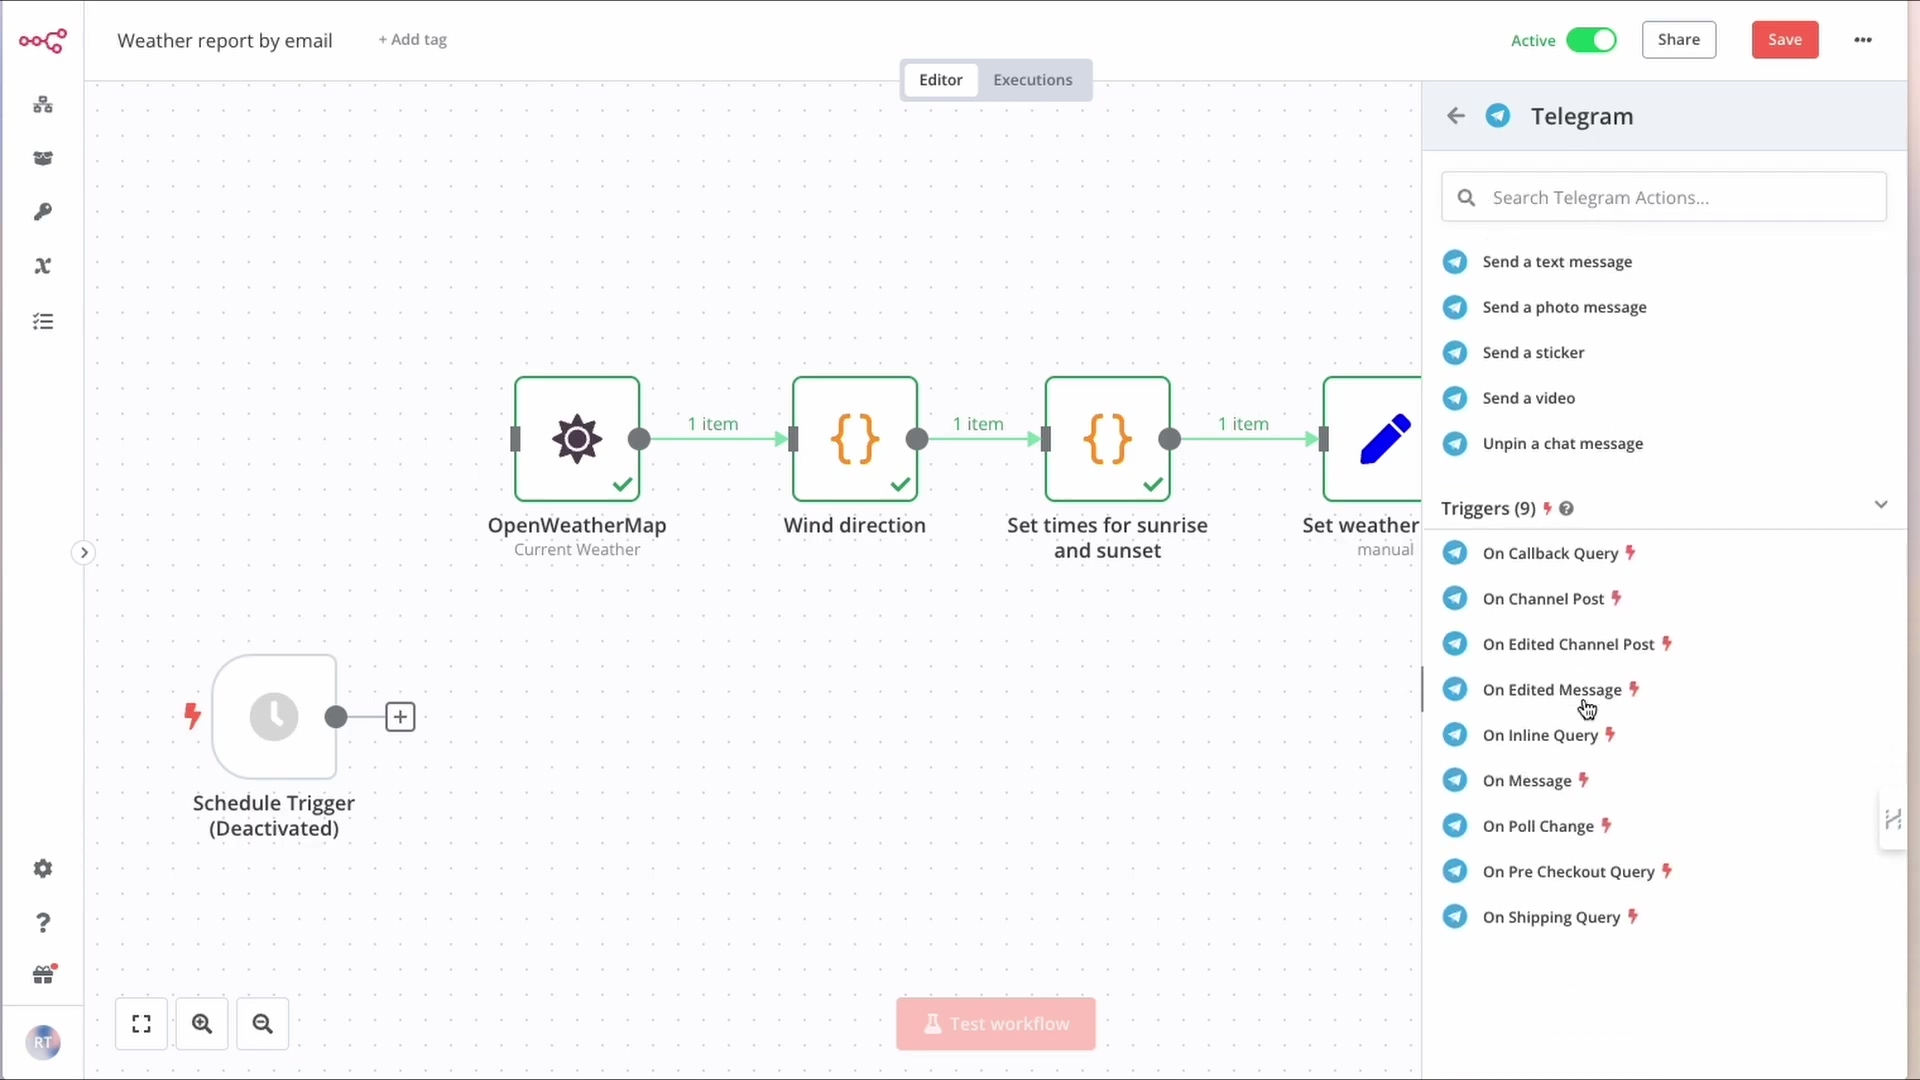
This image illustrates a complex n8n workflow, demonstrating how various nodes like ‘OpenWeatherMap Current Weather’ and ‘Wind direction’ can be integrated. Notice the ‘Telegram’ panel on the right, which lists various actions and triggers such as ‘On Callback Query’ and ‘On Message’, highlighting the extensive capabilities for Telegram integration within n8n. This visual representation emphasizes how Telegram can be a central part of a sophisticated n8n workflow, enabling real-time interactions and notifications based on various triggers. Pretty neat, right?
Setting Up Your n8n Telegram Trigger Node
Alright, let’s get our hands dirty! This is where we start building. The first step to integrating Telegram with n8n involves adding a Telegram Trigger node to your workflow. This node is specifically designed to listen for incoming messages on Telegram and, upon receiving one, initiate the execution of your n8n workflow. Understanding its function is crucial for building responsive and event-driven automations. Think of it as the doorbell for your automation house.
Initiating Your Telegram Workflow in n8n
- Node Selection: Navigate to the n8n node panel and search for ‘Telegram’. You’ll see a few options, but we’re looking for the one that starts things off.
- Trigger vs. Action: Select the ‘Telegram Trigger’ node, as opposed to an ‘Action’ node, to ensure your workflow starts when a message is received. A trigger starts the workflow, an action does something within the workflow. Gotcha?
- Placement: Drag and drop the trigger node onto your n8n canvas, typically as the starting point of your workflow. It’s usually the very first block in your automation chain.
This initial setup lays the groundwork for any Telegram-based automation. The Telegram Trigger node acts as the entry point, waiting patiently for the specific events you define to occur within your Telegram bot. Without this node, your n8n workflow would not be able to react to real-time Telegram interactions. It’s the essential first step, like putting the key in the ignition!
Configuring the Telegram Trigger Node
Once the Telegram Trigger node is on your canvas, the next critical step is its configuration. While the node itself is straightforward, its effectiveness hinges on proper credential setup, which we will delve into in subsequent sections. For now, focus on understanding the node’s properties and how it signals the start of your automation.
- Add the Node: From the n8n interface, search for “Telegram” and select the “Telegram Trigger” node. You can find the search bar usually on the left side of your n8n canvas.
- Place on Canvas: Drag the selected node to your workflow canvas. Just click and drag, easy peasy.
- Connect: Ensure it’s properly connected as the starting point if it’s the first node. If it’s the very first node, it won’t have anything connected before it, but it will be ready for nodes after it.
- Open Settings: Click on the node to open its configuration panel, where you’ll eventually link your Telegram credentials. This is where the magic happens, where we tell it which Telegram bot to listen to.
This node is the listener, the sentinel that watches for activity on your Telegram bot. When an incoming message matches its criteria, it captures that data and passes it along to the next nodes in your n8n workflow. This seamless data flow is what enables complex, automated responses and actions based on Telegram interactions. It’s like a highly trained guard dog, but for your messages!
The Core of Connection: Understanding n8n Credentials
Okay, this part is super important for security and making sure everything talks nicely. Let’s dive in.
What Are n8n Credentials and Why Are They Essential?
n8n credentials are the secure keys that allow your n8n workflows to connect and interact with external services like Telegram. Think of them as digital passports that authenticate your n8n instance to these third-party platforms. Without proper credentials, n8n cannot securely access or manipulate data on these services, making them a fundamental component of any integrated workflow. No passport, no entry, simple as that!
- Security: Credentials encrypt and protect sensitive access tokens and API keys. This keeps your secret keys, well, secret!
- Authentication: They verify n8n’s identity when communicating with external APIs. It’s how Telegram knows it’s your n8n instance trying to connect.
- Reusability: Once set up, credentials can be reused across multiple workflows, streamlining management. Set it up once, use it everywhere – super handy!
Understanding the importance of credentials is paramount for maintaining both the security and functionality of your automated systems. Misconfigured or unsecured credentials can lead to unauthorized access or workflow failures, highlighting the need for careful setup and management. Seriously, treat these like your actual passport!
The Role of Credentials in Secure Integration
Credentials play a vital role in ensuring the secure integration of n8n with services such as Telegram. They abstract away the raw API keys and tokens, providing a secure layer within n8n where these sensitive pieces of information are stored and managed. This prevents direct exposure of tokens within your workflow definitions, significantly enhancing security. It’s like putting your valuables in a safe instead of leaving them on the kitchen counter.
- Data Protection: Credentials safeguard your API tokens from being exposed in workflow logs or shared publicly. This is a big one for preventing unauthorized access.
- Access Control: They ensure that only authorized n8n instances can interact with your Telegram bot. Only your n8n can talk to your bot.
- Compliance: Proper credential management helps in adhering to data security and privacy regulations. Good for you, good for your data!
By centralizing credential management, n8n provides a robust framework for handling sensitive information. This approach not only simplifies the process of connecting to various services but also instills confidence that your integrations are built on a foundation of security and best practices. Always prioritize the secure handling of your credentials to protect your automation ecosystem. Don’t skimp on security, folks!
Step-by-Step: Creating a New Telegram Credential in n8n
Alright, time to create that digital passport for n8n! This is where we tell n8n how to securely talk to Telegram.
Initiating the Credential Creation Process
Creating a new Telegram credential in n8n is a straightforward process that begins within the n8n interface. This step is crucial as it establishes the secure link between your n8n instance and your Telegram bot. The credential setup typically involves selecting the service and then providing the necessary authentication details.
- Access Credential Manager: Within your Telegram Trigger node settings (remember that node we just added?), locate the ‘Credentials’ dropdown and select ‘Create New Credential’. It’s usually a button or a link right there in the node’s configuration panel.
- Select Service: From the list of available services, choose ‘Telegram API’. There are tons of services n8n can connect to, but we’re focusing on Telegram today.
- Name Your Credential: Assign a descriptive name to your credential, e.g., ‘MyTelegramBot’ or ‘WeatherGuyBot’, for easy identification later. This is just for your reference, so make it something you’ll remember!
This initial phase prepares n8n to receive the specific authentication token required for Telegram. The user-friendly interface guides you through each step, ensuring that even those new to n8n can confidently set up their integrations. The naming convention is important for organizational purposes, especially as you scale your n8n workflows. Trust me, a good name saves headaches later!
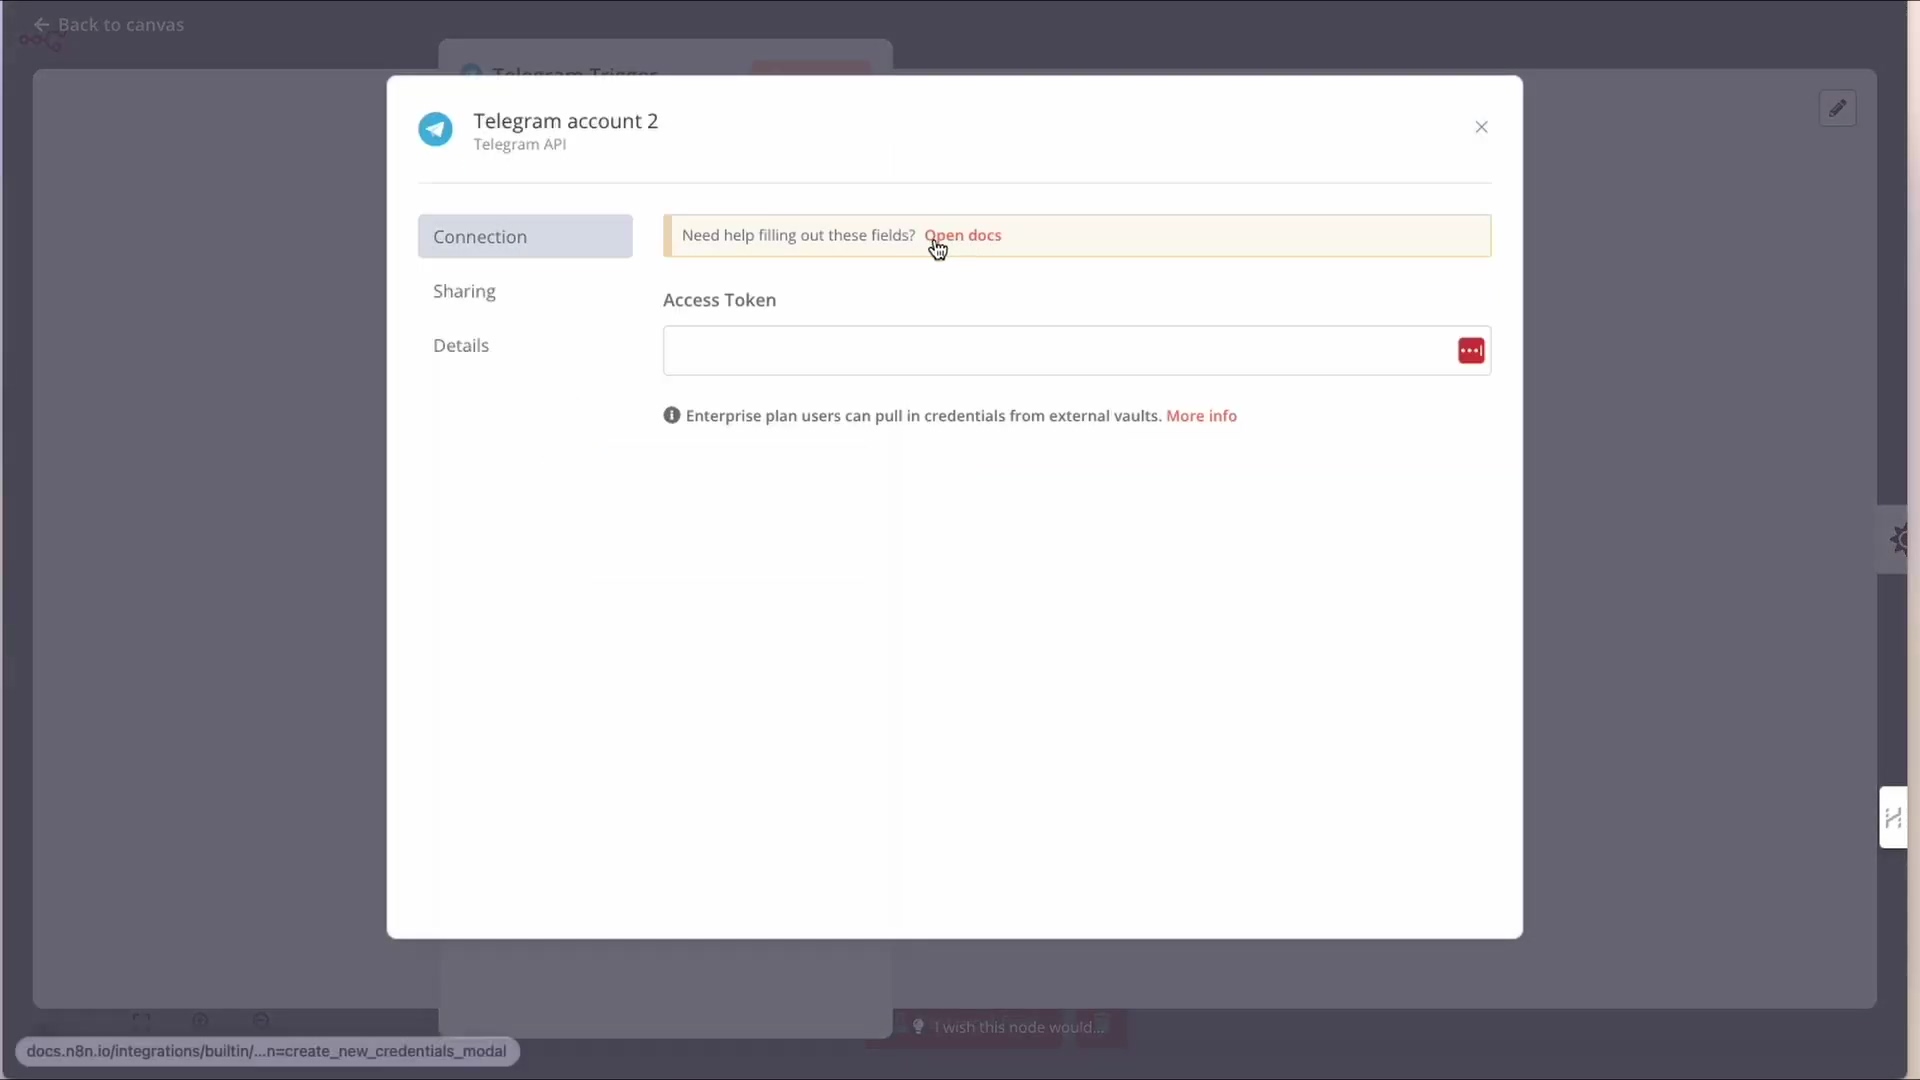
This image shows the modal window for setting up a new Telegram credential in n8n. It highlights the ‘Access Token’ field, which is crucial for authentication and is currently empty, indicated by a red outline. This is where you will paste the token obtained from BotFather. See that red outline? That’s where our secret key goes!
Inputting Your Telegram Bot Token
Now for the really critical part: inputting the Bot Token. This token is a unique identifier and authentication key for your Telegram bot, which you will obtain from Telegram’s BotFather. Without this token, n8n cannot communicate with your bot. It’s the secret password that unlocks all the communication!
- Token Field: Locate the ‘Bot Token’ field within the n8n credential setup dialog. It’s usually labeled pretty clearly.
- Paste Token: Carefully paste the Bot Token obtained from BotFather into this field. Ensure there are no leading or trailing spaces. Those sneaky spaces can break things!
- Save Credential: After pasting the token, click ‘Save’ or ‘Create’ to finalize the credential setup. Don’t forget this step, or all your hard work will be for naught!
It is imperative to handle this token with care, as it grants full access to your bot. Never share it publicly or embed it directly into your workflow definitions. n8n’s credential management system is designed to keep this token secure. Once saved, this credential will be available for use across all your Telegram-related nodes in n8n, simplifying future integrations. Seriously, guard this token like it’s the last slice of pizza!

Here, the image shows the Telegram credential configuration with the ‘Access Token’ field now populated and masked for security. This confirms that the token has been successfully entered and is ready to be saved, establishing a secure connection between n8n and your Telegram bot. See how it’s all stars or dots? That’s n8n keeping your secret safe!
BotFather: Your Gateway to Telegram Bot Tokens
Okay, so where do we get this magical Bot Token? From the one and only BotFather! This is Telegram’s official bot for creating and managing your other bots. It’s like the bot-parent of all bots.
Interacting with BotFather to Create a New Bot
BotFather is Telegram’s official bot that allows you to create new bots and manage their settings, including generating the crucial API token needed for n8n integration. Engaging with BotFather is a conversational process within the Telegram app itself, making it intuitive and accessible. It’s just like chatting with a friend, but this friend gives you robot babies!
- Search for BotFather: Open your Telegram app and search for
@BotFather. Make sure it’s the official one with the blue checkmark! - Start Chat: Initiate a chat with BotFather by tapping on its profile and selecting ‘Start’. This gets the conversation going.
- Create New Bot: Type
/newbotinto the chat and send the message to BotFather. This is the command to tell it you want a new bot. - Name Your Bot: BotFather will ask for a display name for your bot (e.g., ‘The Weather Guy’). This is the name users will see in their chat list. Choose something cool!
- Choose Username: Next, you’ll need to choose a unique username for your bot. This username must end with ‘bot’ (e.g.,
TheWeatherGuy_bot). BotFather will notify you if the username is taken. This is super important – don’t forget the_botat the end!
This sequence of interactions with BotFather is the foundational step in bringing your Telegram bot to life. The names you choose will define your bot’s identity within Telegram, so select them carefully to reflect its purpose. Pay close attention to the username requirement, as it’s a common point of error for new bot creators. I’ve definitely messed this up a few times, so you’re not alone!
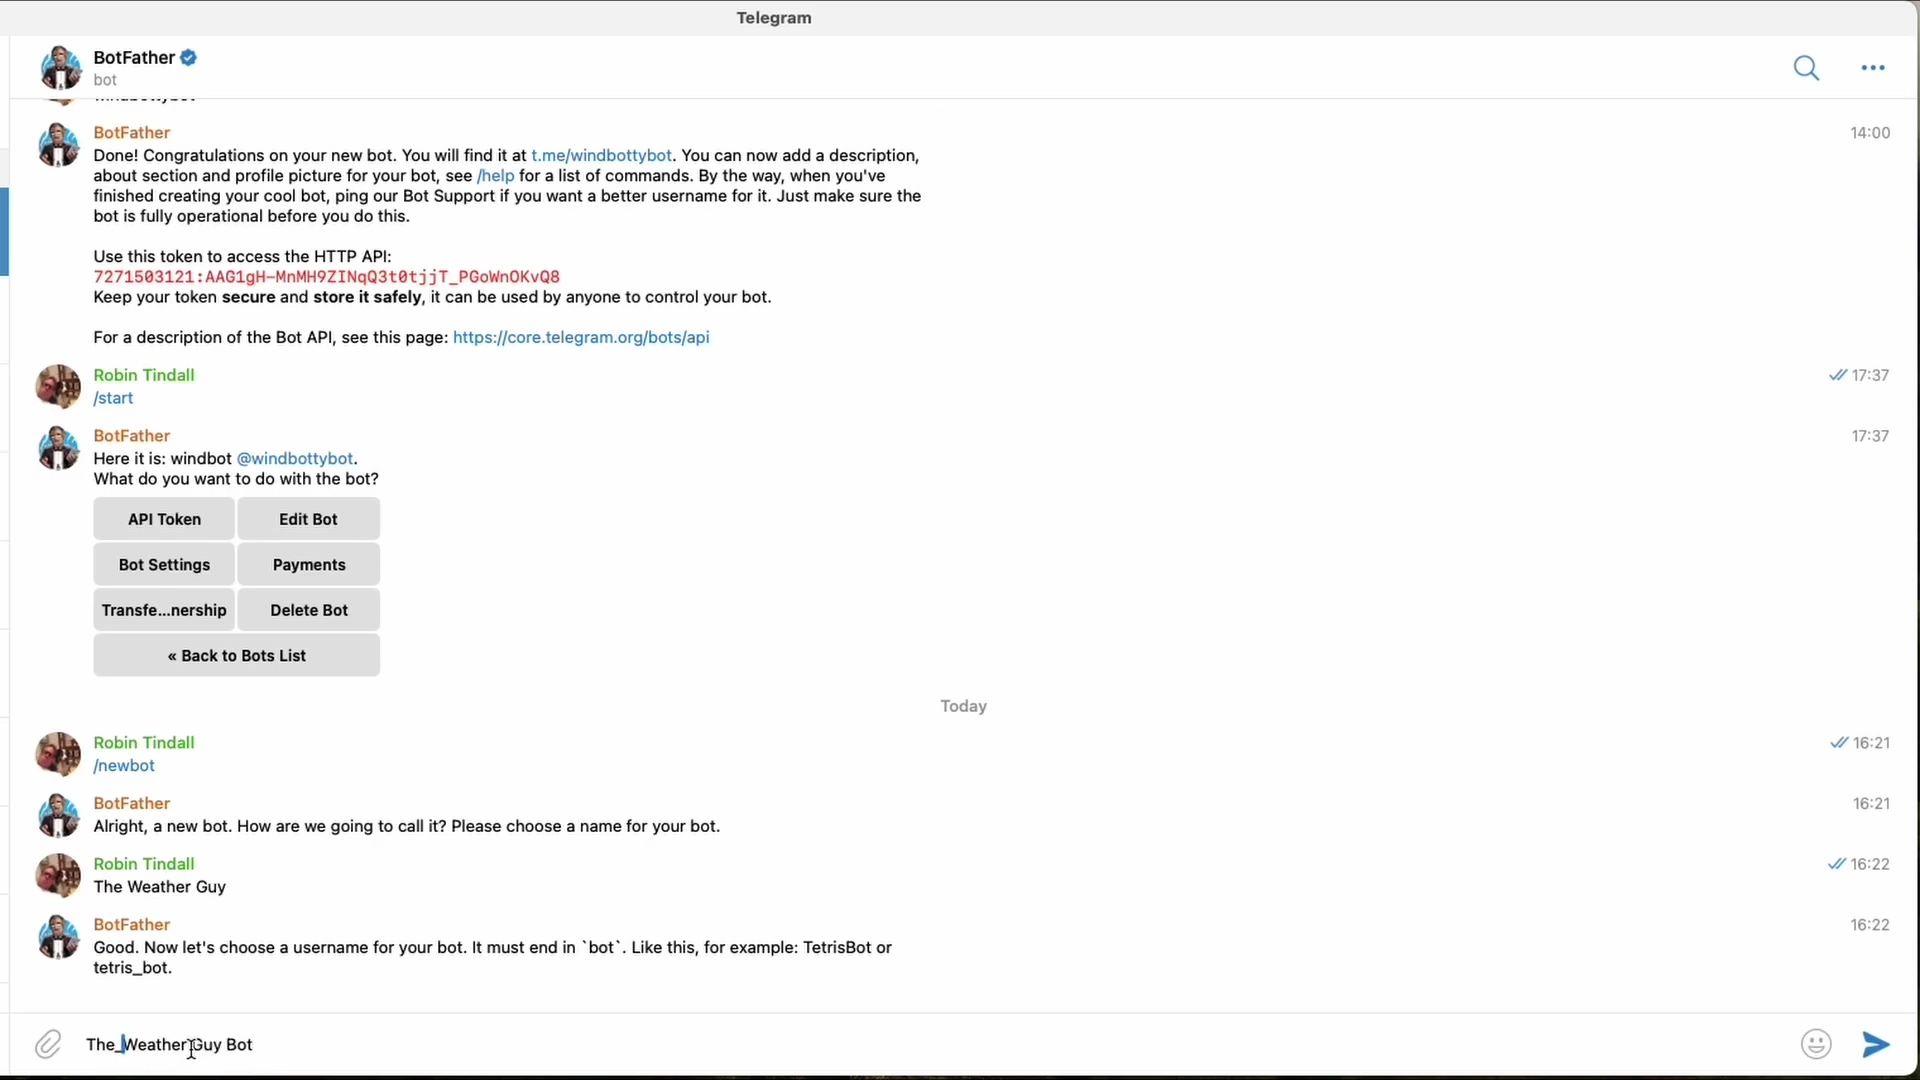
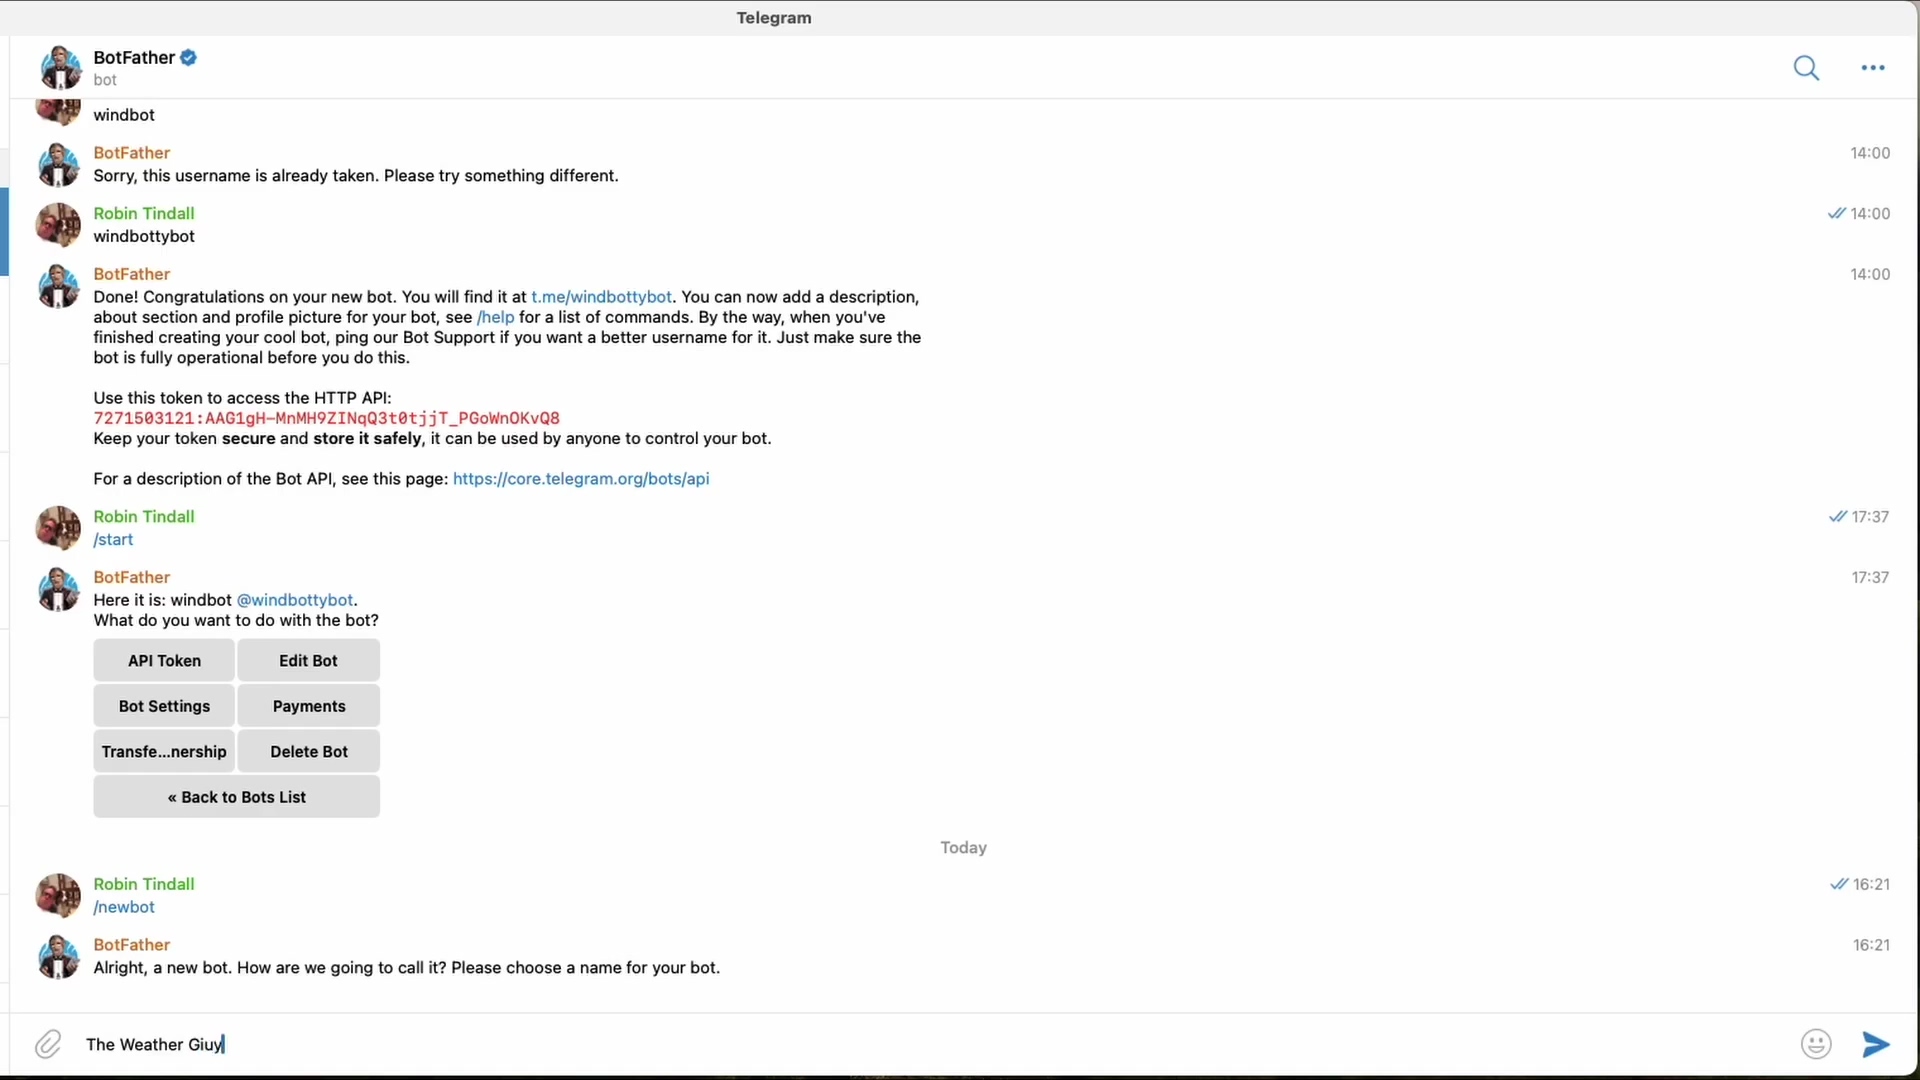
This image shows a Telegram chat with BotFather, illustrating the process of creating a new bot. You can see the user typing ‘/newbot’ and BotFather prompting for a name, then a username ending in ‘bot’, which is being typed as ‘The_WeatherGuy Bot’. This visual guides you through the initial steps of bot creation. See how it walks you through it? BotFather is pretty helpful!
Obtaining Your Essential API Token
Once you’ve successfully created your bot through BotFather, the final and most critical piece of information you’ll receive is the API token. This alphanumeric string is the key that n8n will use to authenticate and communicate with your new Telegram bot. BotFather provides this token immediately after your bot’s creation. This is the golden ticket, the secret sauce, the thing we’ve been waiting for!
- Token Location: After confirming your bot’s username, BotFather will send a message containing a congratulatory note and your unique API token. It’s usually a long string of characters, so don’t miss it!
- Copying the Token: Carefully copy the entire string of characters that represents your API token. It’s usually a long string of letters, numbers, and symbols. Make sure you get all of it, no missing characters!
- Security Best Practice: Treat this token as a password. Do not share it publicly, commit it to version control, or expose it in unsecured environments. If compromised, you can revoke and regenerate it via BotFather using the
/revokecommand. Seriously, this is like your bot’s social security number. Keep it safe!
This API token is the bridge between Telegram’s infrastructure and your n8n workflows. It grants n8n the necessary permissions to send and receive messages on behalf of your bot. Always ensure you copy the token accurately and store it securely within n8n’s credential management system, as outlined in the previous section. This step is non-negotiable for a functioning Telegram integration. Without it, your bot is just a pretty face with no brain!
This image captures the critical moment where BotFather provides the API token after successful bot creation. It also shows an error message for a taken username, emphasizing the iterative nature of choosing a unique bot username. The presence of the API token and management options like “API Token” and “Edit Bot” are clearly visible, guiding you to retrieve the necessary token. See that long string of characters? That’s your token! Copy it carefully!
Configuring Your Telegram Trigger Node with Credentials
We’re almost there! Now we just need to tell our Telegram Trigger node which credential (and thus, which bot) to use. This is like telling your doorbell which house it belongs to.
Linking Your Bot to the n8n Workflow
After successfully creating your Telegram credential with the BotFather token, the next step is to link this credential to your Telegram Trigger node in n8n. This action tells the n8n workflow which specific Telegram bot it should be listening to for incoming messages. Without this connection, the trigger node remains inactive. It’s like having a phone but no SIM card – it can’t make calls!
- Open Trigger Node: Click on your Telegram Trigger node on the n8n canvas to open its configuration panel. You know, the one we added earlier.
- Select Credential: In the ‘Credentials’ dropdown menu, you will now see the name of the Telegram credential you just created (e.g., ‘The Weather Guy Bot’). Select this credential. This is where you connect the passport to the traveler!
- Auto-Save: n8n typically auto-saves the selection, establishing the link between the node and your bot. You might see a little spinner or a quick flash, but it usually happens automatically.
This simple selection is the final piece of the puzzle for authenticating your Telegram Trigger node. Once the credential is chosen, your n8n workflow is technically ready to start listening for messages from your designated Telegram bot. This modular approach to credentials ensures that you can easily swap or update authentication details without reconfiguring each node individually. It keeps things tidy and flexible!
Verifying the Credential Connection
It’s always good practice to verify that your credential connection is active and working as expected. While n8n provides a ‘Test Connection’ feature for credentials, observing the node’s behavior after linking it is the ultimate confirmation. A successful connection means your n8n instance is now authorized to interact with your Telegram bot. Think of it as a quick sanity check, just to be sure!
- Connection Status: After selecting the credential, n8n may display a ‘Connection Tested Successfully’ message, confirming the token’s validity. Look for a green checkmark or a similar positive indicator.
- Node Readiness: The Telegram Trigger node will now show a green indicator or a similar visual cue, signifying it’s ready to listen. This means it’s armed and ready!
- Error Handling: If an error occurs, double-check your Bot Token in the credential settings for any typos or missing characters. This is the most common culprit, so be meticulous!
This verification step is crucial for troubleshooting. If the connection fails, it often points to an incorrect Bot Token or an issue with the credential setup. By ensuring this link is solid, you set the stage for reliable and secure communication between your n8n workflows and your Telegram bot, paving the way for seamless automation. A solid foundation is key to any great build!
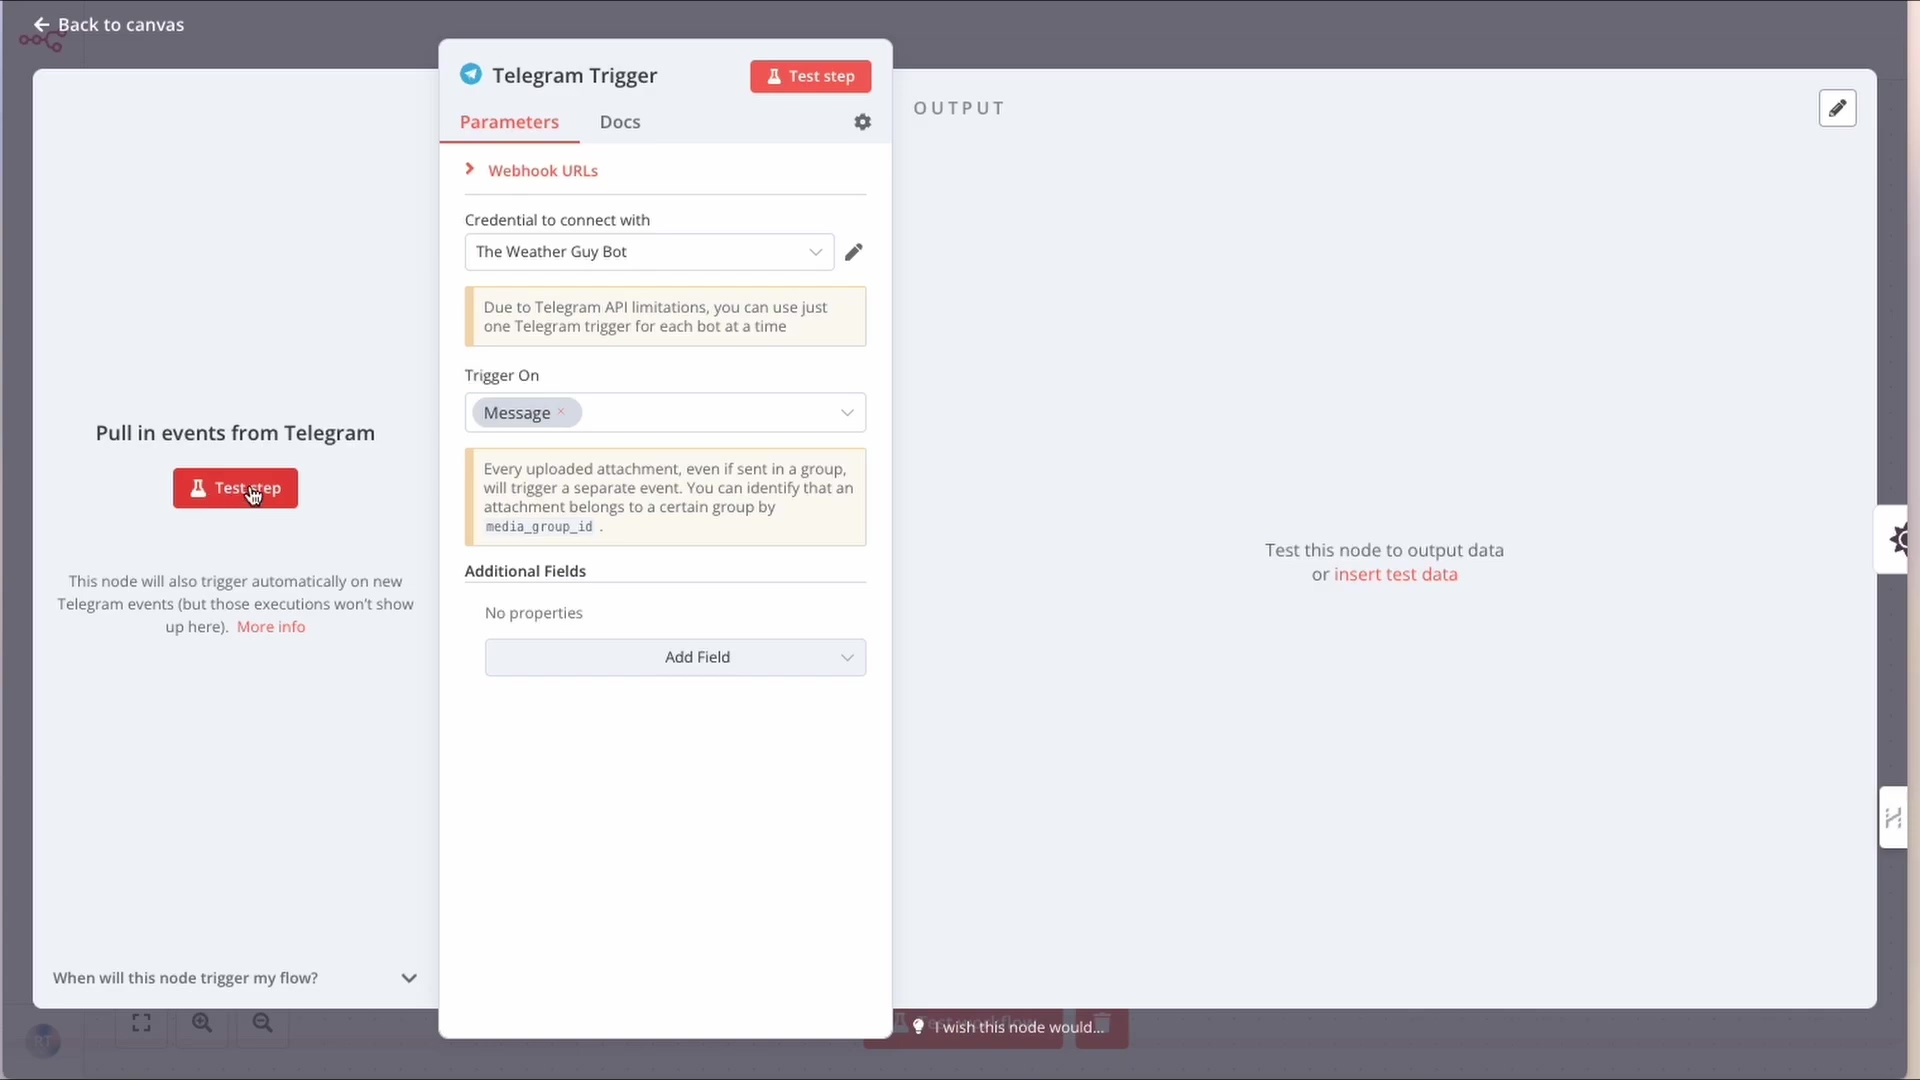
This image shows the configuration panel for the ‘Telegram Trigger’ node in n8n. It clearly displays ‘The Weather Guy Bot’ selected under ‘Credential to connect with’, indicating that the bot is now linked to the workflow. The ‘Test step’ button is visible, prompting you to verify the connection, and the ‘Trigger On’ parameter is set to ‘Message’, confirming it’s listening for incoming messages. See how ‘The Weather Guy Bot’ is selected? That’s what we want!
Testing Your Telegram Integration: Receiving Messages in n8n
Moment of truth! Did it all work? Let’s find out by sending a message and seeing if n8n catches it.
Activating the Listener and Sending a Test Message
With your Telegram Trigger node configured and linked to the correct credentials, the next logical step is to test the integration. This involves activating the ‘Test Setup’ mode in n8n and then sending a message to your Telegram bot. This process verifies that n8n is actively listening and can successfully receive data from Telegram. It’s like shouting into a cave and waiting for an echo!
- Activate Test Setup: In your n8n workflow, click the ‘Test Setup’ button on the Telegram Trigger node. This puts the node into a listening state, waiting for incoming data. It’s usually a button right on the node itself.
- Open Telegram Bot: Navigate to your newly created Telegram bot in the Telegram app (you can find its link in BotFather’s confirmation message). You can search for its username or click the link BotFather gave you.
- Initiate Chat: Click ‘Start’ in your bot’s chat window if you haven’t already. This is usually the first thing you do when interacting with a new bot.
- Send Message: Type a simple message, such as “Hello,” and send it to your bot. Keep it simple for the first test!
Upon sending the message, n8n should almost immediately capture this incoming data. This real-time feedback is invaluable for confirming that your setup is correct and that the communication channel between Telegram and n8n is open and functional. It’s an exciting moment when you see your automation come to life for the first time. You’ll feel like a tech wizard, I promise!
Verifying Data Reception in n8n
Once you’ve sent a test message to your Telegram bot, return to your n8n interface. The Telegram Trigger node should now display incoming data, confirming that the integration is successful. This data will be presented in a structured format, allowing you to inspect the message content and other relevant details. This is where we check the echo!
- Data Display: The n8n Telegram Trigger node will show a ‘1 item’ or similar indicator, meaning it has received one message. This little number is your sign of success!
- Inspect Output: Click on the output of the node to view the JSON payload, which contains details like the sender’s chat ID, the message text, and timestamps. This is the raw data your bot received, super useful for building out your workflow.
- Troubleshooting: If no data appears, re-check your Bot Token, ensure the ‘Test Setup’ is active, and confirm you sent the message to the correct bot. Go back through the steps, one by one. It’s usually a small typo or a missed click!
Successfully receiving data in n8n is a clear indication that your Telegram integration is working. This data is the raw material for your subsequent automation steps, allowing you to build workflows that react intelligently to specific message content or sender information. This foundational test is crucial before building out more complex automations. You’ve just laid the cornerstone for your automated empire!
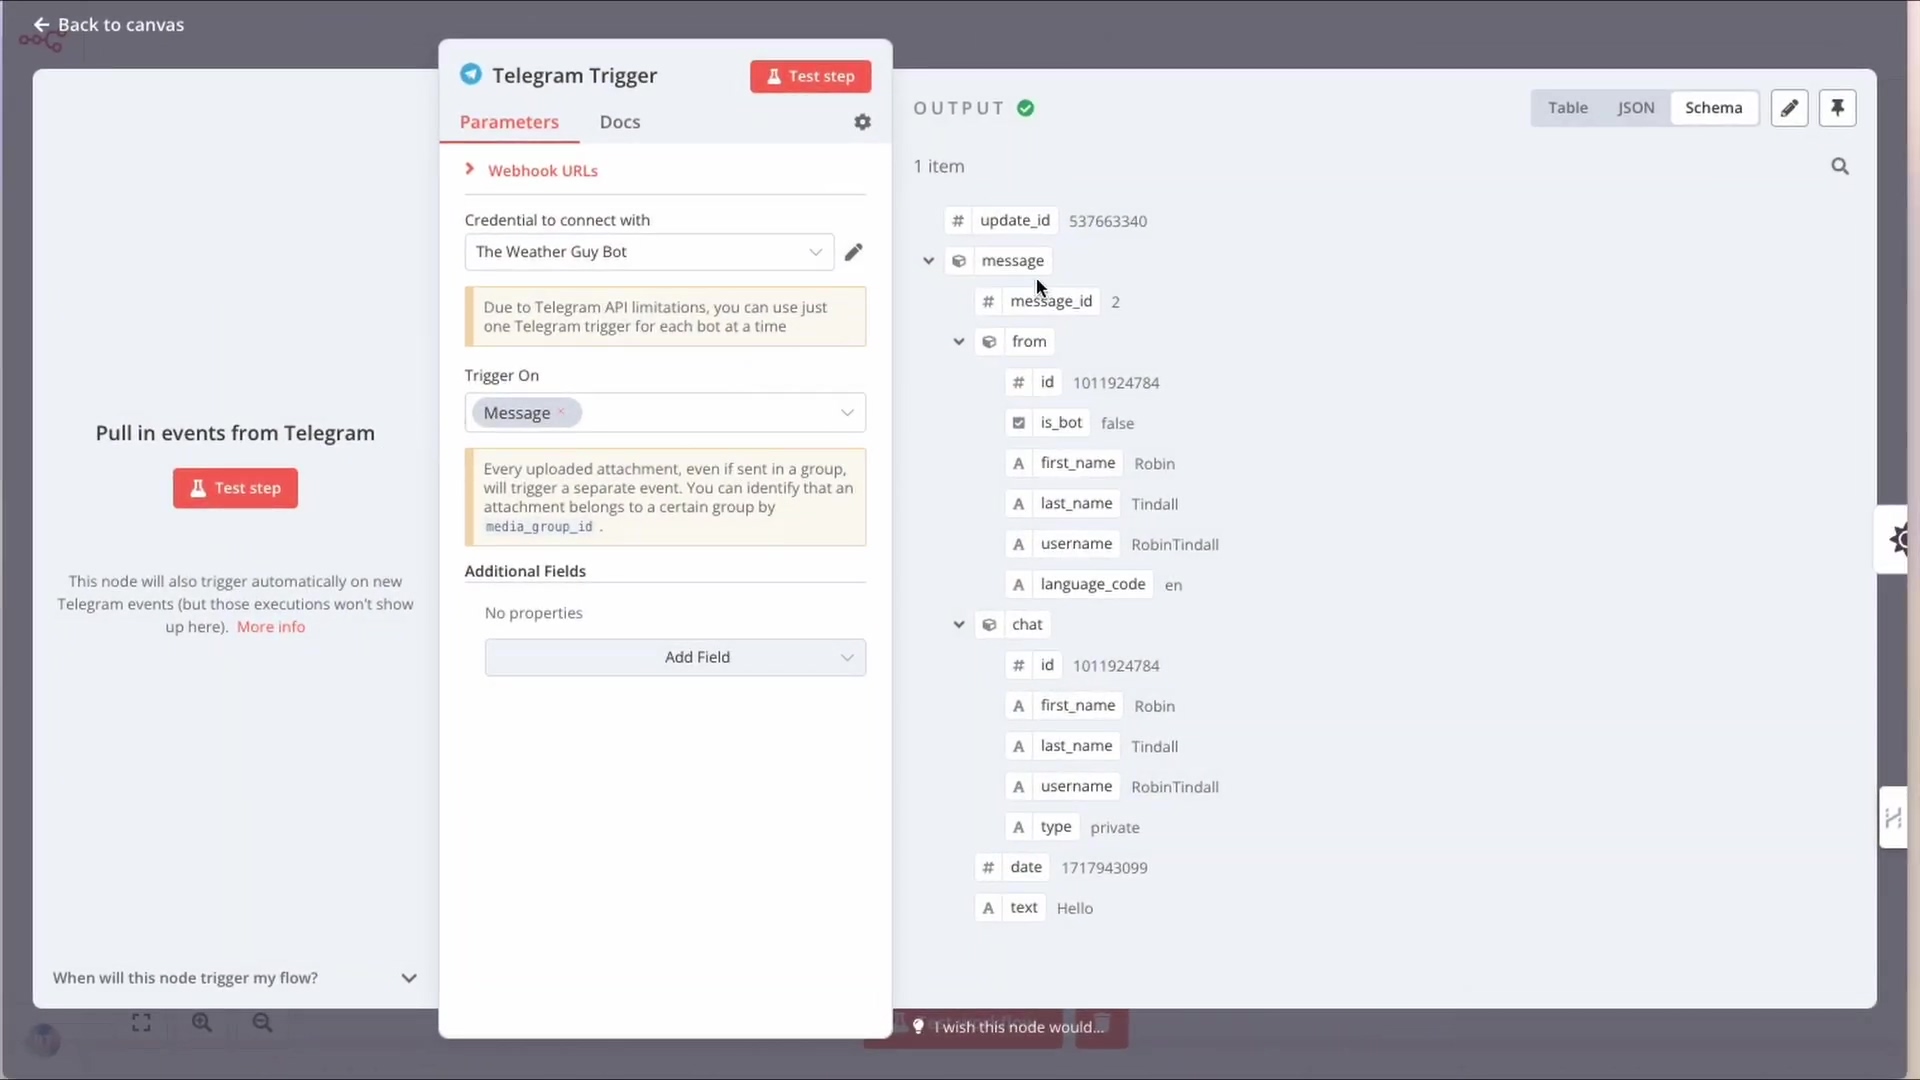
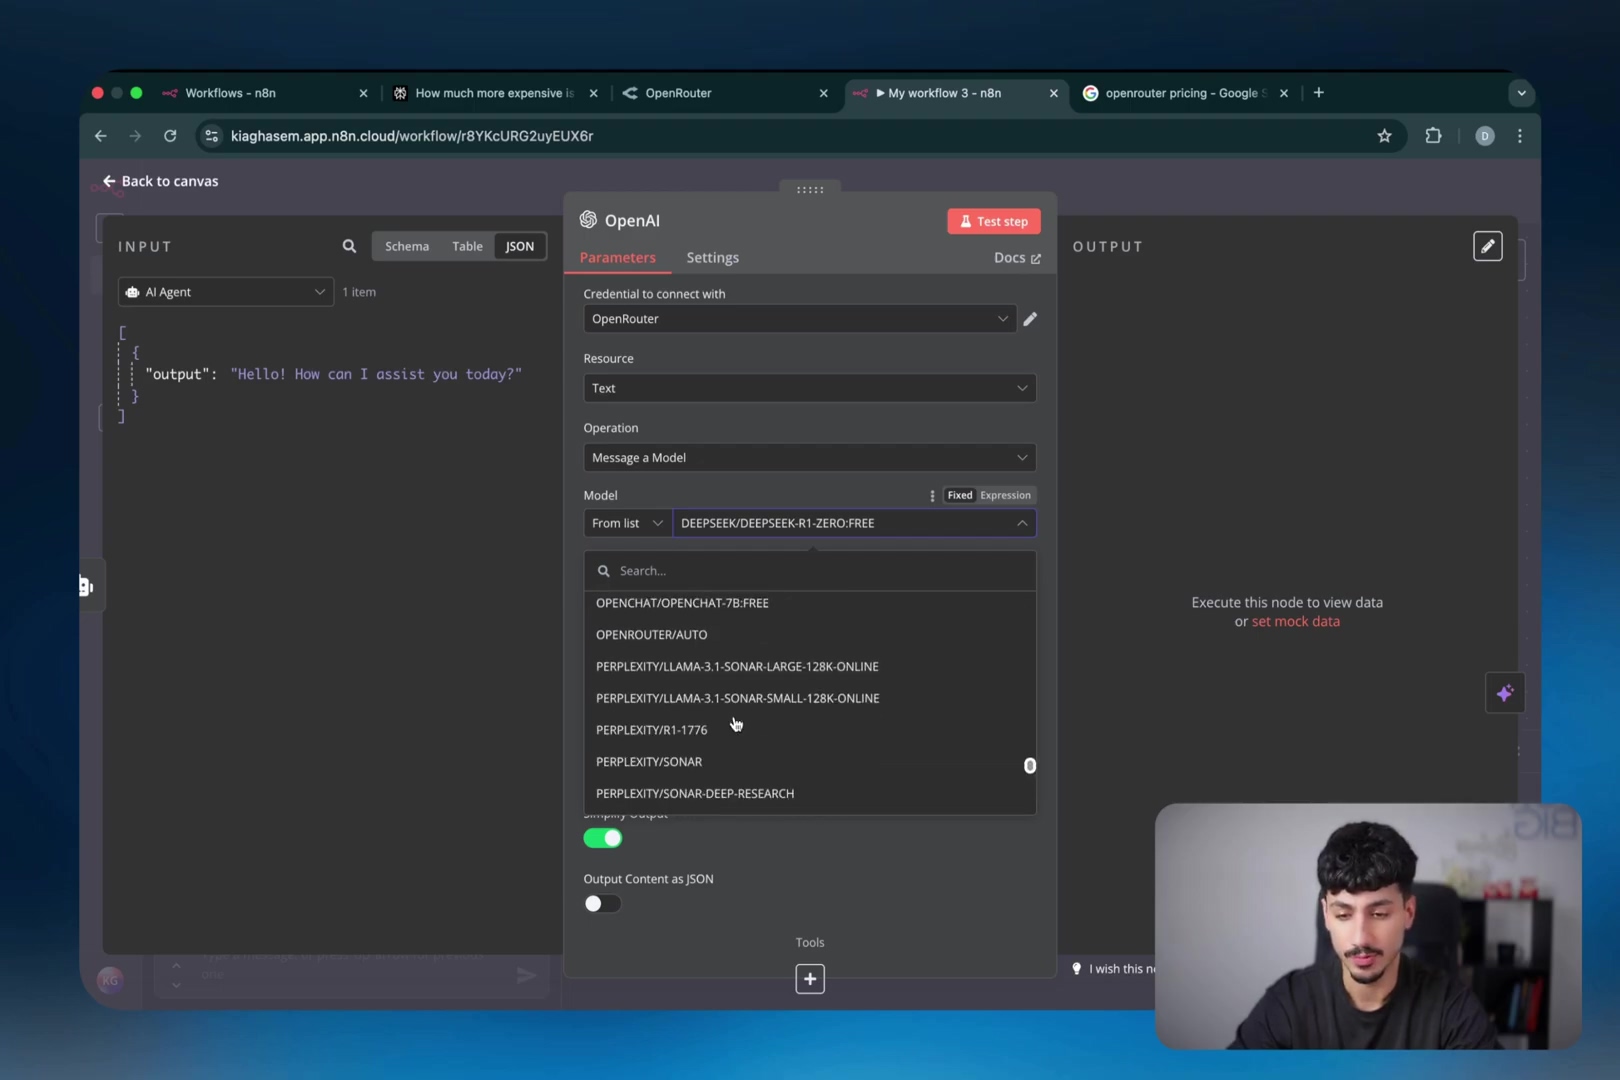
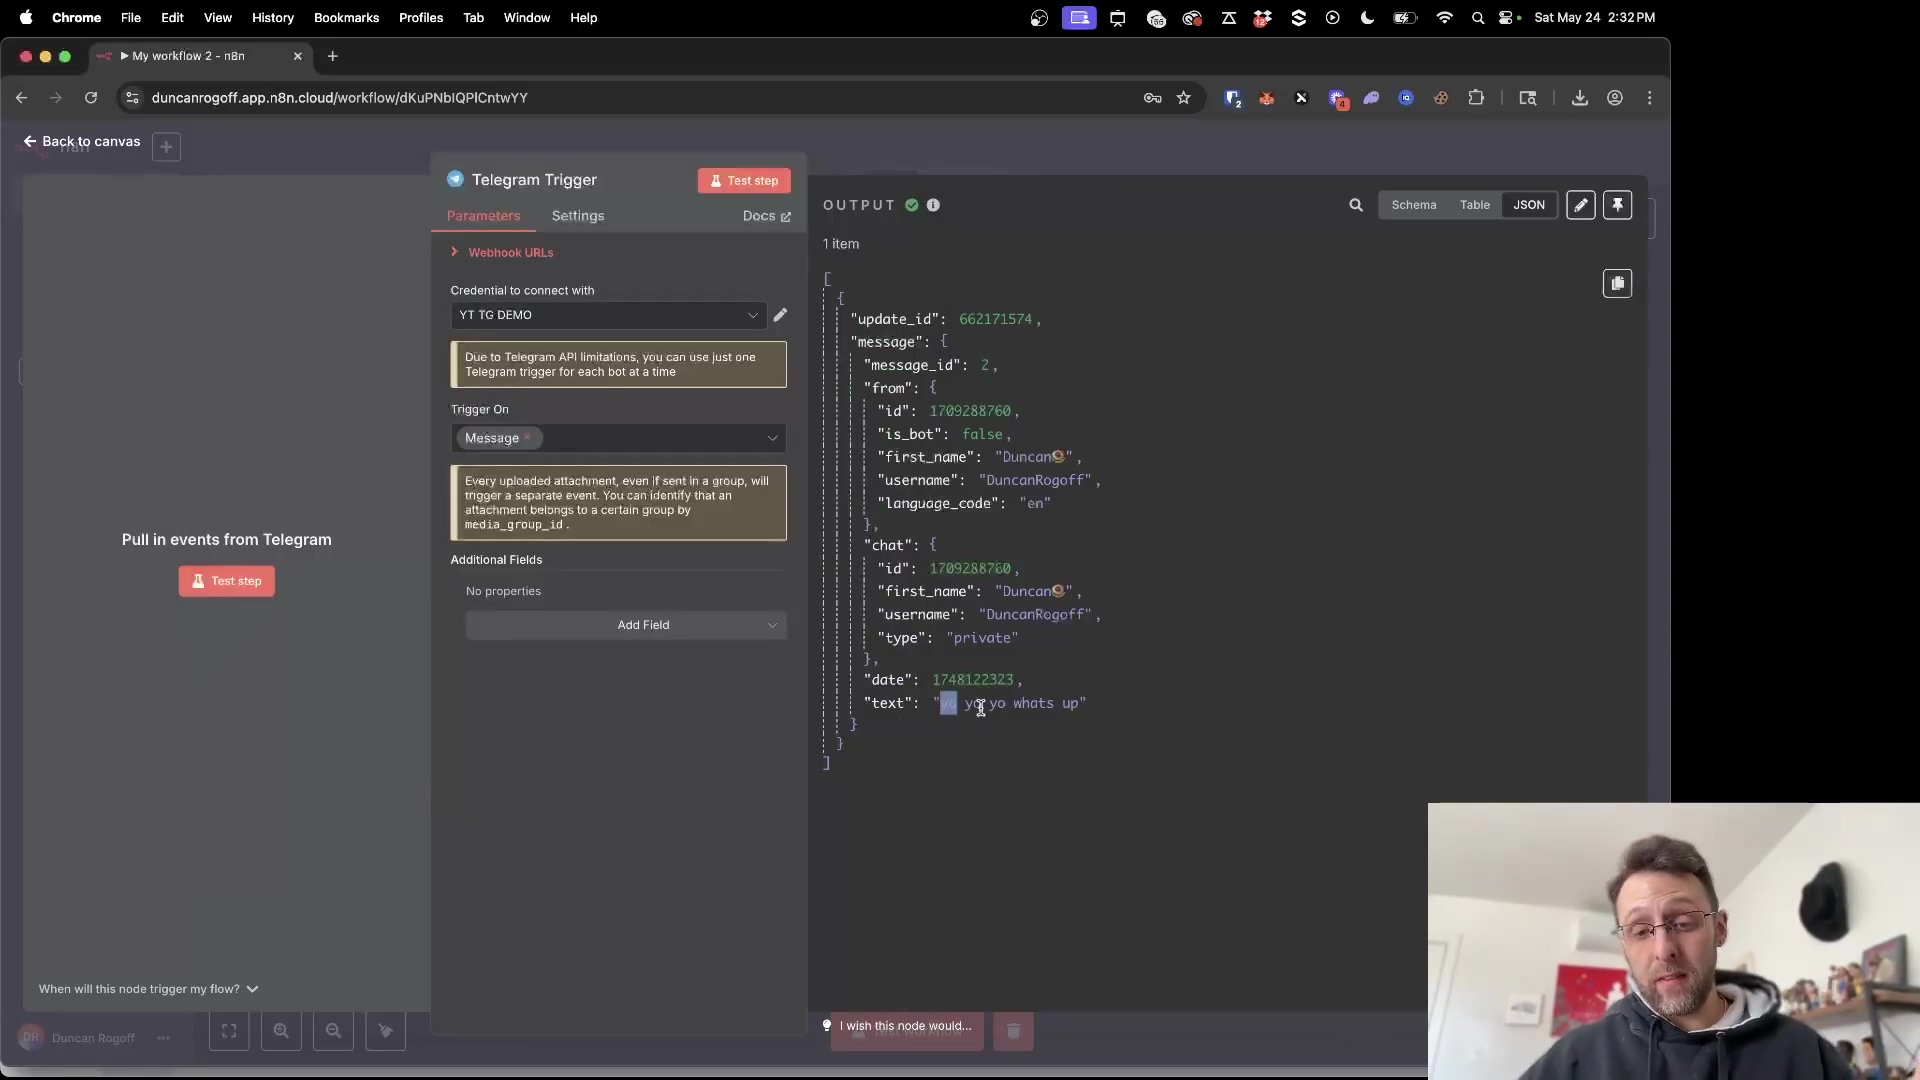
This image provides visual proof of a successful test message received by the n8n Telegram Trigger node. The ‘OUTPUT’ section clearly shows the JSON data containing ‘message_id’, ‘from’ user details (including ‘Robin Tindall’ as the sender), ‘chat’ details, and the ‘text’ field with “Hello”. This confirms that the integration is working and n8n is successfully capturing incoming Telegram messages. Look at that beautiful JSON output! “Hello” right there, just like you sent it!
Advanced Telegram Automation: Beyond the Trigger
So, you’ve got your bot listening. What’s next? The real fun begins! This is where we turn a simple listener into a full-blown conversational genius.
Building Responsive Telegram Workflows
While the Telegram Trigger node is essential for initiating workflows, the true power of n8n lies in its ability to build complex, responsive automations. Once an incoming message triggers your workflow, you can use other n8n nodes to process the message, interact with other services, and even send a response back to Telegram. This transforms a simple message reception into a dynamic interaction. It’s like teaching your bot to not just hear, but to understand and reply!
- Message Processing: Use ‘Code nodes’ or ‘Function nodes’ to parse message content, extract keywords, or perform conditional logic. This is where your bot gets its brain, deciding what to do based on what it hears.
- External Service Integration: Connect to databases, CRMs, email services, or other APIs based on Telegram input. Your bot can become a bridge to all your other tools!
- Conditional Responses: Implement logic to send different Telegram replies based on the message content or external data. “If this, then that” for your bot’s conversations.
For example, a user might send “weather in London” to your bot. Your n8n workflow could parse “London,” query a weather API, and then use a Telegram ‘Send Message’ node to reply with the current weather conditions. This level of interaction moves beyond basic notifications to a truly intelligent conversational agent. Imagine the possibilities!

This image showcases a more complex n8n workflow, starting with a conditional node and integrating various services like ‘OpenWeatherMap’ before potentially sending an email. The ‘Telegram’ panel on the right lists numerous ‘MESSAGE ACTIONS’ such as ‘Send a text message’ and ‘Send a photo message’, demonstrating the diverse ways n8n can interact with Telegram beyond just triggering workflows. See how many actions are available? The sky’s the limit!
Sending Automated Replies with Telegram Action Nodes
To complete the conversational loop, your n8n workflow will often need to send messages back to the user on Telegram. This is achieved using a Telegram ‘Send Message’ (or other action) node. This node allows your automation to provide feedback, deliver results, or request further information, making the interaction seamless and engaging. It’s how your bot talks back!
- Add Telegram Action Node: After your processing nodes, add a ‘Telegram’ node and select an ‘Action’ like ‘Send Text Message’. This is the node that actually sends the message.
- Select Credential: Use the same Telegram credential you set up for the trigger node. Consistency is key here!
- Retrieve Chat ID: Crucially, you need the
chat_idfrom the incoming message (provided by the Telegram Trigger node) to ensure your reply goes to the correct user. This is how your bot knows who to reply to. You can access this using an expression like{{ $json.chat.id }}. - Compose Message: Use expressions to dynamically create your reply message, incorporating data from previous nodes. This makes your replies personalized and relevant, not just canned responses.
This setup enables your bot to engage in meaningful conversations. By dynamically retrieving the chat_id from the incoming message, you ensure that replies are always directed to the correct sender, maintaining context and personalization. This capability is fundamental for building interactive customer support bots, automated information services, or personalized notification systems. Your bot is now a conversationalist!
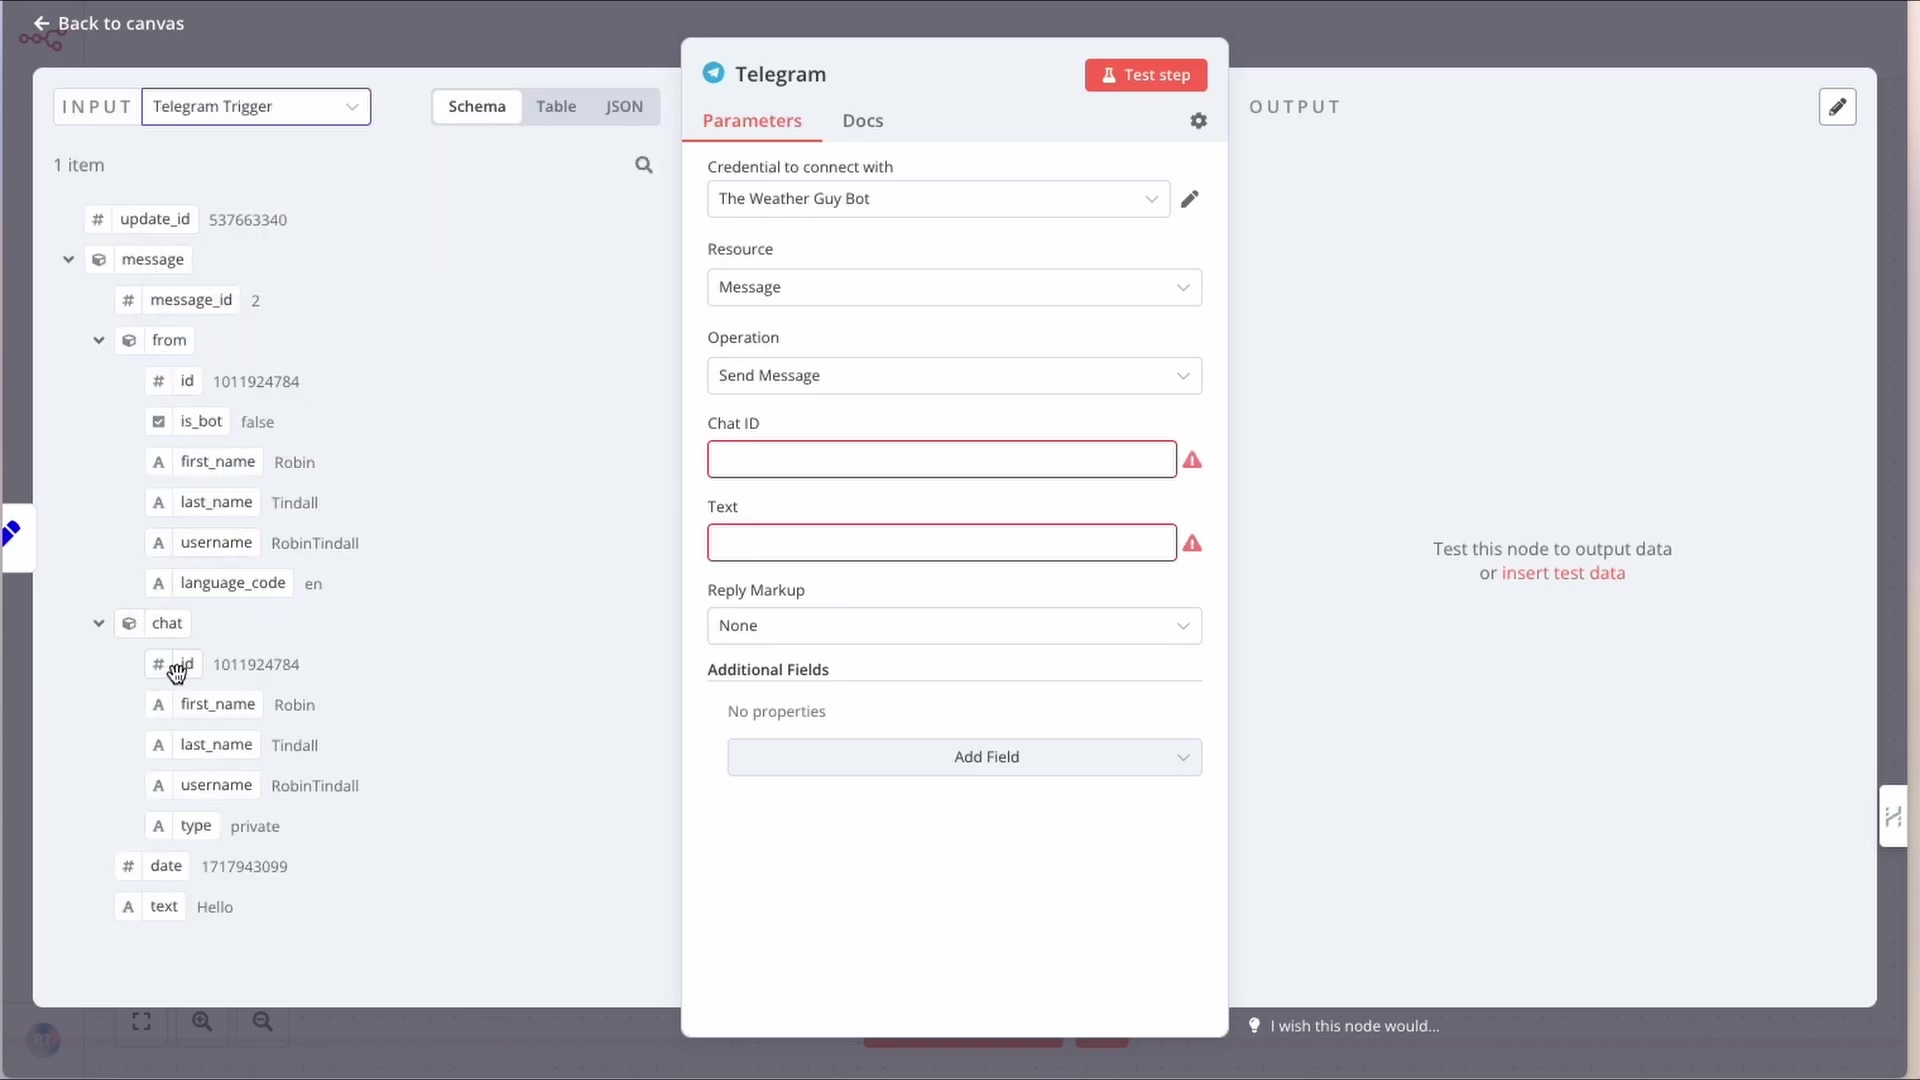
This image illustrates how to configure a Telegram ‘Send Message’ action node. On the left, it shows the JSON input from a ‘Telegram Trigger’ node, including the crucial chat_id and the incoming message “Hello” from ‘Robin Tindall’. On the right, the Telegram action node’s parameters are displayed, with ‘Chat ID’ and ‘Text’ fields highlighted as required. This visual demonstrates how to use the chat_id from the trigger to send a dynamic reply. Notice how the chat_id from the input is used in the output? That’s the magic!
FAQ: Common Telegram & n8n Integration Questions
Integrating Telegram with n8n can sometimes present unforeseen challenges. This FAQ section aims to address the most common questions and issues users encounter, providing clear solutions and best practices to ensure a smooth and reliable automation experience. Understanding these points can save significant troubleshooting time. Trust me, I’ve hit every one of these walls!
Addressing Common Integration Challenges
-
Q1: My Telegram Trigger node isn’t receiving messages. What should I check?
- A1: First, ensure your n8n workflow is active and the Telegram Trigger node is in ‘Test Setup’ mode (if testing). Double-check that your Bot Token in n8n credentials is correct and matches the one from BotFather. Verify you are sending messages to the correct bot username in Telegram. Also, ensure there are no firewalls blocking n8n’s outbound connections to Telegram’s API. Sometimes, your network might be a bit too protective!
-
Q2: How do I find my Telegram
chat_idfor sending messages?- A2: The easiest way is to have a user send a message to your bot. The Telegram Trigger node in n8n will capture this message, and the
chat_idwill be present in the output data. You can then reference thischat_idusing an expression in your Telegram ‘Send Message’ action node, like{{ $json.chat.id }}. It’s automatically provided when someone messages your bot!
- A2: The easiest way is to have a user send a message to your bot. The Telegram Trigger node in n8n will capture this message, and the
-
Q3: Can I use the same Telegram bot for multiple n8n workflows?
- A3: Yes, absolutely! Once you’ve created a Telegram credential in n8n, you can reuse it across any number of Telegram Trigger or Action nodes in different workflows. This promotes efficiency and simplifies credential management. Build once, use many times!
-
Q4: My bot isn’t responding to commands. What could be wrong?
- A4: Check the logic in your n8n workflow after the Telegram Trigger. Ensure you have nodes that process the incoming message (e.g., ‘If nodes’ for conditional logic, ‘Switch nodes’ for commands) and that your Telegram ‘Send Message’ node is correctly configured with the
chat_idand message content. It’s all about the flow of logic!
- A4: Check the logic in your n8n workflow after the Telegram Trigger. Ensure you have nodes that process the incoming message (e.g., ‘If nodes’ for conditional logic, ‘Switch nodes’ for commands) and that your Telegram ‘Send Message’ node is correctly configured with the
-
Q5: How do I update my bot’s profile picture or description?
- A5: You need to interact with BotFather in Telegram. Use commands like
/setuserpicor/setdescriptionwithin your chat with BotFather, and it will guide you through the process of updating your bot’s profile. BotFather is the boss of bot aesthetics!
- A5: You need to interact with BotFather in Telegram. Use commands like
-
Q6: Is it safe to store my Telegram Bot Token in n8n?
- A6: Yes, n8n’s credential management system is designed to securely store sensitive information like API tokens. They are encrypted and not exposed directly in your workflow definitions. However, always ensure your n8n instance itself is secured with strong passwords and proper access controls. Think of n8n’s credential storage as a digital vault.
-
Q7: Can n8n handle file attachments from Telegram?
- A7: Yes, the Telegram Trigger node can receive various types of messages, including files, photos, and videos. The incoming data will contain details about the attachment, which you can then process further in your n8n workflow, for example, by downloading the file to a cloud storage service like Google Drive or Dropbox. Your bot can be a digital filing clerk!
These FAQs cover common scenarios and provide actionable advice. By understanding these points, you can proactively troubleshoot and optimize your Telegram and n8n integrations, leading to more robust and reliable automated workflows. Knowledge is power, especially when troubleshooting!
Advanced Integration Strategies: Maximizing Telegram with n8n
Now that you’re a pro at the basics, let’s talk about taking your Telegram-n8n game to the next level. This is where we unleash the true potential!
Leveraging Telegram for Interactive Data Collection
Beyond simple notifications, Telegram can serve as a powerful tool for interactive data collection within your n8n workflows. By designing conversational flows, you can prompt users for information, validate inputs, and store data in various backend systems. This capability transforms your Telegram bot into a dynamic data entry point. It’s like turning your chat app into a smart form!
- Form-like Interactions: Create multi-step conversations where the bot asks questions and the user provides answers. Think of it as a guided interview by your bot.
- Input Validation: Implement n8n logic to validate user input (e.g., checking for valid email formats, numerical ranges). No more garbage in, garbage out! Your bot can ensure data quality.
- Dynamic Menus: Use Telegram’s inline keyboards or custom keyboards to offer predefined choices to users, simplifying input. Make it easy for users to interact with just a tap!
Consider a scenario where you need to collect daily reports from your team. Instead of manual emails, your Telegram bot can prompt each team member, collect their input through a series of questions, and then store this data in a spreadsheet or database via n8n. This approach significantly streamlines data collection processes and improves data quality through guided input. Imagine the time saved!
Building a Telegram-Powered Command Center
With n8n, your Telegram bot can evolve into a personalized command center, allowing you to remotely control and monitor your automated systems or even physical devices. By sending specific commands to your bot, you can trigger complex actions, retrieve system statuses, or even control smart home devices, all from your mobile phone. Your phone becomes a universal remote for your digital world!
- Remote Workflow Execution: Send commands like
/start_backupor/check_server_statusto trigger specific n8n workflows. Control your entire backend from your pocket! - System Monitoring: Request real-time updates on server health, website uptime, or IoT device status. Get instant reports on anything you’re monitoring.
- Conditional Actions: Implement role-based access, allowing only authorized users to execute critical commands. Keep your powerful commands safe and sound.
For instance, you could send a command /reboot_server to your bot, which n8n then interprets and executes an SSH command on a remote server. The bot would then reply with the server’s status. This level of control offers unparalleled convenience and flexibility, turning your Telegram app into a powerful remote management interface for your entire automated ecosystem. How sci-fi is that?
| Feature | Basic Telegram Integration | Advanced Telegram with n8n | Benefits |
|---|---|---|---|
| Notifications | ✅ Basic Alerts | ✅ Contextual & Dynamic | Timely, relevant information delivery |
| User Interaction | ❌ Limited | ✅ Conversational Flows | Enhanced user experience, data collection |
| Workflow Control | ❌ None | ✅ Remote Command Execution | On-the-go management of systems |
| Data Collection | ❌ Manual | ✅ Automated & Validated | Reduced errors, increased efficiency |
| External Services | ❌ None | ✅ Seamless Integration | Unlocks vast automation possibilities |
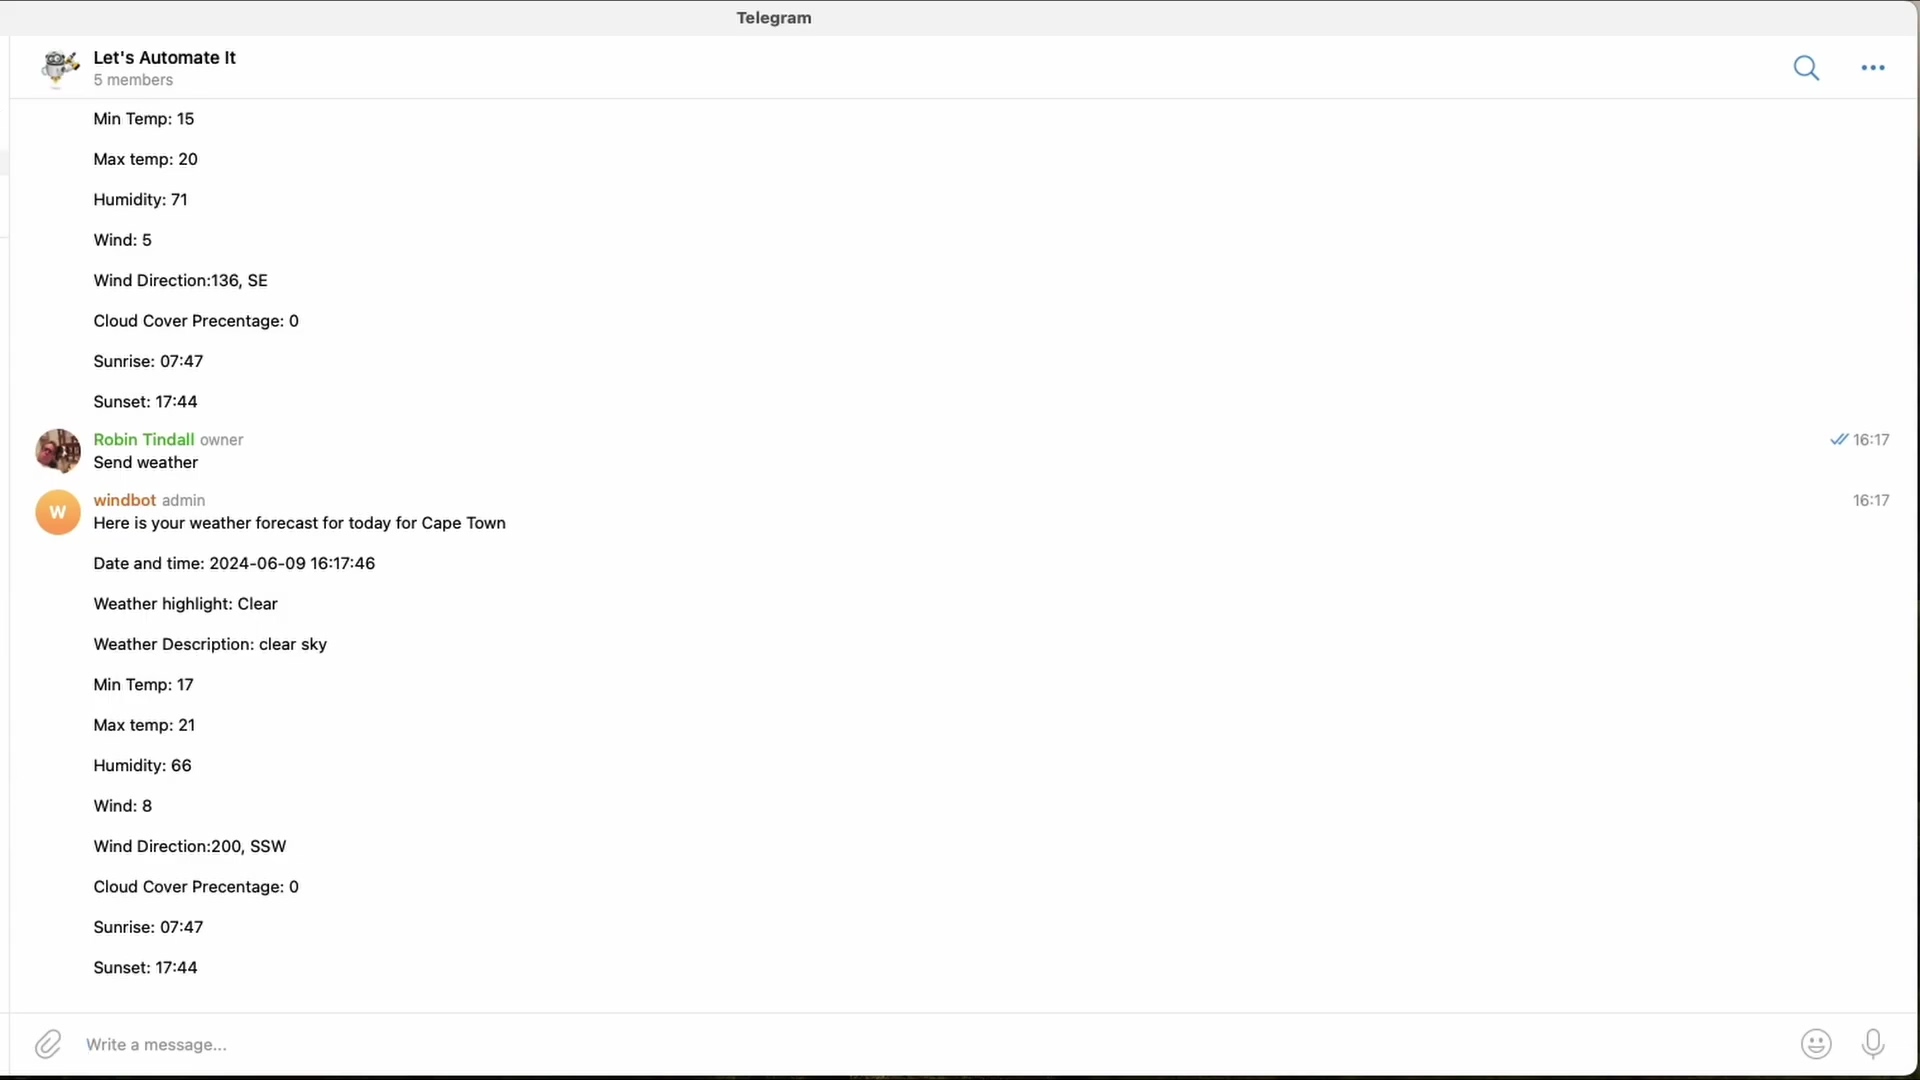
This image shows a Telegram chat with ‘windbot admin’, demonstrating a practical application of advanced Telegram automation. The bot provides a detailed weather forecast for Cape Town, including ‘Min Temp’, ‘Max Temp’, ‘Humidity’, ‘Wind Direction’, and ‘Sunrise/Sunset’ times. This illustrates how n8n can process data from external sources (like weather APIs) and deliver it interactively via Telegram, creating a rich user experience. This is a real-world example of what you can build – pretty cool, huh?
Conclusion: Unlock the Power of Telegram Automation with n8n
Phew! We’ve journeyed through the comprehensive process of integrating Telegram with n8n, transforming theoretical concepts into practical, actionable steps. From the initial setup of your Telegram Trigger node and the secure management of n8n credentials to leveraging BotFather for essential API tokens and testing your integration, you now possess the foundational knowledge to build robust automated workflows. The ability to connect a powerful messaging platform like Telegram with n8n’s versatile automation capabilities opens up a vast landscape of possibilities for enhanced communication and operational efficiency. You’ve just leveled up your automation skills!
The true value of this integration extends far beyond simple message notifications. It empowers you to create interactive bots, automate data collection, build remote command centers, and connect your communication channels with virtually any other service. By mastering these techniques, you’re not just automating tasks; you’re building intelligent, responsive systems that can significantly reduce manual effort, improve response times, and provide a seamless user experience. This synergy between communication and automation is a game-changer for individuals and organizations alike. It’s like having a superpower for your digital life!
Ready to elevate your automation game? Start by experimenting with a simple Telegram-n8n workflow today. Create a bot that sends you daily weather updates, or perhaps one that notifies you when a specific email arrives. Explore n8n’s extensive node library to discover how you can connect Telegram with your favorite tools, from project management systems to cloud storage. The journey to a fully automated and interconnected digital ecosystem begins now, and with Telegram and n8n, you have the powerful tools to make it a reality. Dive in, build, and unlock the full potential of your automated future! Go forth and automate, my friend!