Watch the Video Tutorial
💡 Pro Tip: After watching the video, continue reading below for detailed step-by-step instructions, code examples, and additional tips that will help you implement this successfully.
Want to learn how to use n8n for free and build a seriously powerful automation system without the monthly fees? You’ve come to the right place. Boyce here, and in this guide, I’m going to show you the ultimate self-hosting setup that combines the power of n8n with free, local AI models and a persistent database. We’re talking about a full-stack, enterprise-grade automation hub that you own and control completely. Forget cloud subscription costs; we’re diving step-by-step into Docker, Ollama, and PostgreSQL to build your personal Jarvis from the ground up.
TL;DR
- Setup Docker Desktop: Download and install Docker Desktop from official website to initiate n8n, Ollama, and Postgres setups.
- Deploy n8n: Pull the official n8n Docker image, then run it configuring host port (e.g., 5678) and a local volume mapping to
/home/node/n8n. - Integrate Ollama: Install Ollama, pull desired AI models (e.g., “nomic-embed-text” for embeddings, “llama2” for chat), then connect n8n to Ollama by setting the base URL to
host.docker.internal. - Persist Memory with Postgres: Deploy a PGVector Docker image, configure credentials (host:
host.docker.internal, port:5432), and integrate it into n8n’s memory nodes. - Expose n8n with Ngrok: Install Ngrok, authenticate it, then expose your n8n instance using
ngrok http 5678to obtain a public URL for external integrations.
This guide details setting up n8n for free, integrating AI models, and utilizing databases for robust, cost-effective automation. It targets developers, automation enthusiasts, small businesses, and individuals seeking efficient workflow solutions without incurring significant costs.
Historically, advanced automation and AI integrations were costly, often requiring subscriptions to proprietary platforms or significant investment in computing resources. The approach outlined here democratizes these capabilities, making them accessible to a broader audience. By combining n8n’s flexible workflow engine with free and open-source components, users can build sophisticated automation solutions that were once exclusive to larger enterprises.
Table of Contents
Open Table of Contents
- Setting Up Your n8n Environment with Docker
- Activating Your n8n Instance: First-Time Setup
- Building Your First Workflow: Triggers and Basic Nodes
- Integrating Free AI: Setting Up Ollama and Chat Models
- Enhancing Workflows with Memory Management
- Free Database Integration: Leveraging Postgres
- Exposing n8n Publicly with Ngrok for External Access
- Advanced Integrations: Google Cloud and OAuth Clients
- Best Practices for Free n8n Implementations
- Frequently Asked Questions (FAQ)
- Q: Is n8n completely free to use?
- Q: What are the hardware requirements for self-hosting n8n with AI models?
- Q: Can I run n8n on a cloud Free Tier (e.g., AWS, GCP)?
- Q: Why use Ollama over other AI model runners?
- Q: What happens if my n8n instance or database restarts? Will I lose AI memory?
- Q: How does the free Postgres setup compare to paid database services?
- Q: Is using Ngrok secure for exposing n8n publicly?
- Q: How do I ensure my Google Cloud credentials remain secure within n8n?
- The Future of Free Automation with n8n
- Final Summary
Setting Up Your n8n Environment with Docker
Alright, let’s get our hands dirty! Establishing a robust n8n environment begins with Docker Desktop, a platform that simplifies the deployment of applications in containers. If you’re new to Docker, think of it as a magical box that lets you package up an application (like n8n) and all its bits and pieces, so it runs exactly the same way, everywhere. It abstracts away environmental inconsistencies, ensuring n8n — and its dependencies like Ollama and Postgres — run uniformly across different operating systems. This section guides you through the initial setup of Docker Desktop and the subsequent deployment of n8n.
Install Docker Desktop
To begin, acquire and install Docker Desktop, which facilitates containerized application management. This is your first step into the world of containerization, and trust me, it’s super handy!
-
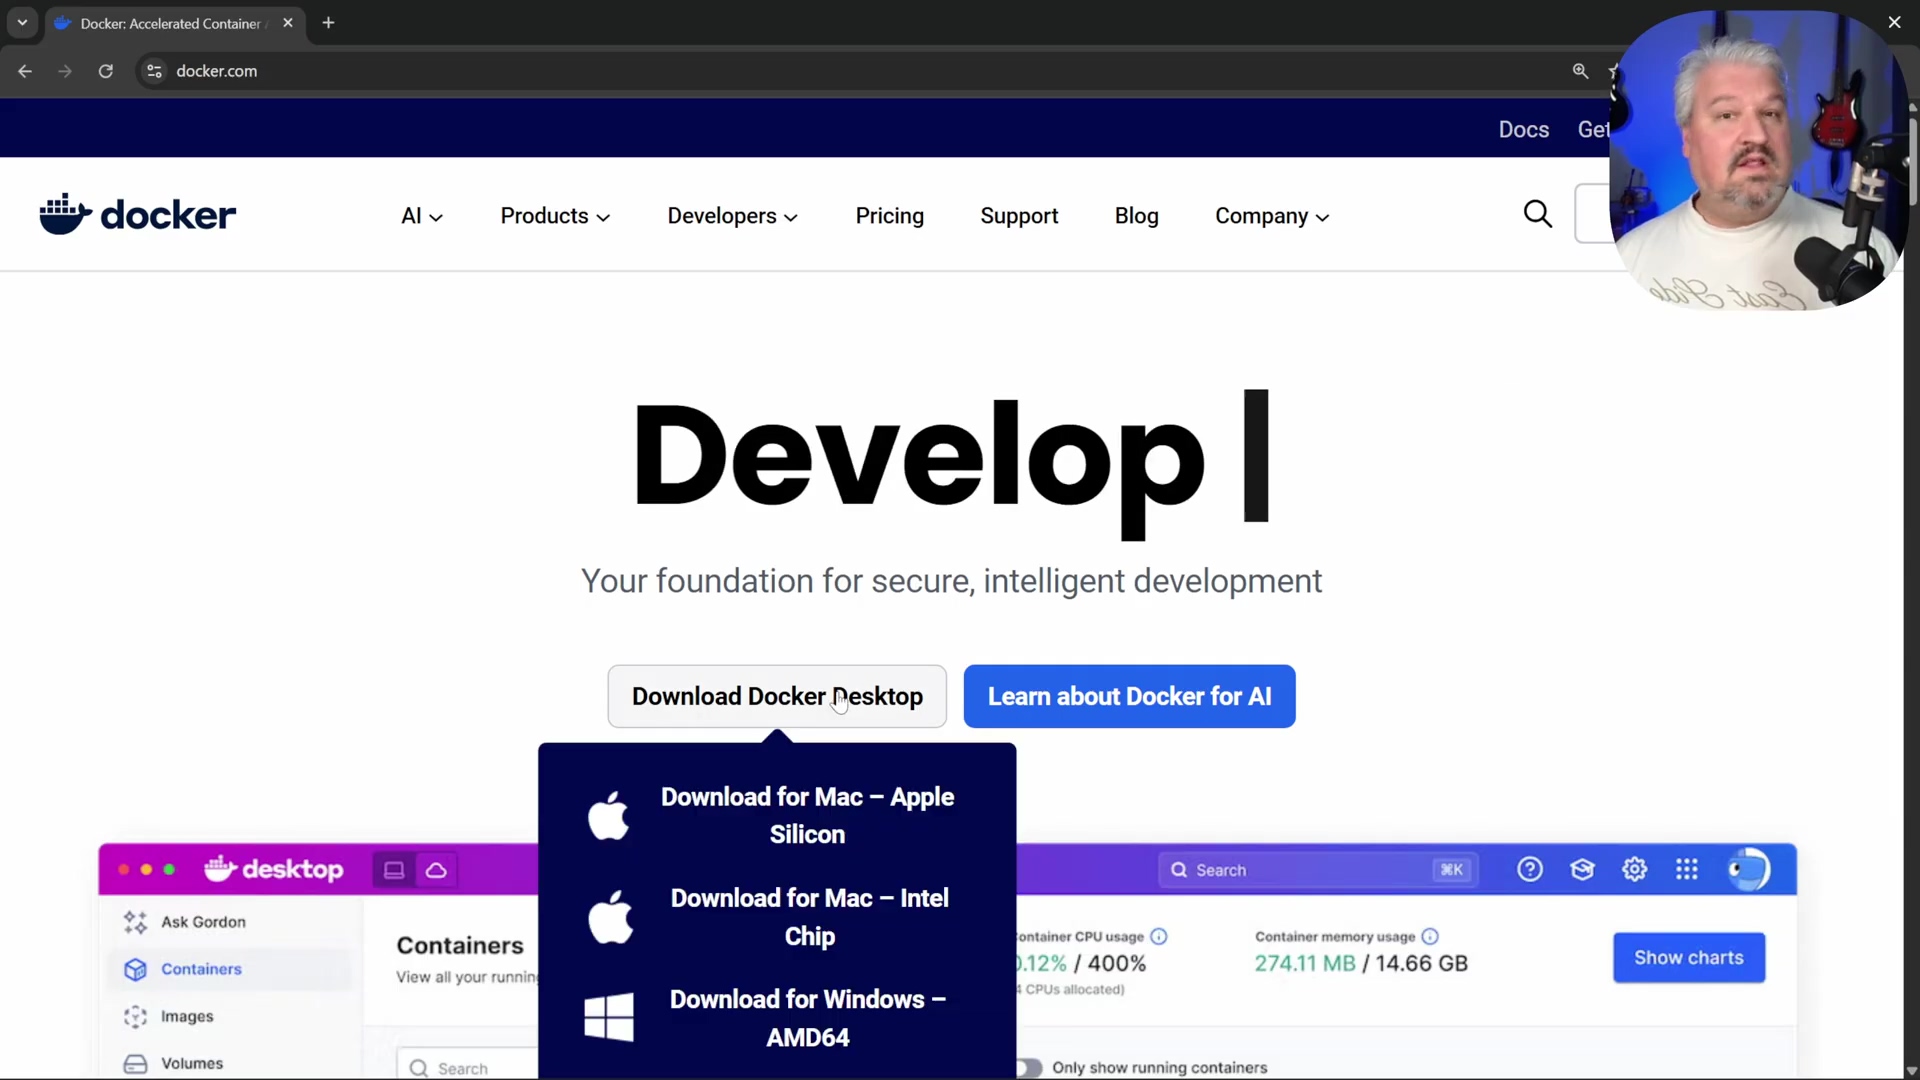
Navigate to Docker Website: Open your web browser and go to
docker.com. Easy peasy. -
Download and Install: Download the appropriate Docker Desktop installer for your operating system (Mac, Windows, Linux – they’ve got you covered!) and follow the installation prompts. The Docker website provides download options for various operating systems, including Mac (Apple Silicon and Intel Chip) and Windows.
- Enable WSL on Windows (if prompted): If you’re a Windows user, Docker Desktop might ask you to enable Windows Subsystem for Linux (WSL). Don’t panic! Just copy the provided command and execute it in PowerShell as an administrator. This basically lets your Windows machine run a lightweight Linux environment, which Docker loves.
Verification: After installation, launch Docker Desktop. Its dashboard should indicate that the Docker engine is running. You’ll see a little green light or a “Docker Desktop is running” message. If it’s not running, give it a moment or check for any error messages.
Deploy n8n via Docker Image
Once Docker Desktop is operational, the next step is to pull the n8n Docker image and run it. This creates a self-contained n8n instance right on your local machine. It’s like unwrapping a pre-built LEGO set – all the pieces are there, ready to go!
- Search for n8n Image: In the Docker Desktop app, use the search bar to find the official
n8nimage. You’re looking for the one published byn8nio. - Pull Image: Click on the ‘Pull’ button to download the n8n Docker image to your local machine. This might take a minute or two, depending on your internet speed. Think of it as downloading a game – you’re getting all the necessary files.
- Access Images Tab: Navigate to the ‘Images’ tab in Docker Desktop to view your downloaded images. You should see
n8nio/n8nlisted there. - Run n8n Container: Locate the n8n image and click the ‘Run’ button. This is where the magic happens – you’re telling Docker to actually start n8n.
- Configure Container Settings: In the ‘Optional settings’ dialog, configure the container. This is crucial for making sure n8n works just right:
-
Name: Assign a descriptive name (e.g.,
n8n). This helps you identify your n8n instance among other containers. -
Host Port: Specify
5678for the host port. This is the port on your machine that Docker will use to expose n8n. Make sure this port isn’t already being used by another application. If it is, pick another one, like5679. -
Volumes: This is super important for data persistence! Map a local folder (e.g.,
datawithin ann8ndirectory you create) to the container path/home/node/n8n. What does this mean? It means any data n8n creates (like your workflows, credentials, etc.) will be stored in that local folder on your computer, not inside the temporary container. So, if you ever restart or even delete the n8n container, your precious data will be safe and sound. This configuration ensures data persistence across container restarts.
-
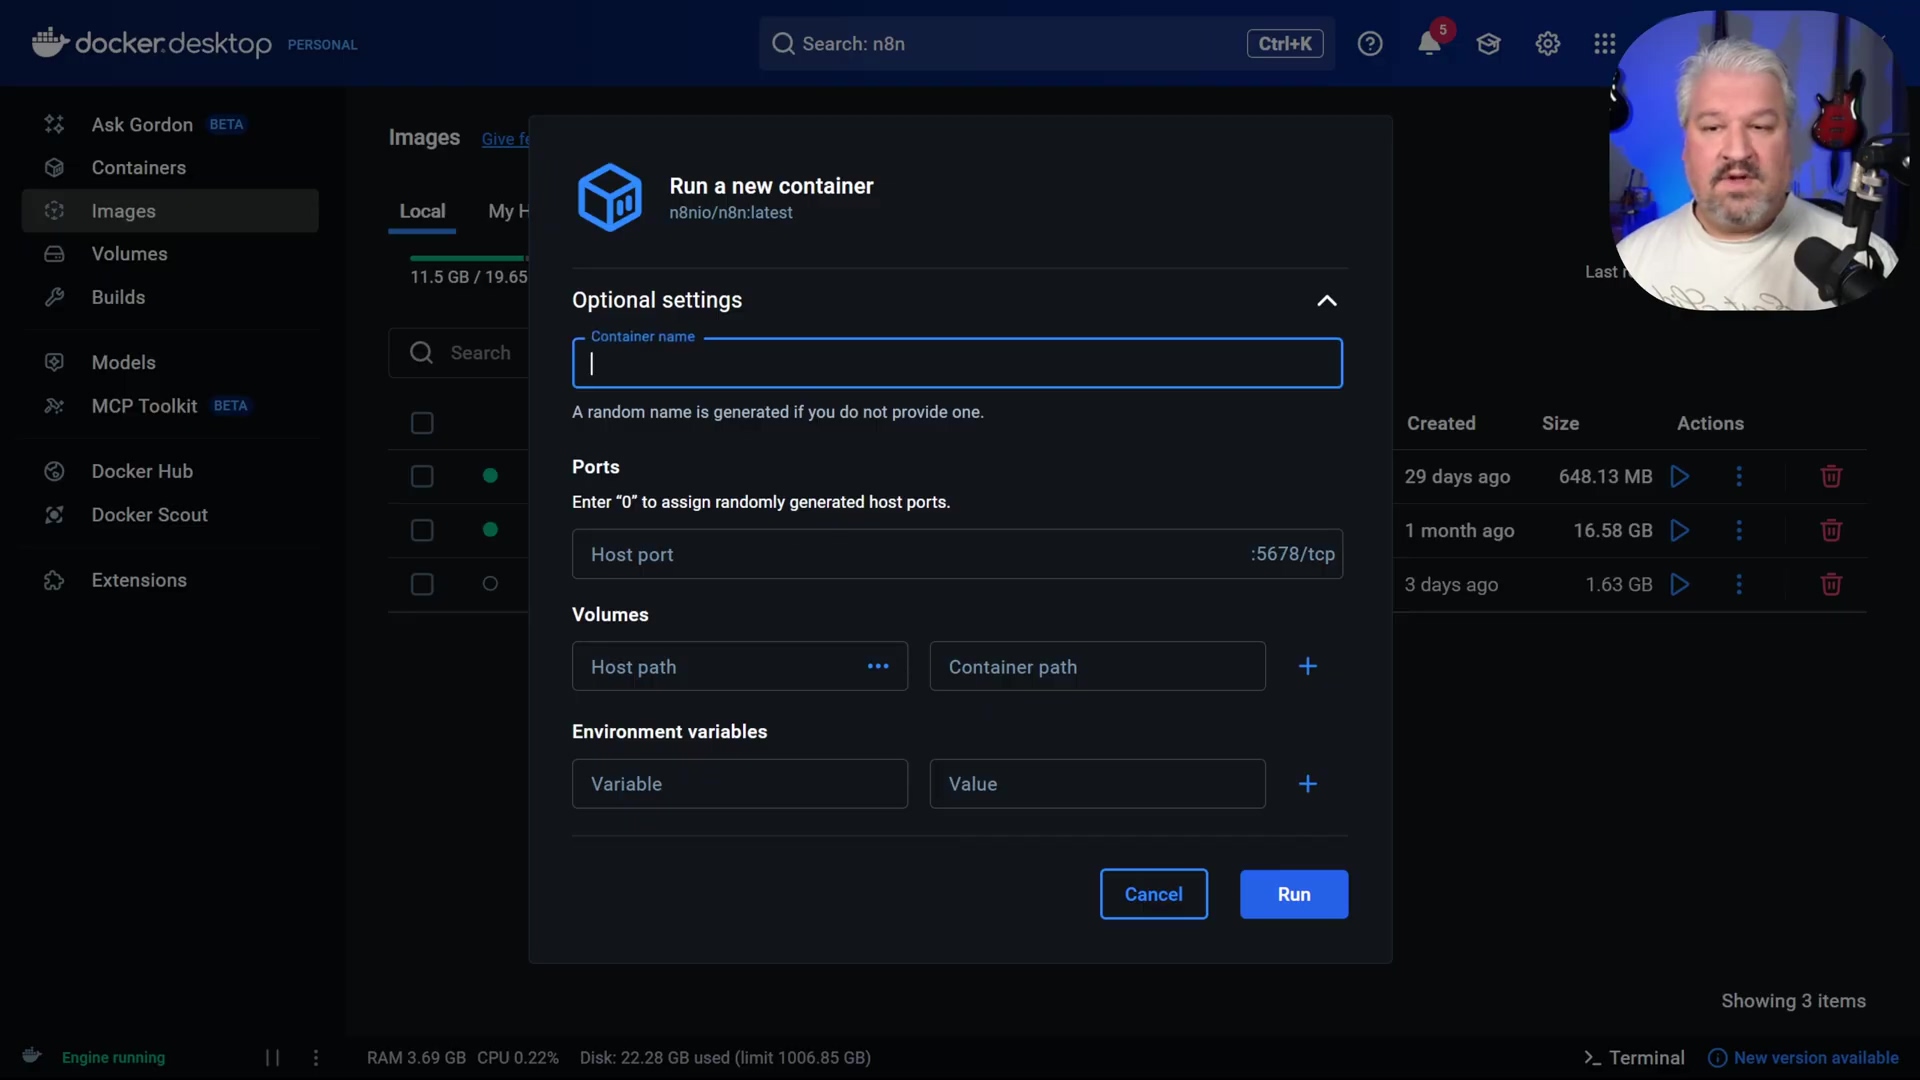
* **Environment variables**: When exposing n8n publicly (we'll get to that later with Ngrok), you will later configure the `WEBHOOK_URL` in the 'Environment variables' section. For now, you can leave this blank.6. Execute Run: Click ‘Run’ to start your n8n instance. Give it a few seconds to spin up.
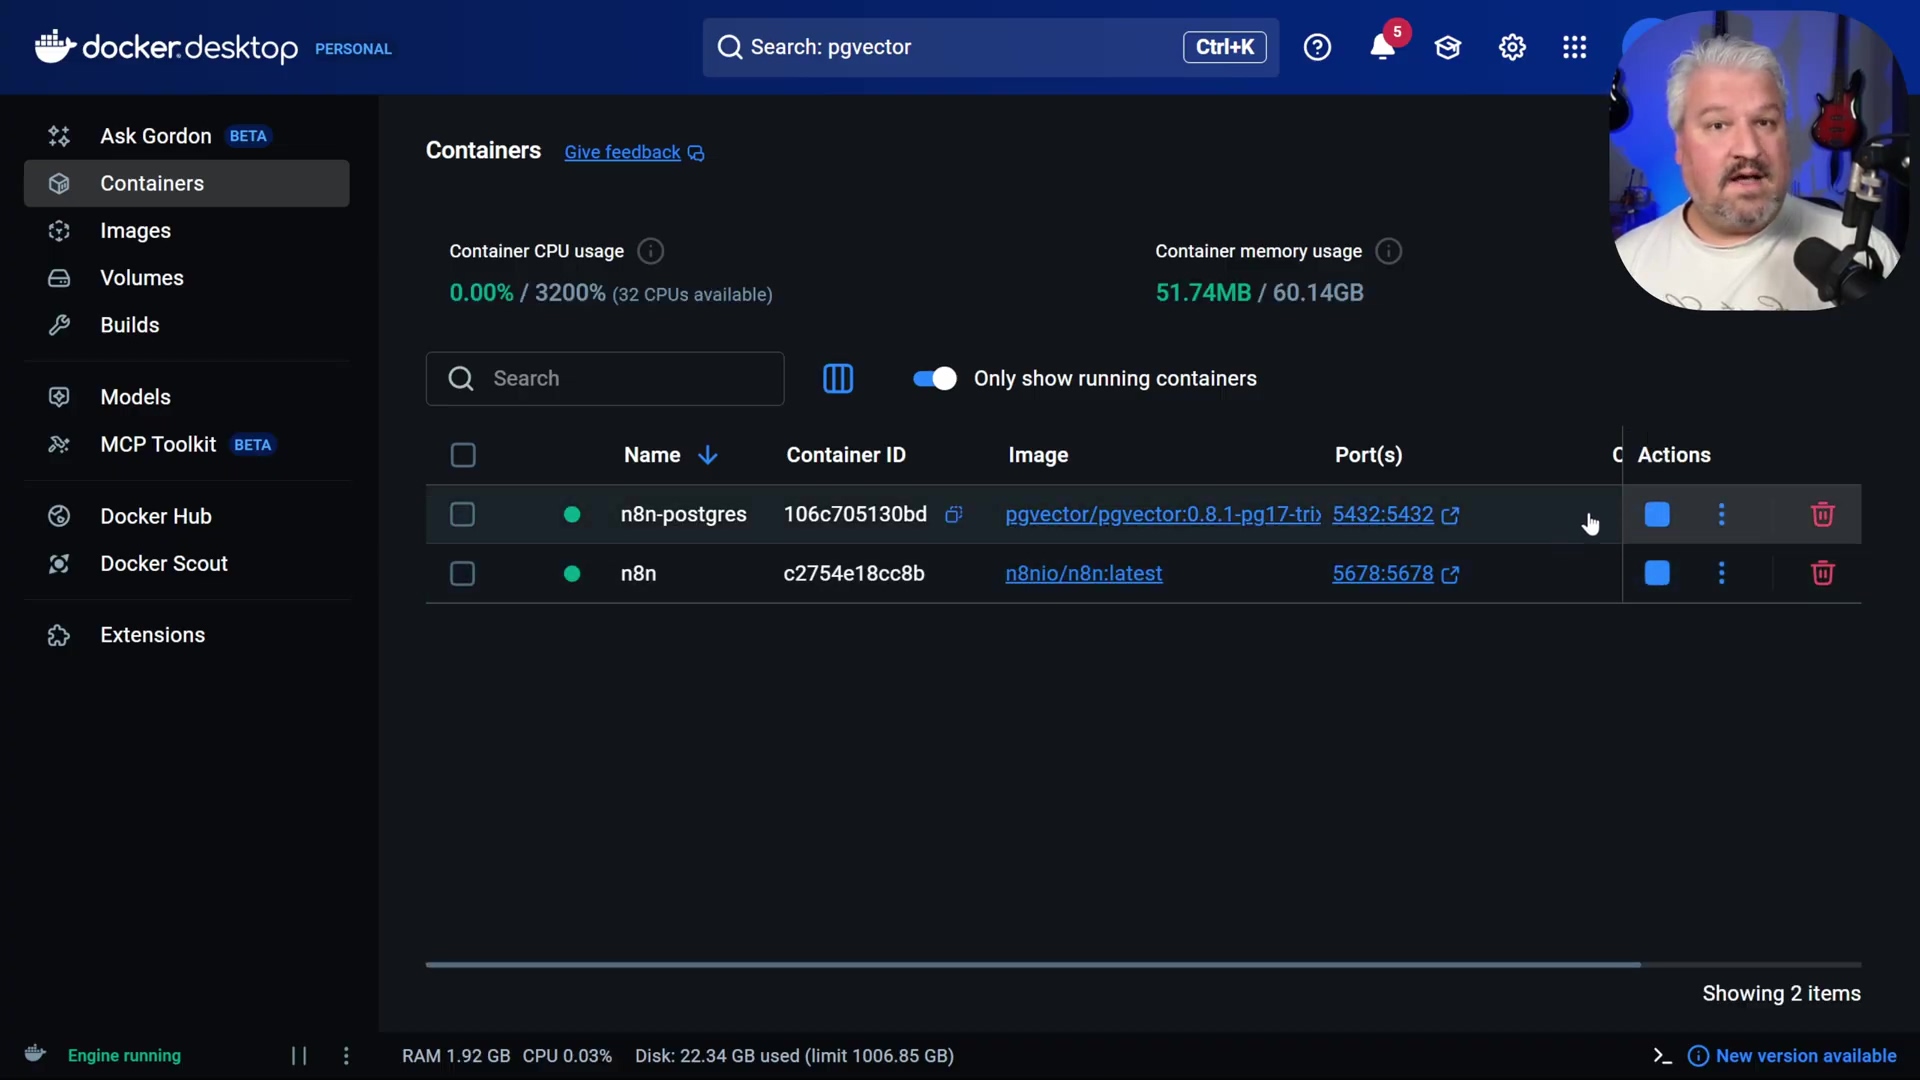
Verification: Docker Desktop’s ‘Containers’ tab will display the n8n instance as running. You can also monitor the logs for the access URL, typically indicating http://localhost:5678. The Docker Desktop interface will show running containers, including n8n and potentially n8n-postgres if it’s already set up, along with their respective ports. If you see green, you’re golden!
Activating Your n8n Instance: First-Time Setup
Upon successfully deploying n8n via Docker, the next crucial step involves its initial setup, including account creation and license activation. This process ensures full access to n8n’s features and allows you to begin building workflows. An active license key, though free for self-hosted instances, is essential for unlocking the complete n8n experience. Don’t worry, it’s a free license, just a formality to get all the cool features!
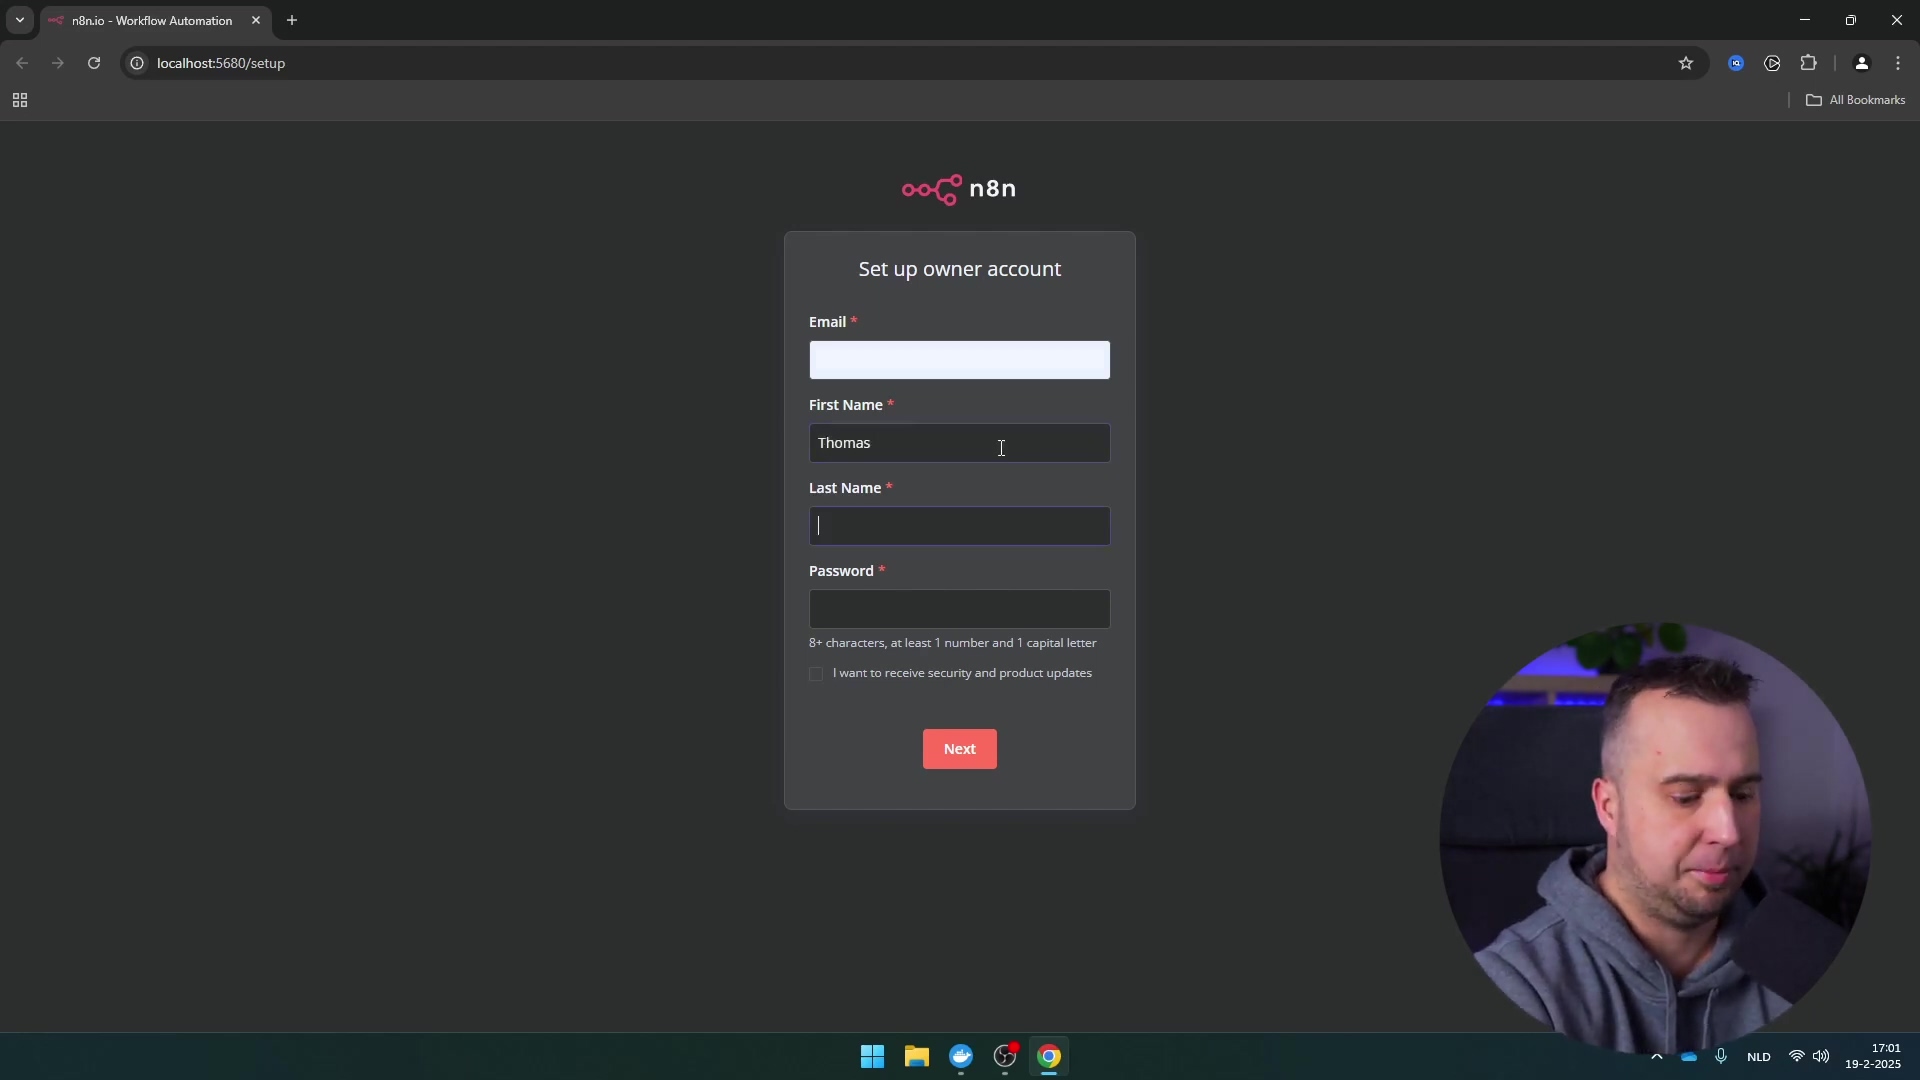
Initial n8n Account Setup
Access your newly deployed n8n instance through your web browser to create your administrator account. This is like creating your user profile for your new automation command center.
- Open n8n in Browser: In Docker Desktop, navigate to the ‘Containers’ tab. Locate your running n8n instance and click the ‘Open in browser’ button. This is the easiest way! Alternatively, you can manually enter
http://localhost:5678(or whatever host port you chose) in your browser. - Sign-Up Form: On the sign-up page, enter your email, first name, last name, and a secure password. Make sure it’s a strong one!
Verification: Upon successful submission, you will be redirected to a screen prompting for a license key. This is a good sign – it means n8n is up and running and ready for activation.
Obtaining and Activating Your Free License Key
n8n requires a license key even for free self-hosted use. This key activates advanced features and confirms your instance’s legitimacy. It’s like getting the master key to unlock all the cool rooms in your automation mansion.
- Request License Key: On the activation screen, provide your email address and click ‘Send me a free license key’. They’ll send it right to your inbox.
- Retrieve Key: Check your inbox for an email containing your license key. Copy this key to your clipboard. Double-check your spam folder if you don’t see it right away!
- Activate in n8n: Return to your n8n interface.
- Click on your profile settings (usually an avatar or initial in the top right corner). This is where you manage your user stuff.
- Select ‘Enter activation key’. The n8n interface will present an option to enter an activation key from the usage and plan settings.
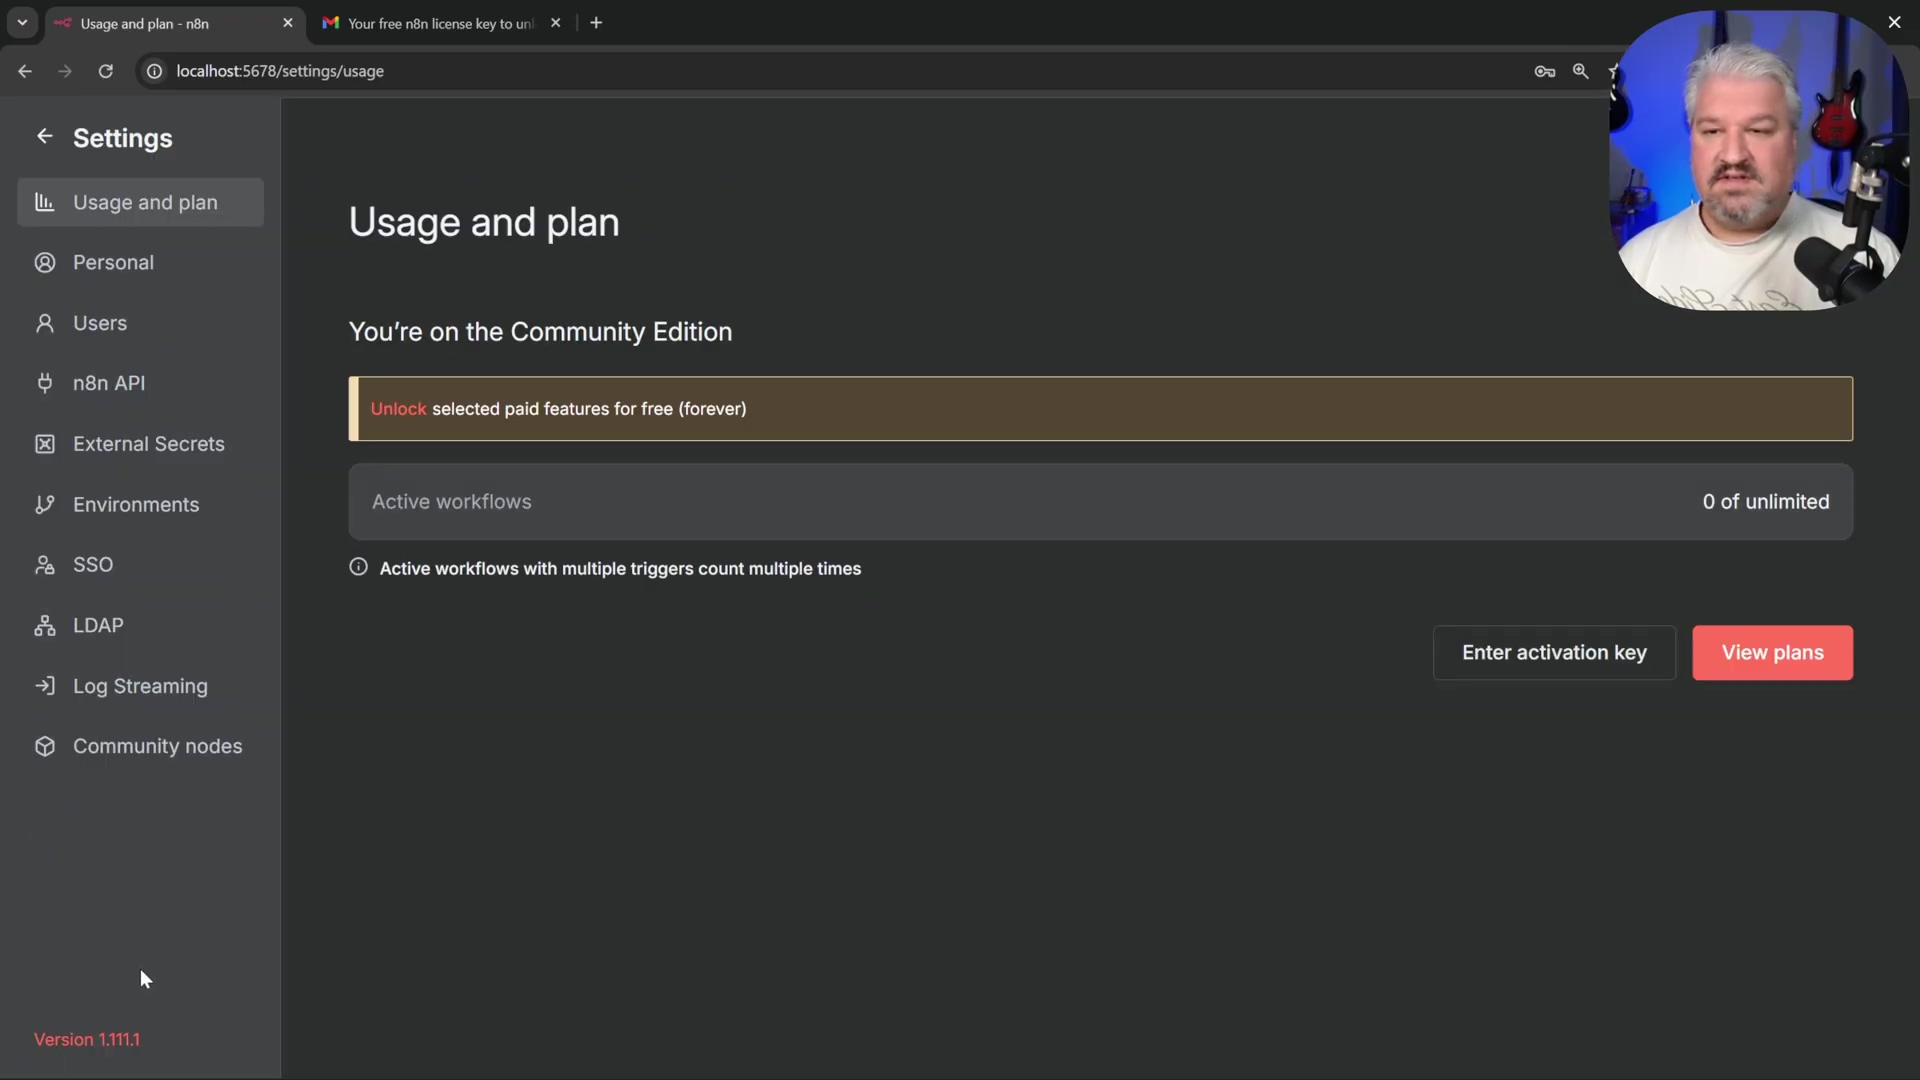
*   Paste the copied license key into the designated field. Make sure you get the whole thing.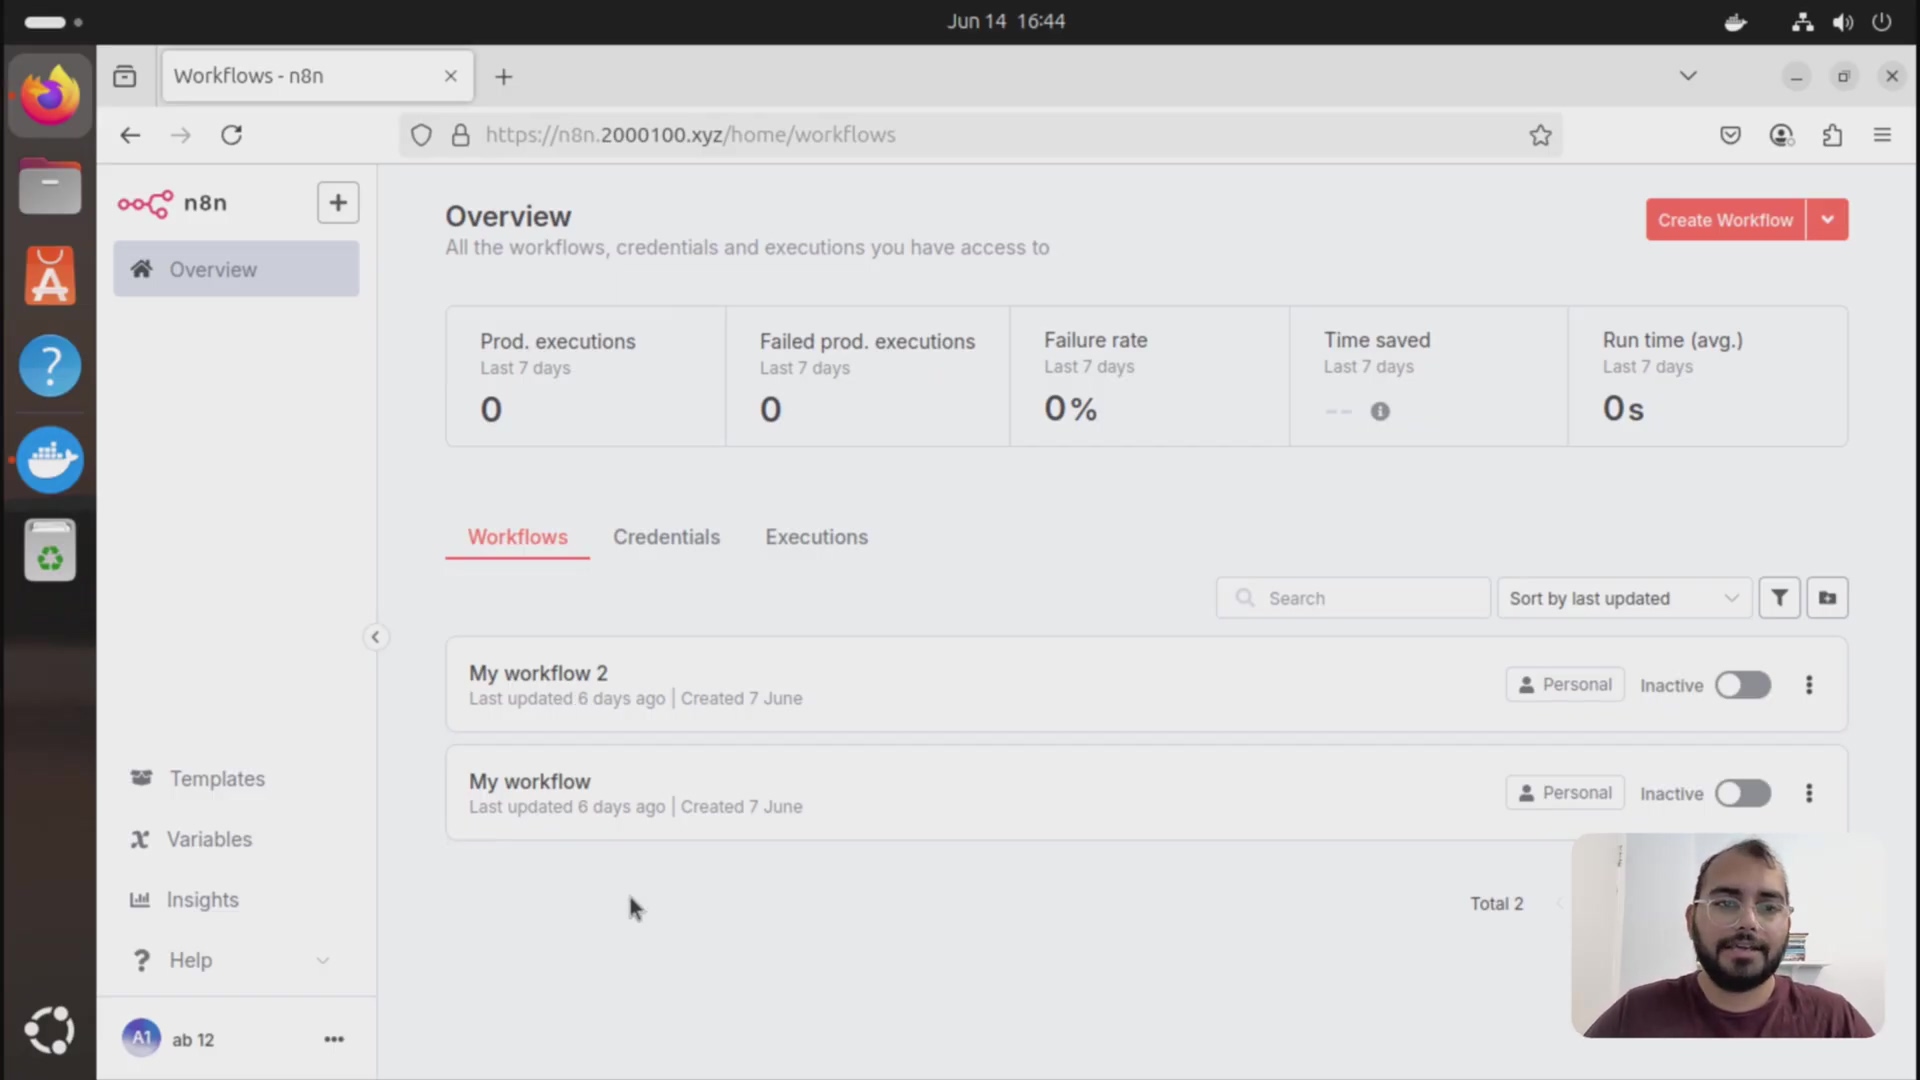
* Click 'Activate'.Verification: A confirmation message will appear, and your n8n instance will be fully activated, ready for workflow creation. You can now access the n8n dashboard, signified by the presence of a ‘Create Workflow’ button. Congratulations, you’re officially an n8n user!
Building Your First Workflow: Triggers and Basic Nodes
Workflows are the core of n8n’s automation capabilities. Each workflow begins with a trigger, an event that initiates the entire sequence of operations. Think of a trigger as the “start” button for your automation robot. This section explores how to create a new workflow, define its trigger, and integrate fundamental nodes, such as a ‘Chat Message’ receiver, to start processing interactions.
Create a New Workflow
Initiate your automation journey by setting up a new workflow and defining its primary function. This is where you tell n8n what you want it to do.
- Access Workflow Creation: From the n8n dashboard, click ‘Create Workflow’ in the top right corner. You’ll see a blank canvas, ready for your masterpiece.
- Rename Workflow: Click on the new workflow’s default name (e.g., ‘My workflow’) and rename it to something descriptive like ‘My Awesome Workflow’. Good naming conventions save lives (or at least, a lot of confusion).
Verification: The workflow canvas will display the new name at the top, indicating the successful creation and naming of your workflow. You’ll see your chosen name proudly displayed.
Configure the Trigger Node
A trigger is the starting point of any workflow, listening for specific events to begin execution. The n8n workflow editor provides a sidebar to select various trigger options. It’s the ear of your automation, always listening for its cue.
- Select Trigger: Every n8n workflow must start with a trigger. Click on the ‘Add first step’ button to view available triggers.
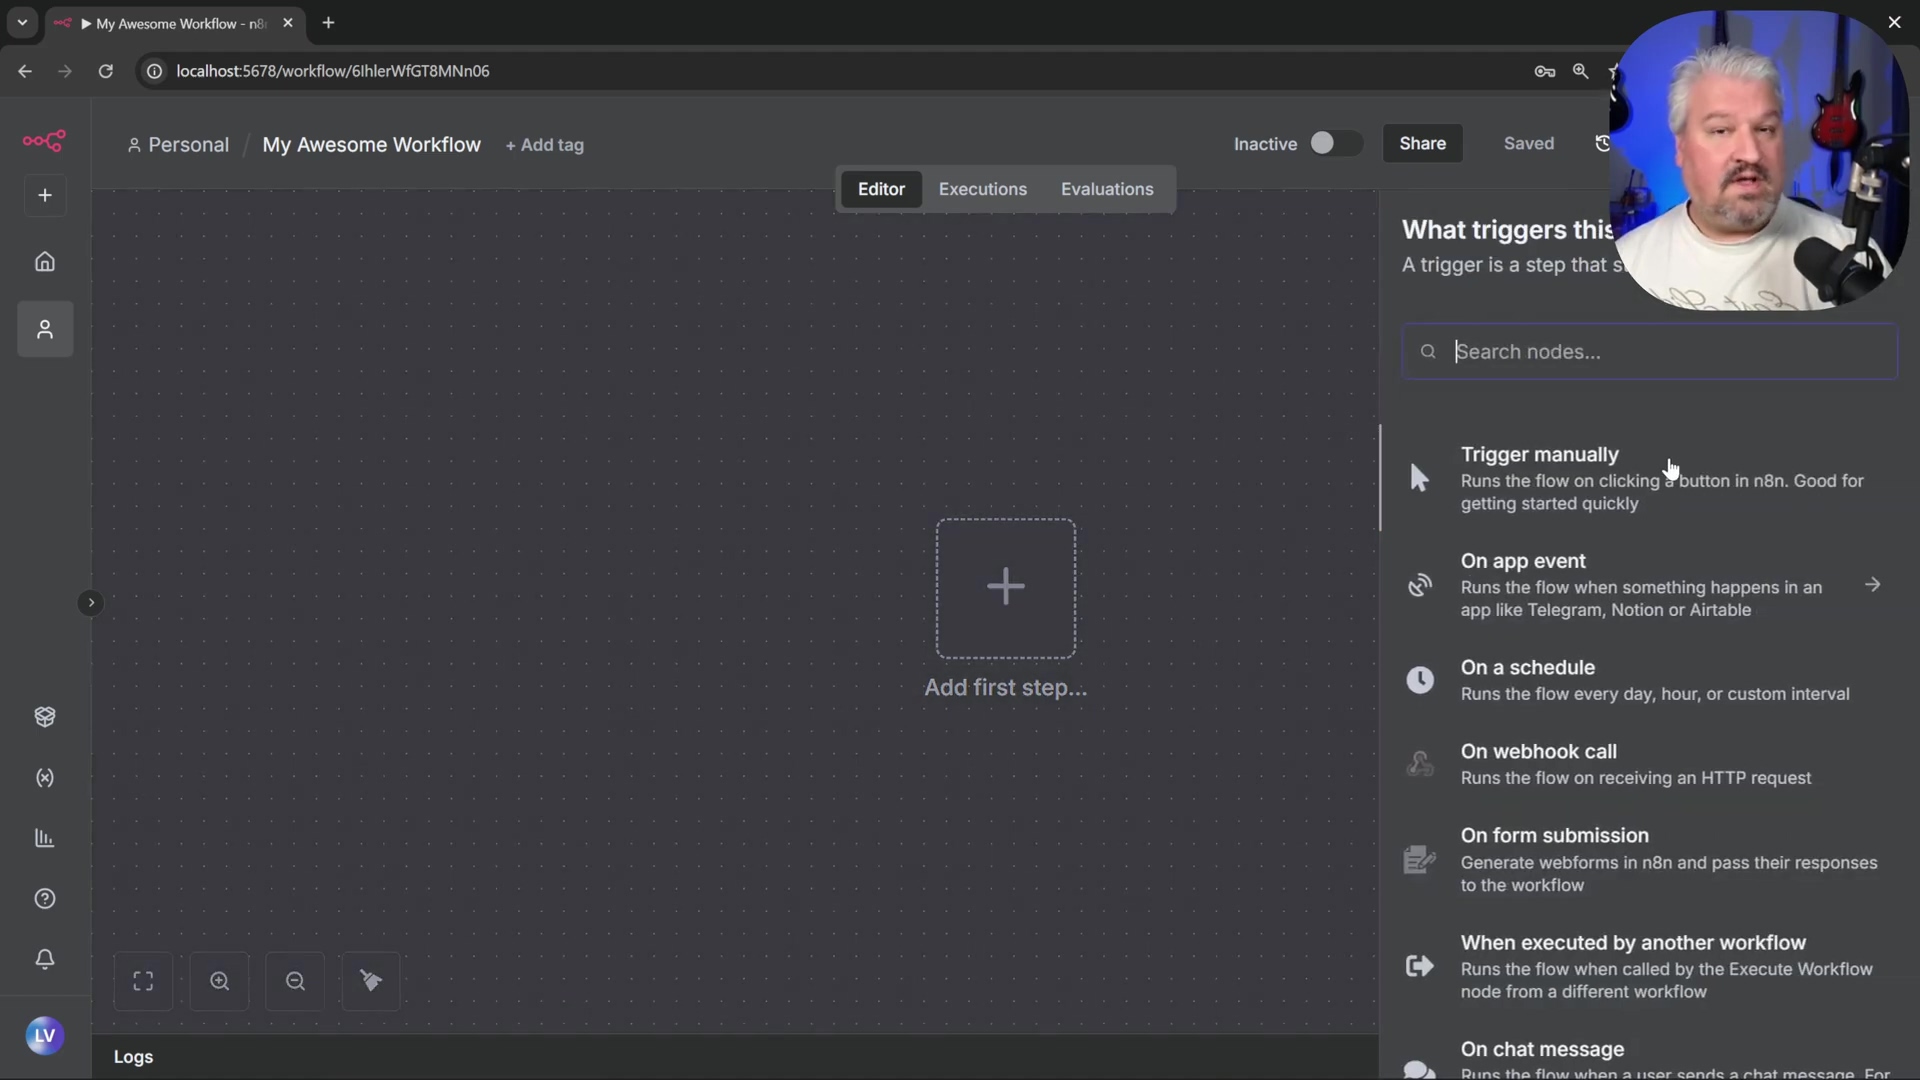
* n8n offers various trigger types, including manual execution, external system events (e.g., [Gmail](https://www.google.com/gmail/)), [webhooks](https://en.wikipedia.org/wiki/Webhook), scheduled tasks, or specific application events like 'On Chat Message'. For our AI agent, 'On Chat Message' is perfect.2. Add ‘On Chat Message’ Node: For interactive AI agents, select the ‘On Chat Message’ node. This trigger listens for incoming chat messages to initiate the workflow. It’s like giving your robot a walkie-talkie. * Close the node configuration window. For now, the default settings are fine.
Verification: A ‘Chat Message’ node will appear on your canvas. Clicking on it will open a chat window. Sending a test message (e.g., “Hey”) will trigger the node, though no further action occurs until an AI agent is added. You’ll see a little green checkmark or a successful execution message if it triggers.
Add an AI Agent Node
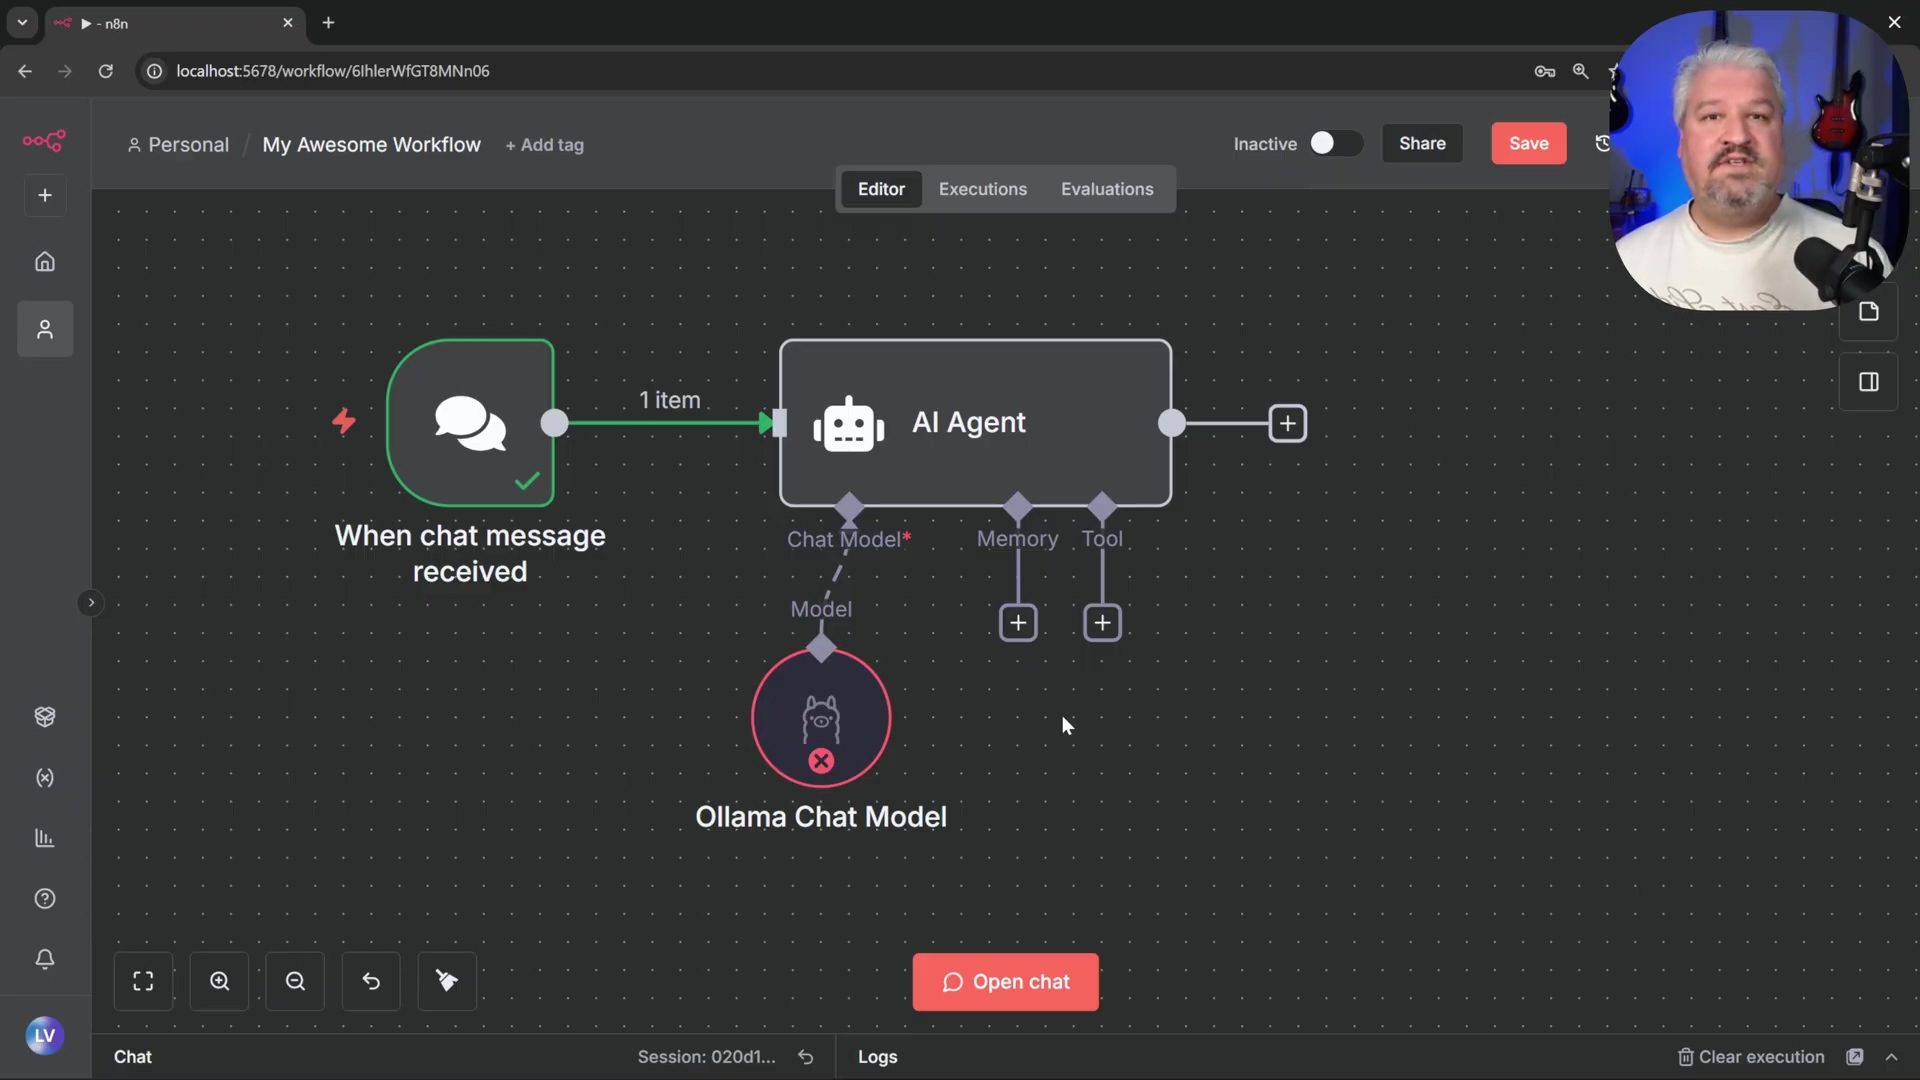
To process incoming messages intelligently, integrate an AI agent into the workflow. The n8n workflow interface shows several integrated AI nodes, including the ‘AI Agent’ node. This is where we give our robot a brain!
- Add AI Node: Click the ’+’ button next to the ‘Chat Message’ node, then navigate to ‘AI’ and select ‘AI Agent’. This node is the core of our intelligent automation.
- Default Configuration: For now, no changes are needed within the AI Agent node’s settings. Close the configuration panel to return to the canvas. We’ll configure its brain (the chat model) and memory later.
Verification: Both the ‘Chat Message’ and ‘AI Agent’ nodes will be connected on the canvas. The ‘AI Agent’ node will show inputs for ‘Chat Model’, ‘Memory’, and ‘Tools’, signifying it’s ready for further integration. It’s like seeing the empty slots for upgrades on your robot.
Integrating Free AI: Setting Up Ollama and Chat Models
To imbue your n8n workflows with intelligence, integrating free AI models is crucial. Ollama emerges as an excellent solution, offering an easy way to run open-source models locally. This section covers installing Ollama, downloading a suitable model, and connecting it to your n8n instance. This is where we give our automation robot its smarts, without paying a fortune!
Ollama Installation and Model Download
Ollama simplifies the process of running large language models (LLMs) on your local machine, avoiding the costs associated with cloud-based AI services. It’s like having a super-smart AI assistant living right on your computer, ready to help.
- Install Ollama: Visit
ollama.comand download the installer for your operating system. Follow the instructions to install Ollama. It’s usually a straightforward process, just like installing any other application. - Model Selection: Browse the available models on Ollama’s website via the ‘Models’ page. These models vary in size and capability, from tiny models suitable for basic tasks to larger, more complex ones. The Ollama website provides extensive model details. For testing, I’d recommend starting with something manageable. Think of these models as different personalities or skill sets for your AI.
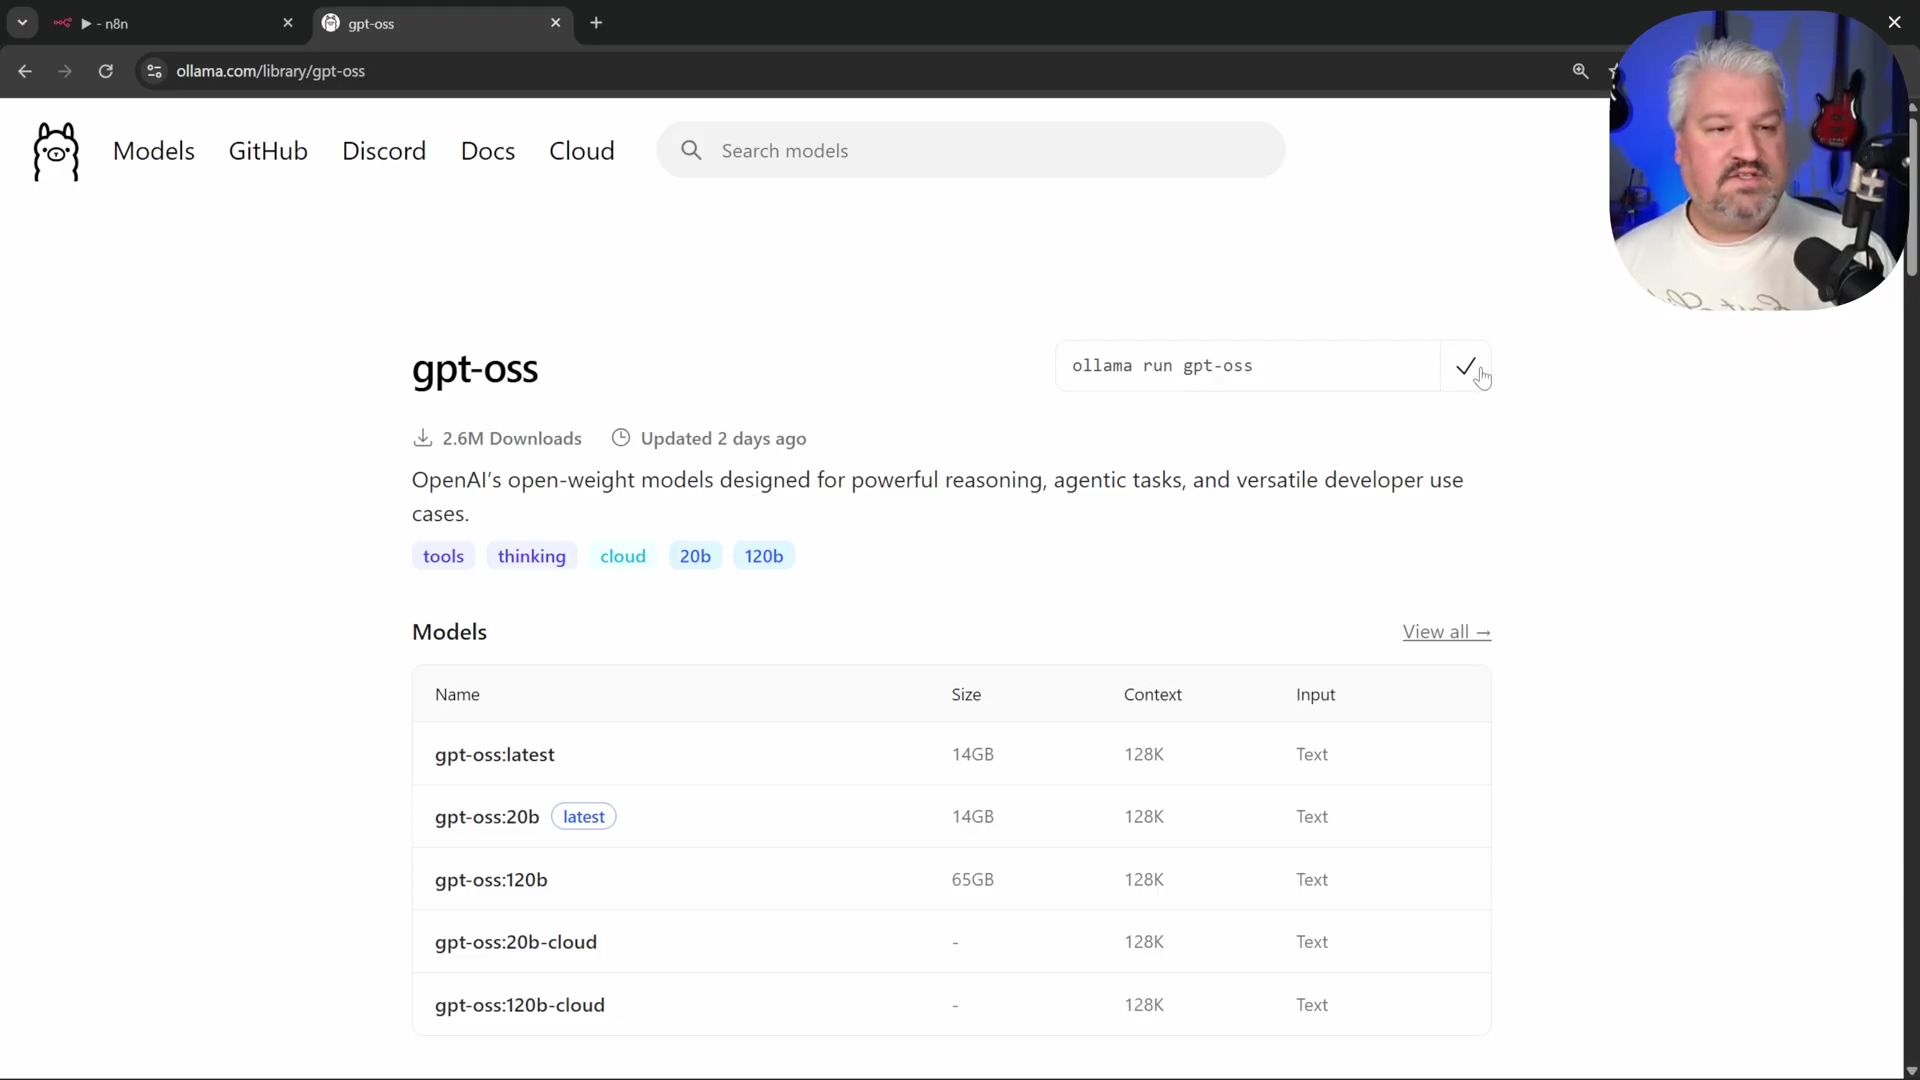
* For testing, considerable choices include `llama2` (a general-purpose model, great for chat) or `nomic-embed-text` (super useful for embeddings, which we'll use for knowledge bases).3. Download Model: Copy the ollama run <model_name> command for your chosen model (e.g., ollama run llama2). Open your command prompt or terminal and execute the command. Ollama will download and run the model. This might take a while, as these models can be quite large. It’s downloading the AI’s brain!
Verification: After the model downloads, you can interact with it directly in your terminal (e.g., by typing “Hey”). It will provide a response, confirming successful installation and model loading. If it chats back, you’ve nailed it!
Connecting Ollama to n8n
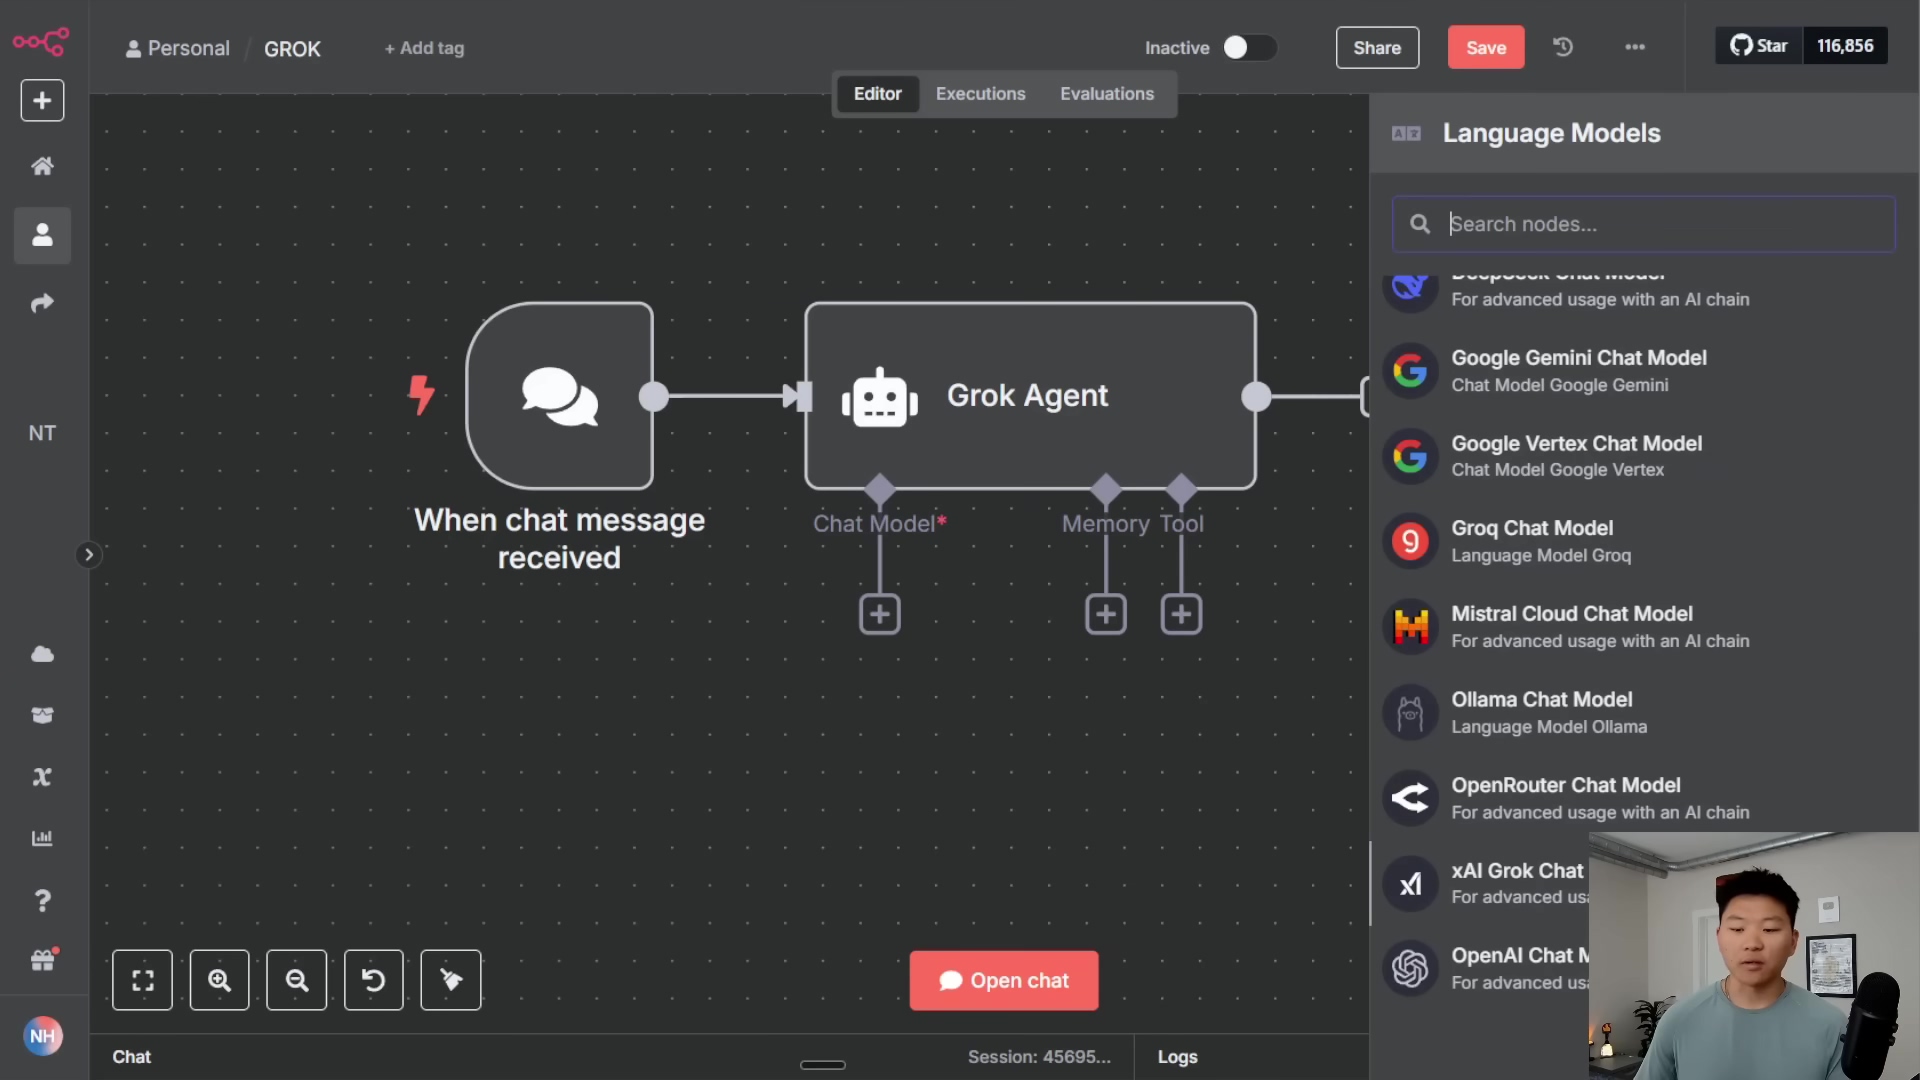
Integrate your locally running Ollama instance into n8n by configuring a chat model node. The n8n workflow editor displays the ‘Ollama Chat Model’ node. This is how n8n talks to your local AI brain.
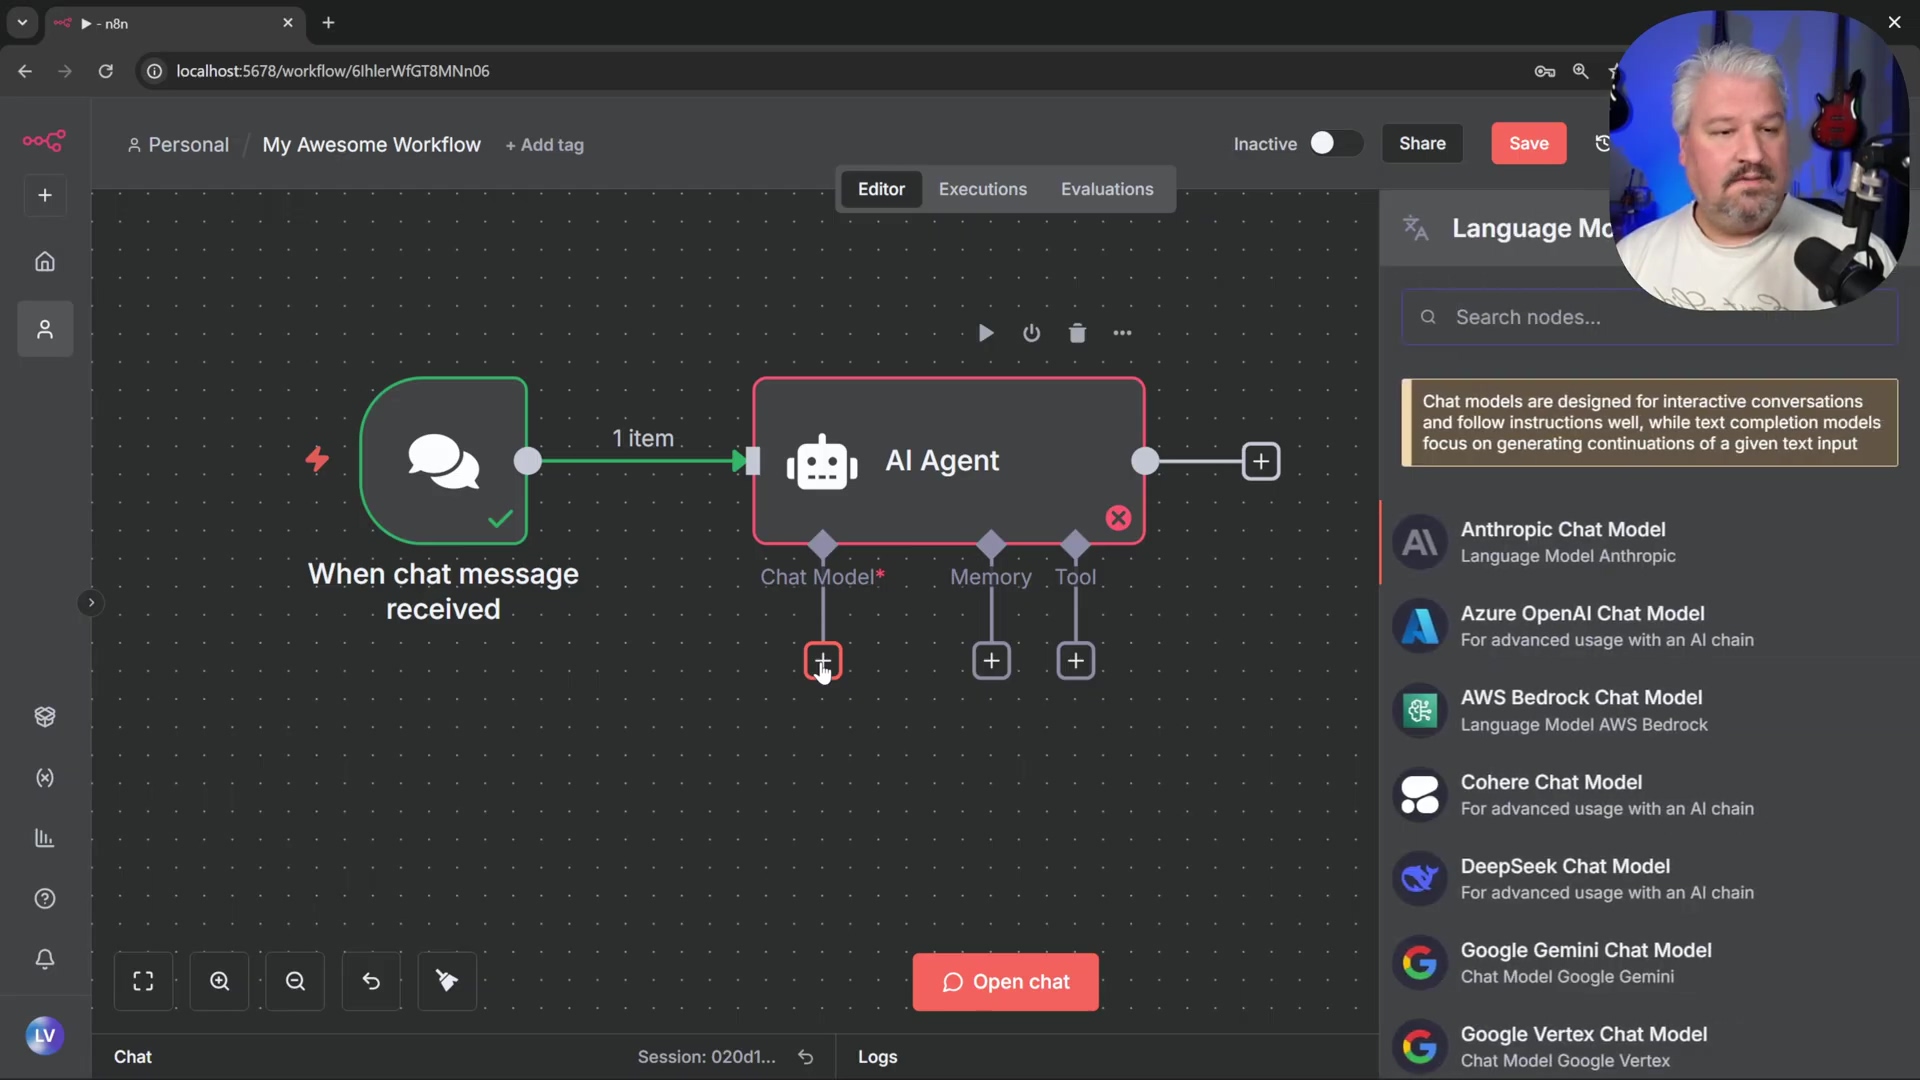
- Access Chat Model Node: Double-click the ‘Chat Model’ input within the ‘AI Agent’ node on your n8n canvas. This opens up the configuration for the AI’s language model.
- Add Ollama Chat Model: Select the ‘Ollama Chat Model’ from the list of providers. This tells n8n we want to use our local Ollama setup.
- Create New Credential: Under ‘Credentials’ in the ‘Ollama Chat Model’ node, click ‘Create New Credential’. Credentials are how n8n securely connects to other services.
- Configure Base URL: In the credential settings, replace
localhostin the ‘Base URL’ field withhost.docker.internal. Inputtinghttp://host.docker.internal:11434allows the n8n Docker container to communicate with Ollama running natively on your host machine. Whyhost.docker.internal? Becauselocalhostinside the Docker container refers to the container itself, not your actual computer.host.docker.internalis a special Docker DNS name that points to your host machine. The default port for Ollama is11434.
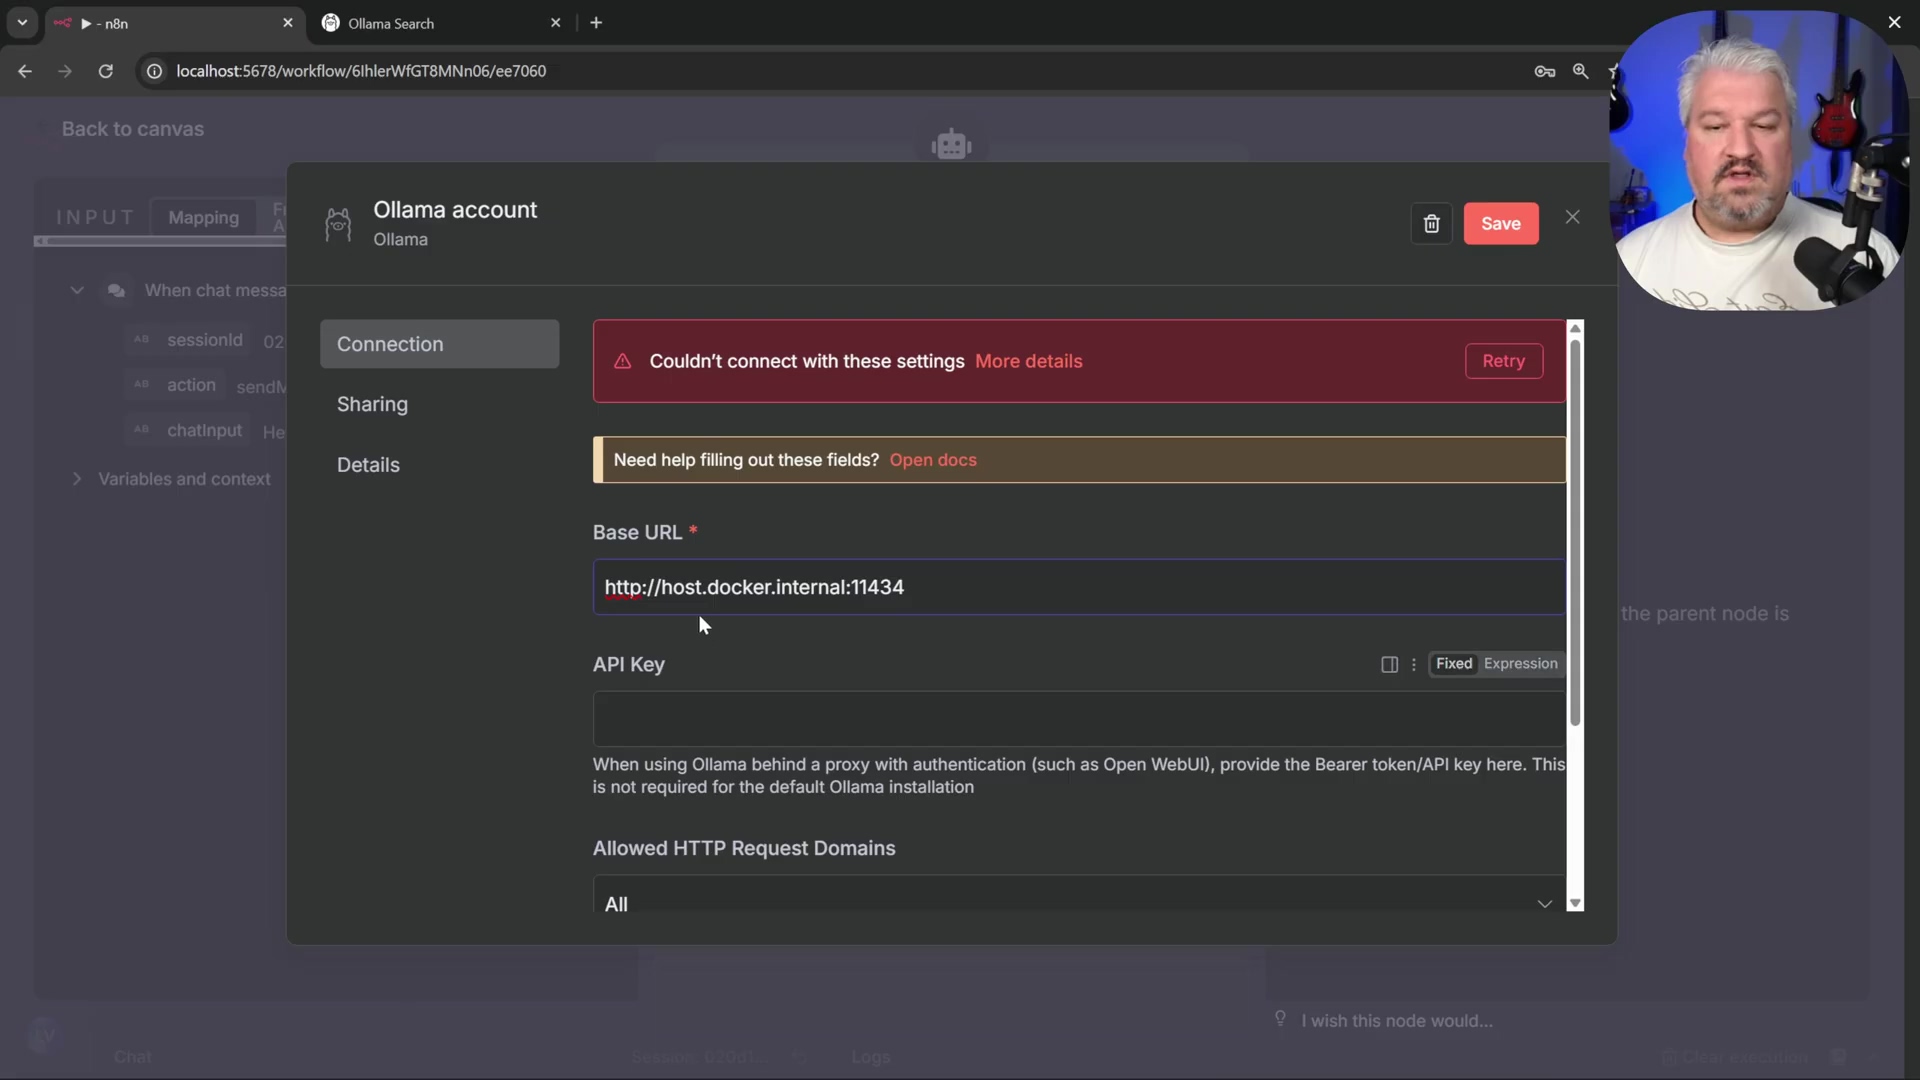
* *Note*: An API key is typically not needed for local Ollama instances. If a prompt appears for an API key, leave it blank. You're running it locally, so no external authentication is usually required.5. Test and Save: Click ‘Test Connection’. If successful, save the credential. This confirms n8n can “see” your Ollama instance. * Troubleshooting: If you encounter an error after saving, save the entire workflow and refresh the n8n page. This often resolves credential loading issues. Sometimes n8n just needs a little nudge.
- Select Downloaded Model: Reopen the ‘Ollama Chat Model’ node. The dropdown list for models should now display the Ollama models you downloaded earlier. Select your preferred chat model (e.g.,
llama2). Now your AI agent knows which brain to use!
Verification: Return to the canvas, open the chat window, and send a message. The AI agent should now respond, indicating successful integration with Ollama. If it talks back, you’ve successfully given your automation a voice!
Comparative Overview of Free AI Options
| Feature | Ollama | Groq Chat Model Node | Docker Desktop Model Runners |
|---|---|---|---|
| Hosting | Local machine, self-hosted | Cloud-based (groq.com), free tier limits | Local machine, self-hosted |
| Model Choice | Extensive open-source models available | Specific models (e.g., Llama, Mixtral) | Limited open-source models |
| Setup Difficulty | Easy (install + ollama run) | Connect to API, use client credentials | Docker image pull, run model container |
| Performance | Dependent on local hardware | High-speed inference (cloud) | Dependent on local hardware |
| Usage Limits | Hardware-dependent | Yes, free tier limits apply | Hardware-dependent |
Enhancing Workflows with Memory Management
Conversational AI agents require memory to maintain context across interactions. Without it, each message is treated as a standalone input, leading to disjointed conversations. Imagine talking to someone who forgets everything you said five seconds ago – frustrating, right? This section details how to implement a basic memory solution within n8n workflows, enabling AI agents to recall previous exchanges and deliver more coherent responses.
Implementing Simple Conversational Memory
n8n’s ‘Simple Memory’ node provides an immediate solution for short-term conversational context, crucial for natural interaction flows. This type of memory is volatile, meaning it resets upon n8n instance restarts — a limitation we will address with persistent storage later. It’s like short-term memory for your AI.
- Access Memory Input: Click on the ‘Memory’ input within the ‘AI Agent’ node. This is where we tell the AI how to remember things.
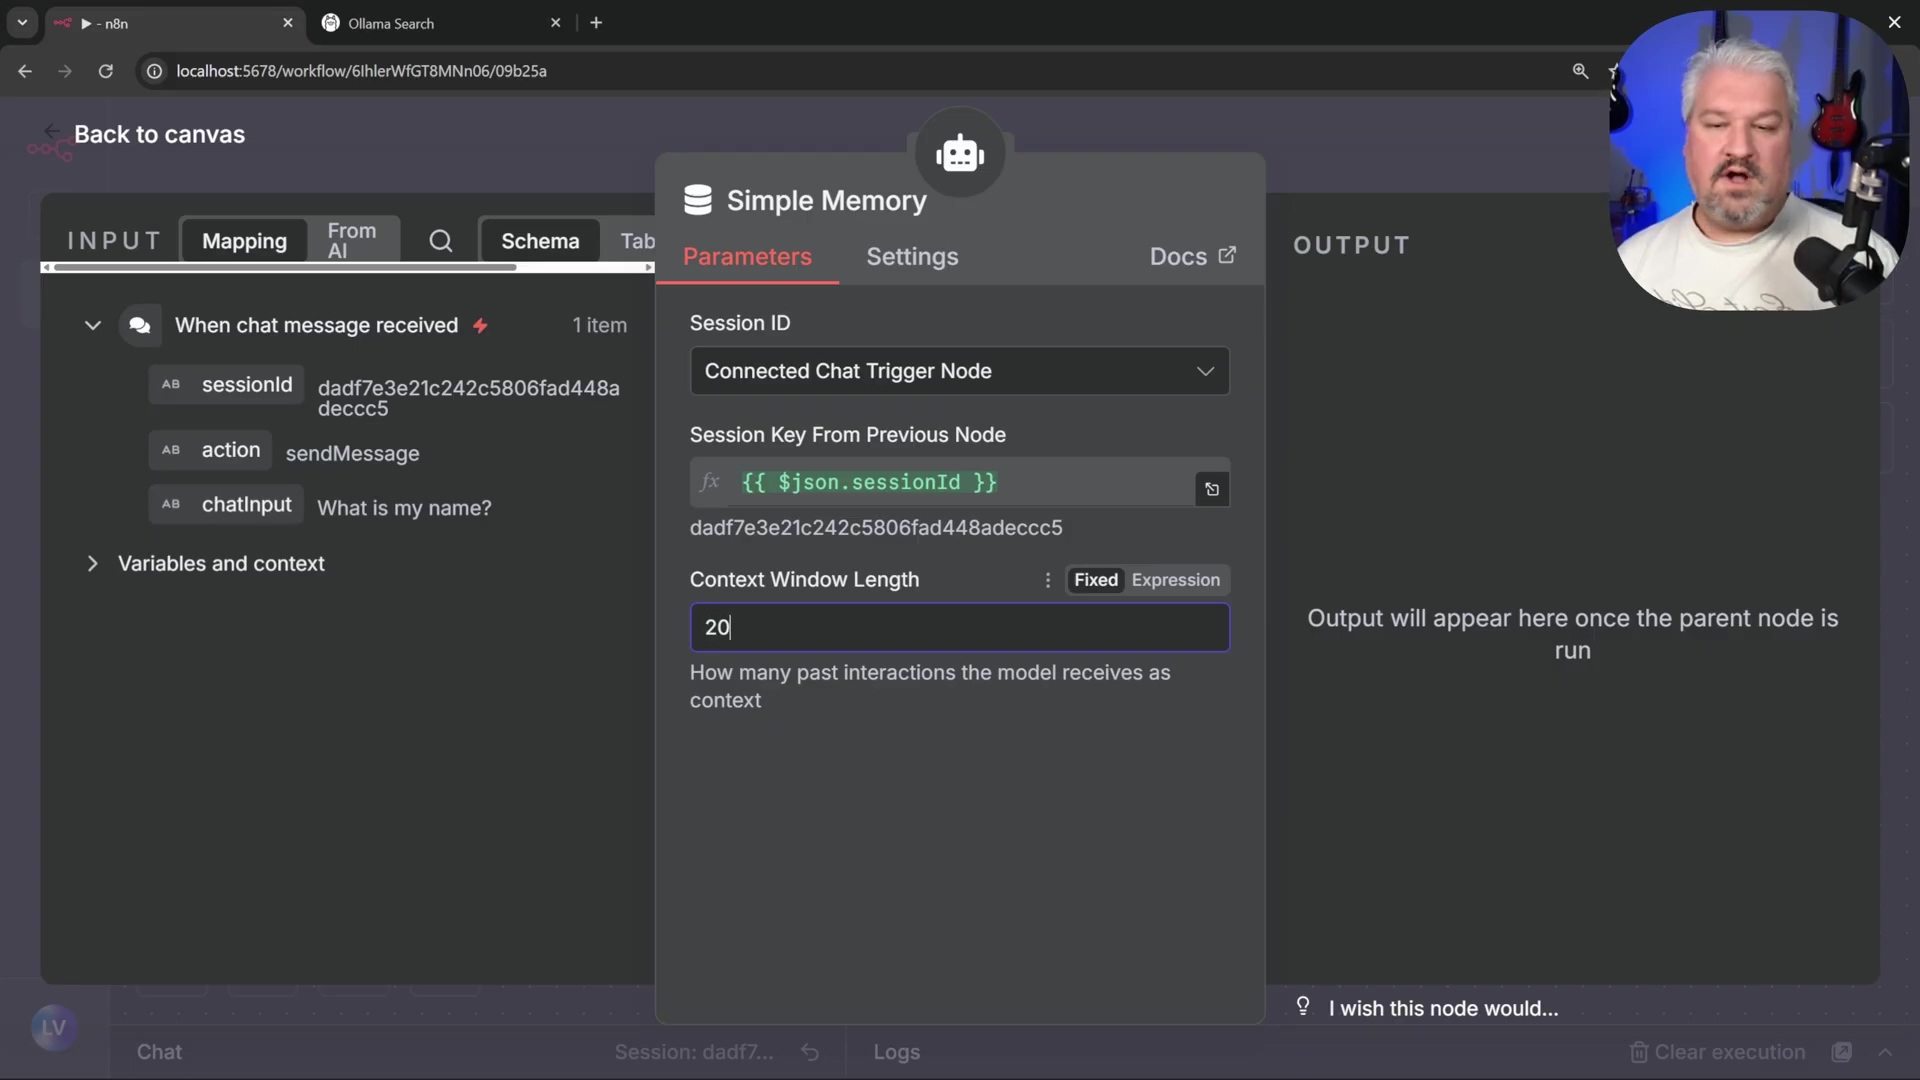
- Add Simple Memory: From the available options, select ‘Simple Memory’.
- Configure Message Count: Adjust the ‘Amount of Messages to Remember’ setting. Increasing this value (e.g., to 20 messages) allows the agent to retain more conversational history. The more messages it remembers, the smarter it seems!
Verification: Test the AI agent by engaging in a multi-turn conversation. For instance, state your name, then ask “What is my name?”. A successful setup will show the agent recalling the previously provided information. If it remembers, you’re good to go!
Understanding Simple Memory Limitations
While effective for real-time interactions, ‘Simple Memory’ is not designed for long-term persistence. This is its Achilles’ heel.
- Volatile Storage: The conversation history is stored only in the n8n instance’s transient memory. Think of it as RAM – it’s fast, but temporary.
- Data Loss on Restart: If the n8n Docker container is stopped and restarted, all stored conversation history is erased. Poof! Gone. This is a big deal if you want your AI to remember things long-term.
Verification: Stop your n8n instance via Docker Desktop, then restart it. Re-engage the AI agent and ask a question that relies on previous interactions. The agent’s inability to recall past context confirms the transient nature of simple memory. This behavior highlights the need for a persistent memory solution, which will be covered in greater detail when integrating a database. Don’t worry, we’ll fix this!
Free Database Integration: Leveraging Postgres
For robust AI conversational memory and custom knowledge bases, a persistent database solution is essential. PostgreSQL, especially integrated with PGVector for vector embeddings, provides a powerful and free option that can be seamlessly deployed with Docker. This section guides you through setting up a PostgreSQL database and connecting it to n8n to store conversation history and other data. This is where we give our AI a long-term memory, like a digital diary!
Deploy PostgreSQL with PGVector via Docker
PGVector extends PostgreSQL to store vector embeddings, which are critical for AI applications like semantic search and knowledge retrieval. Deploying it via Docker ensures a consistent environment. We’re essentially giving our database superpowers for AI.
-
Search for PGVector Image: In Docker Desktop, use the search bar to find
PG Vectorand pull the corresponding image. Look forpgvector/pgvectoror similar official images. -
Run PGVector Container: Navigate to the ‘Images’ tab, locate the
PG Vectorimage, and click ‘Run’. Just like we did for n8n. -
Configure Container Settings: In the ‘Optional settings’ dialog, pay close attention here:
- Name: Assign a name (e.g.,
n8n_Postgres). This helps keep things organized. - Host Port: Set to
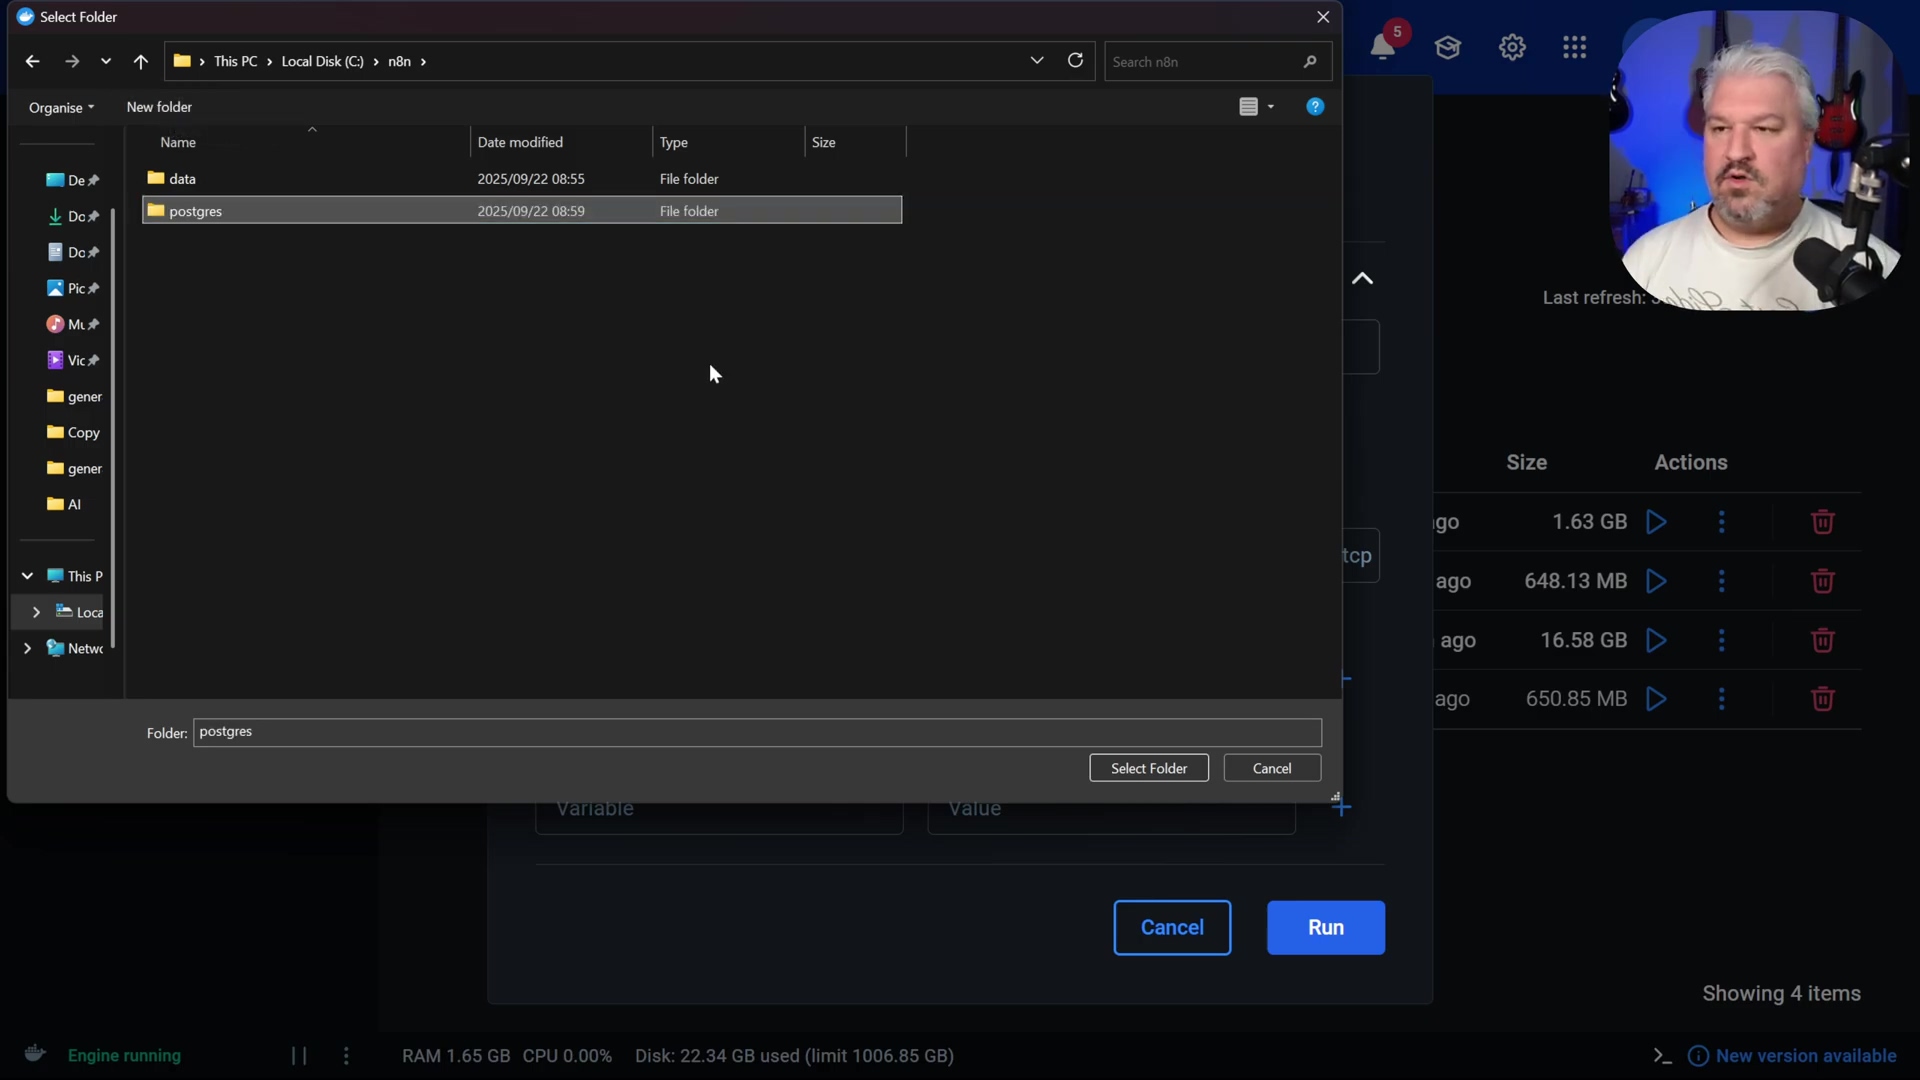
5432(standard PostgreSQL port). Again, ensure this port isn’t already in use on your machine. - Volumes: Map a local folder (e.g., a new folder named
Postgreswithin yourn8ndirectory) to the container path/var/lib/postgresql/data. This is critical! Just like with n8n, this ensures your database’s data persists even if the container is stopped or removed. The file explorer dialog allows selecting a local folder like ‘postgres’ within the ‘n8n’ directory.
- Environment Variables: Add the following environmental variables. These are like the initial setup instructions for your database:
POSTGRES_USER:postgres(or a custom username). For simplicity,postgresis fine for local testing.POSTGRES_PASSWORD:postgres(or a strong custom password). For anything beyond local testing, please, please use a strong, unique password!POSTGRES_DB:n8n(or a custom database name). This is the name of the database n8n will connect to.
- Name: Assign a name (e.g.,
-
Execute Run: Click ‘Run’ to start the PostgreSQL container. Give it a moment to boot up.
Verification: On the ‘Containers’ tab in Docker Desktop, confirm that your n8n_Postgres container is running and listening on port 5432. If it’s green and happy, you’re on the right track!
Connect n8n to PostgreSQL for Memory Management
With PostgreSQL running, configure n8n to use it as a persistent memory store for AI agent conversations. This is where we finally give our AI a proper, long-term memory!
- Remove Simple Memory: If currently using ‘Simple Memory’, remove that node from the ‘AI Agent’s ‘Memory’ input. We’re upgrading!
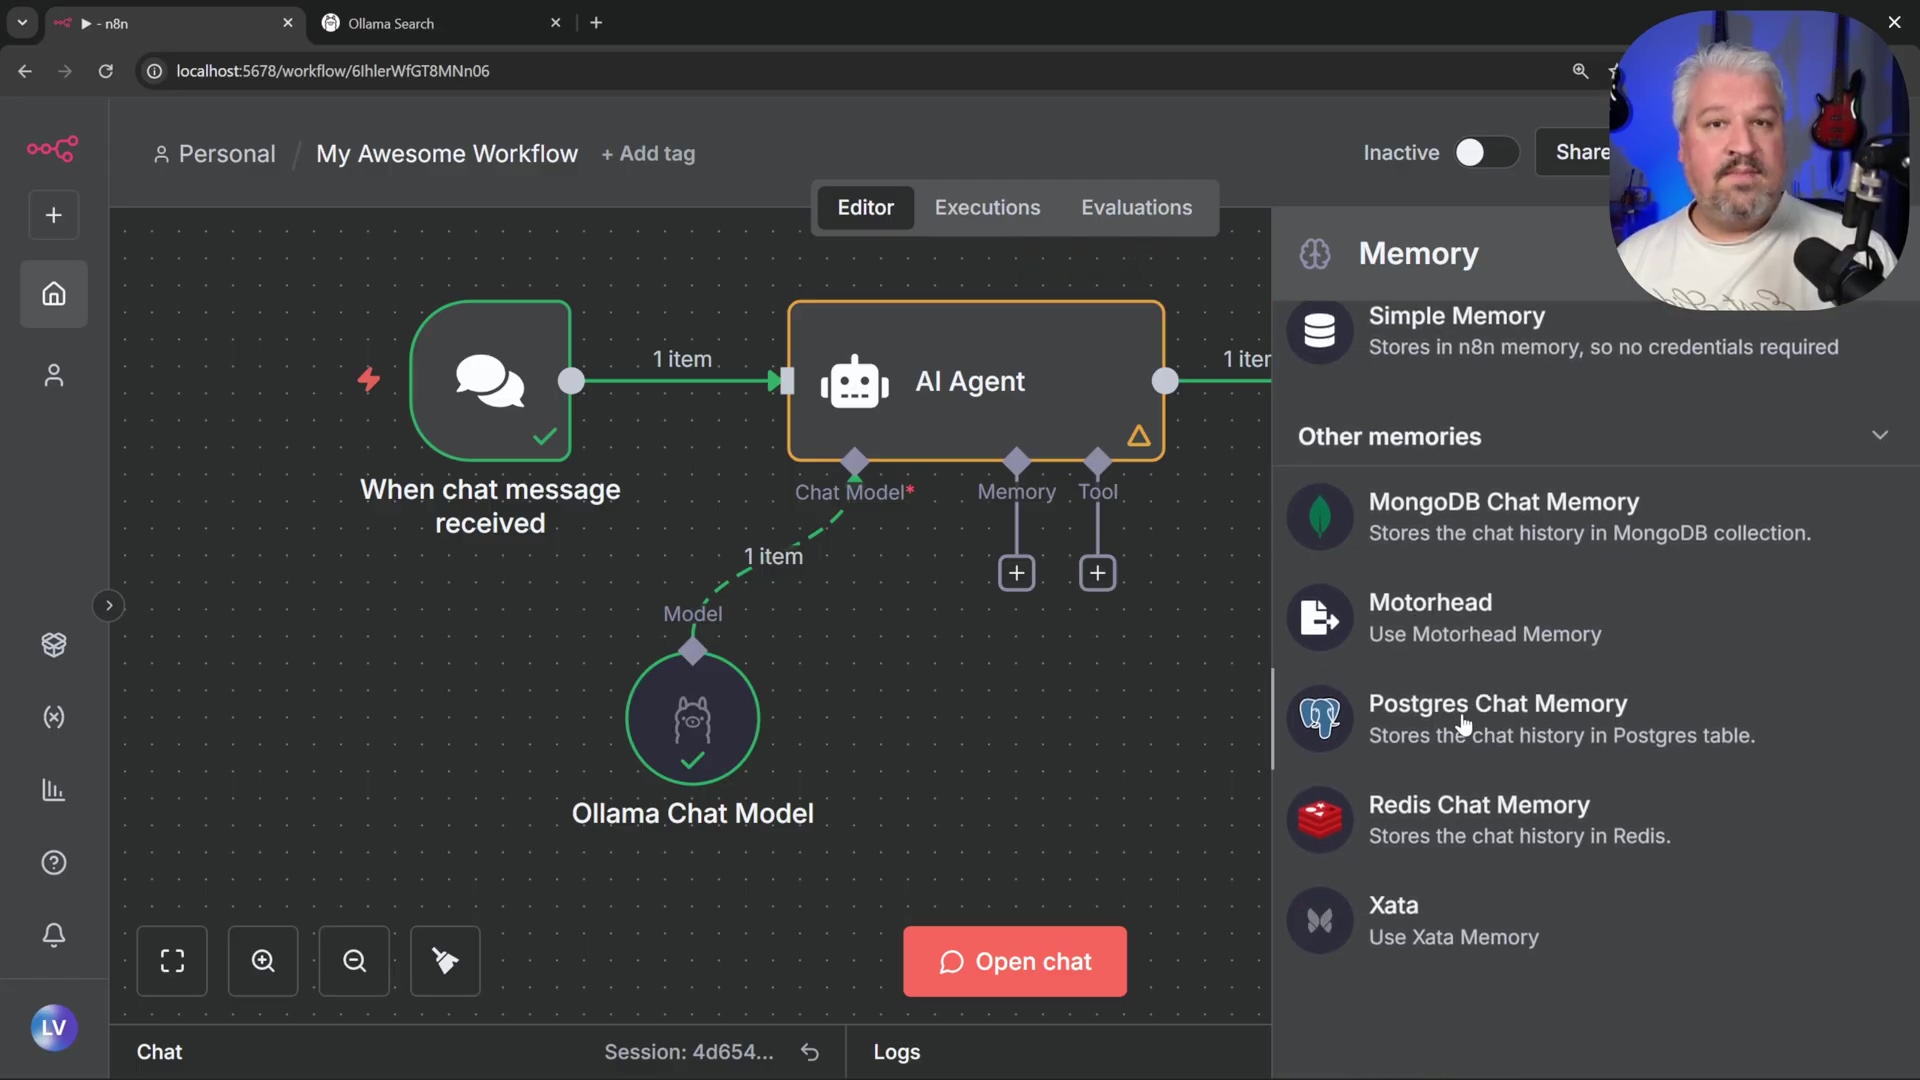
- Add Postgres Chat Memory: Click on the ‘Memory’ input of the ‘AI Agent’ node and select ‘Postgres Chat Memory’. The n8n interface displays various chat memory storage options.
-
Create New Credential: Under ‘Credentials’, click ‘Create New Credential’.
-
Configure PostgreSQL Credentials: Provide the following details. These are the login details for your database:
- Host:
host.docker.internal(allows n8n container to reach host-running PostgreSQL). Remember why we use this? Because n8n is in a Docker container, andhost.docker.internalpoints to your actual machine where Postgres is running. - Database:
n8n(the database name set in environment variables). - User:
postgres(corresponding toPOSTGRES_USER). - Password:
postgres(corresponding toPOSTGRES_PASSWORD). These settings are configured in the Postgres account pop-up window.
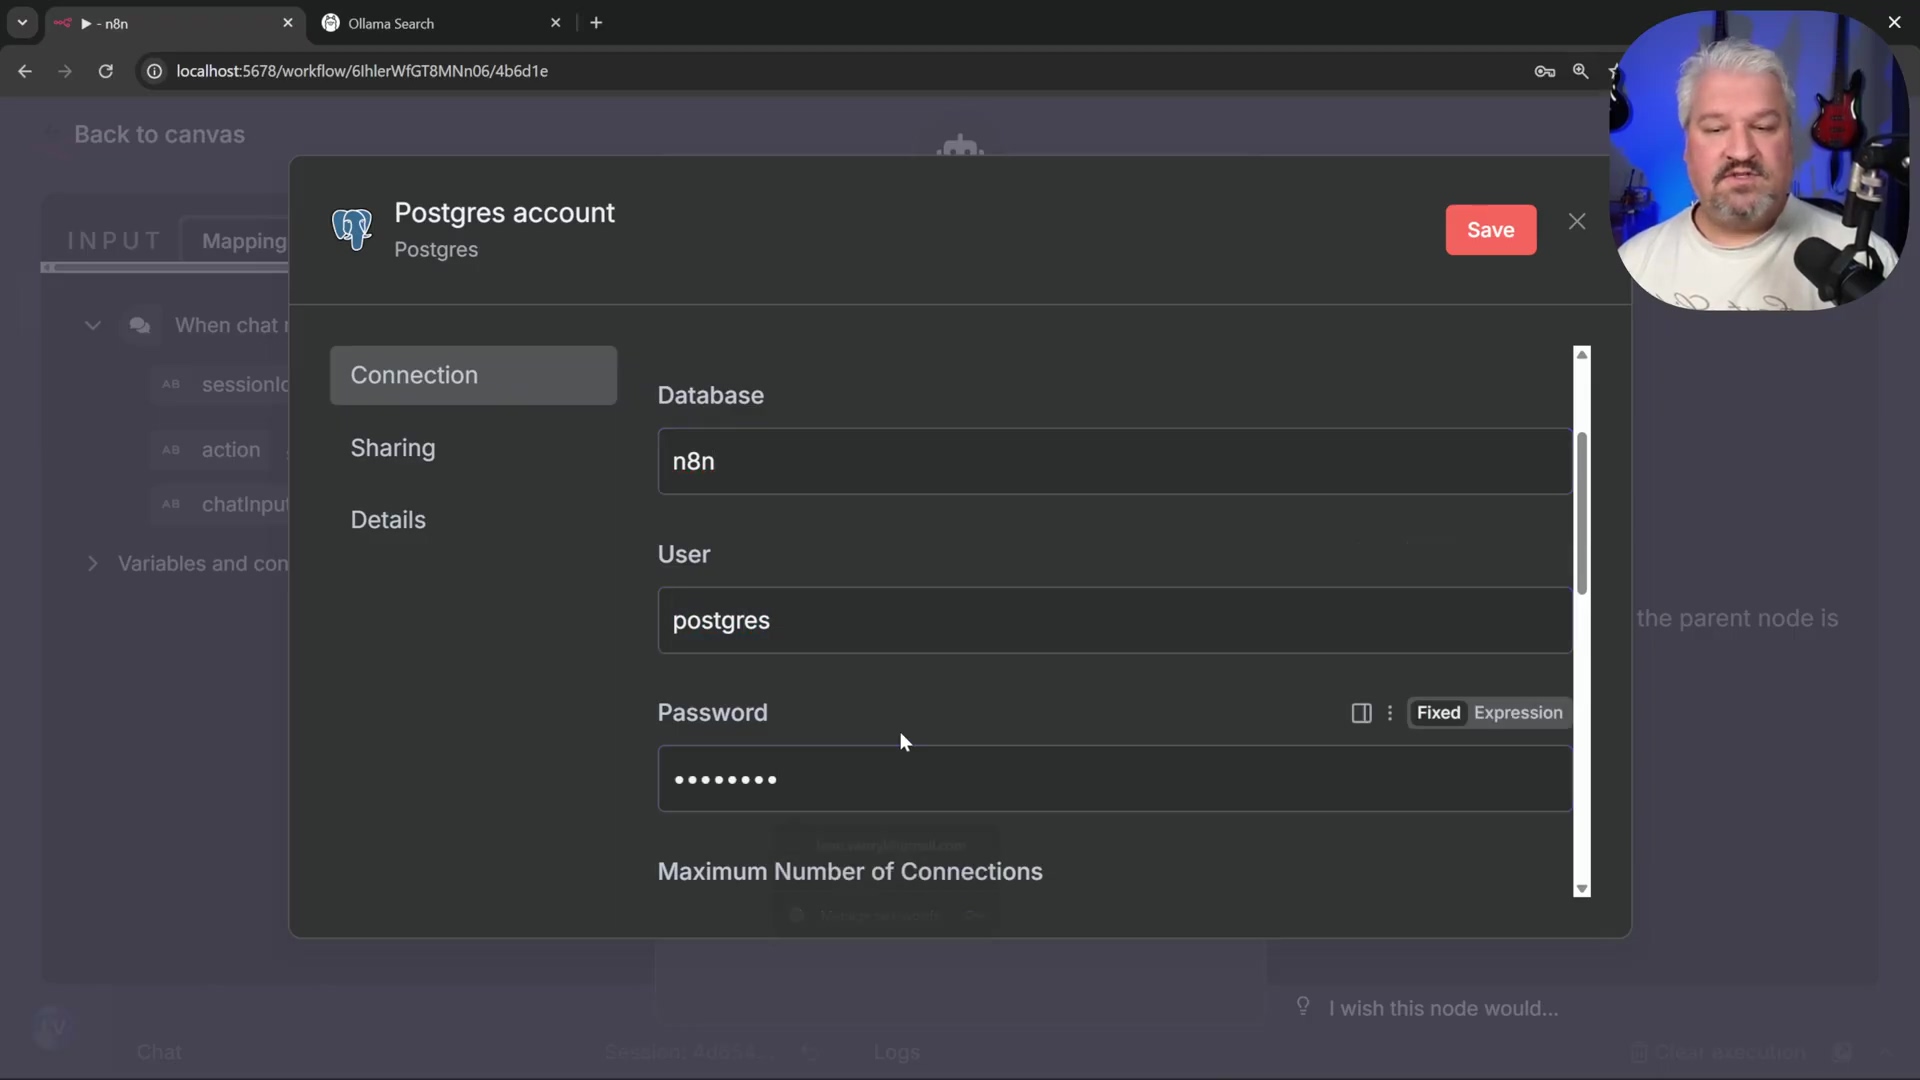
- Port:
5432.
- Host:
-
Test and Save: Click ‘Test Connection’. Upon success, save the credential. This verifies n8n can talk to your database.
-
Adjust Message Length: Optionally, increase the ‘Amount of Messages to Remember’ (e.g., to 20) within the ‘Postgres Chat Memory’ node. Now it can remember even more!
-
Rename Node (Optional): Rename the memory node to ‘Memory’ for clarity. Good practice, as always.
Verification: Initiate a new chat session in n8n and interact with the AI agent (e.g., “My dog’s name is Ruby”). Observe the logs showing messages being stored in the database. Restart both the n8n and PostgreSQL Docker containers. Re-engage the AI agent and ask a question requiring memory recall. If the agent remembers past interactions, persistent memory is successfully configured. If it remembers Ruby’s name after a restart, you’ve done it!
Integrating a Custom Knowledge Base with PGVector
PostgreSQL with PGVector can also serve as a powerful custom knowledge base, allowing your AI agent to answer questions from specific documents. This is like giving your AI a personal library of information!
-
Google Drive Trigger: Add a ‘Google Drive Trigger’ node configured to ‘On changes involving a specific folder’ (e.g.,
invoices). The n8n workflow editor displays Google Drive integration options, including triggers. This means your AI can automatically ingest new documents you add to Google Drive.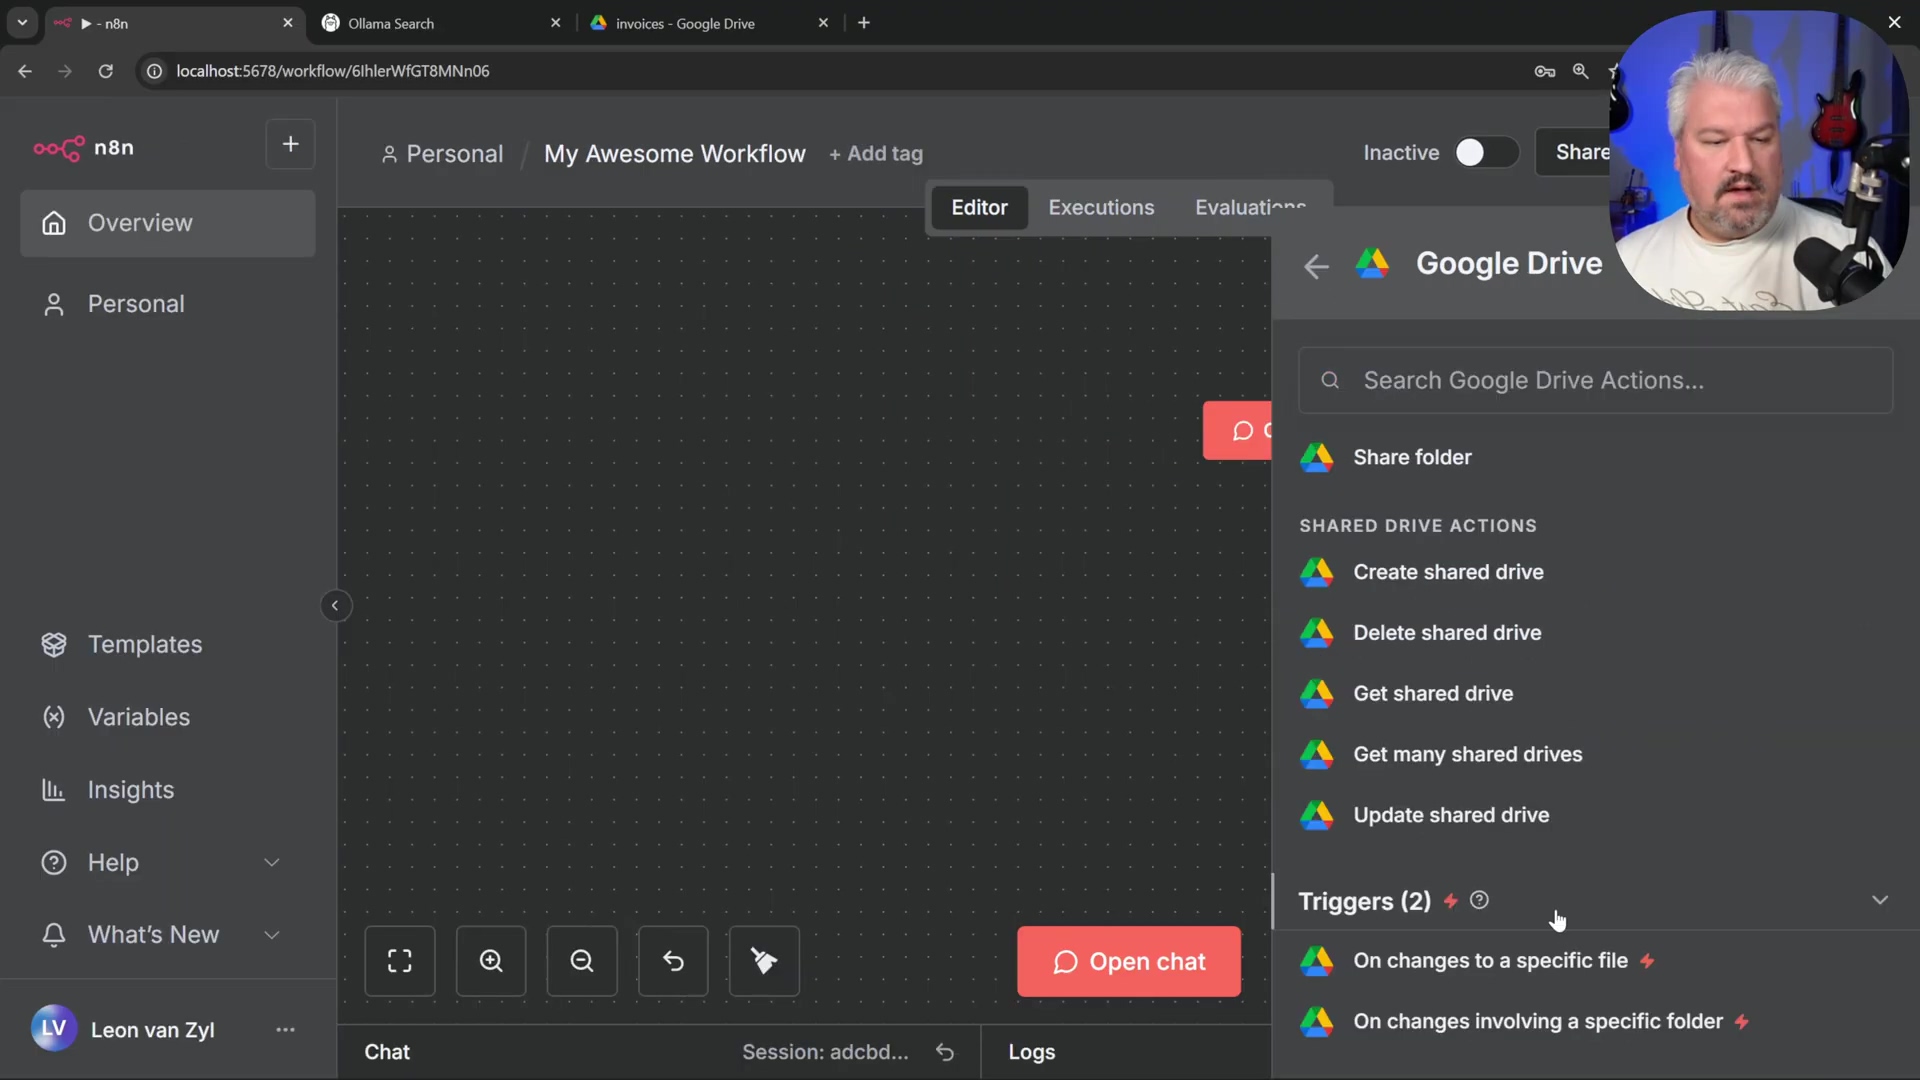
- Credential Setup: This requires setting up OAuth credentials in Google Cloud, involving creating a new project, enabling the Google Drive API, configuring the OAuth consent screen, and generating a client ID and secret. Don’t worry, we’ll cover Google Cloud setup in the next section!
-
Download File Node: Connect a ‘Google Drive Download File’ node to the trigger. Configure it to download the file by ID from the previous node’s output. This pulls the document into your workflow.
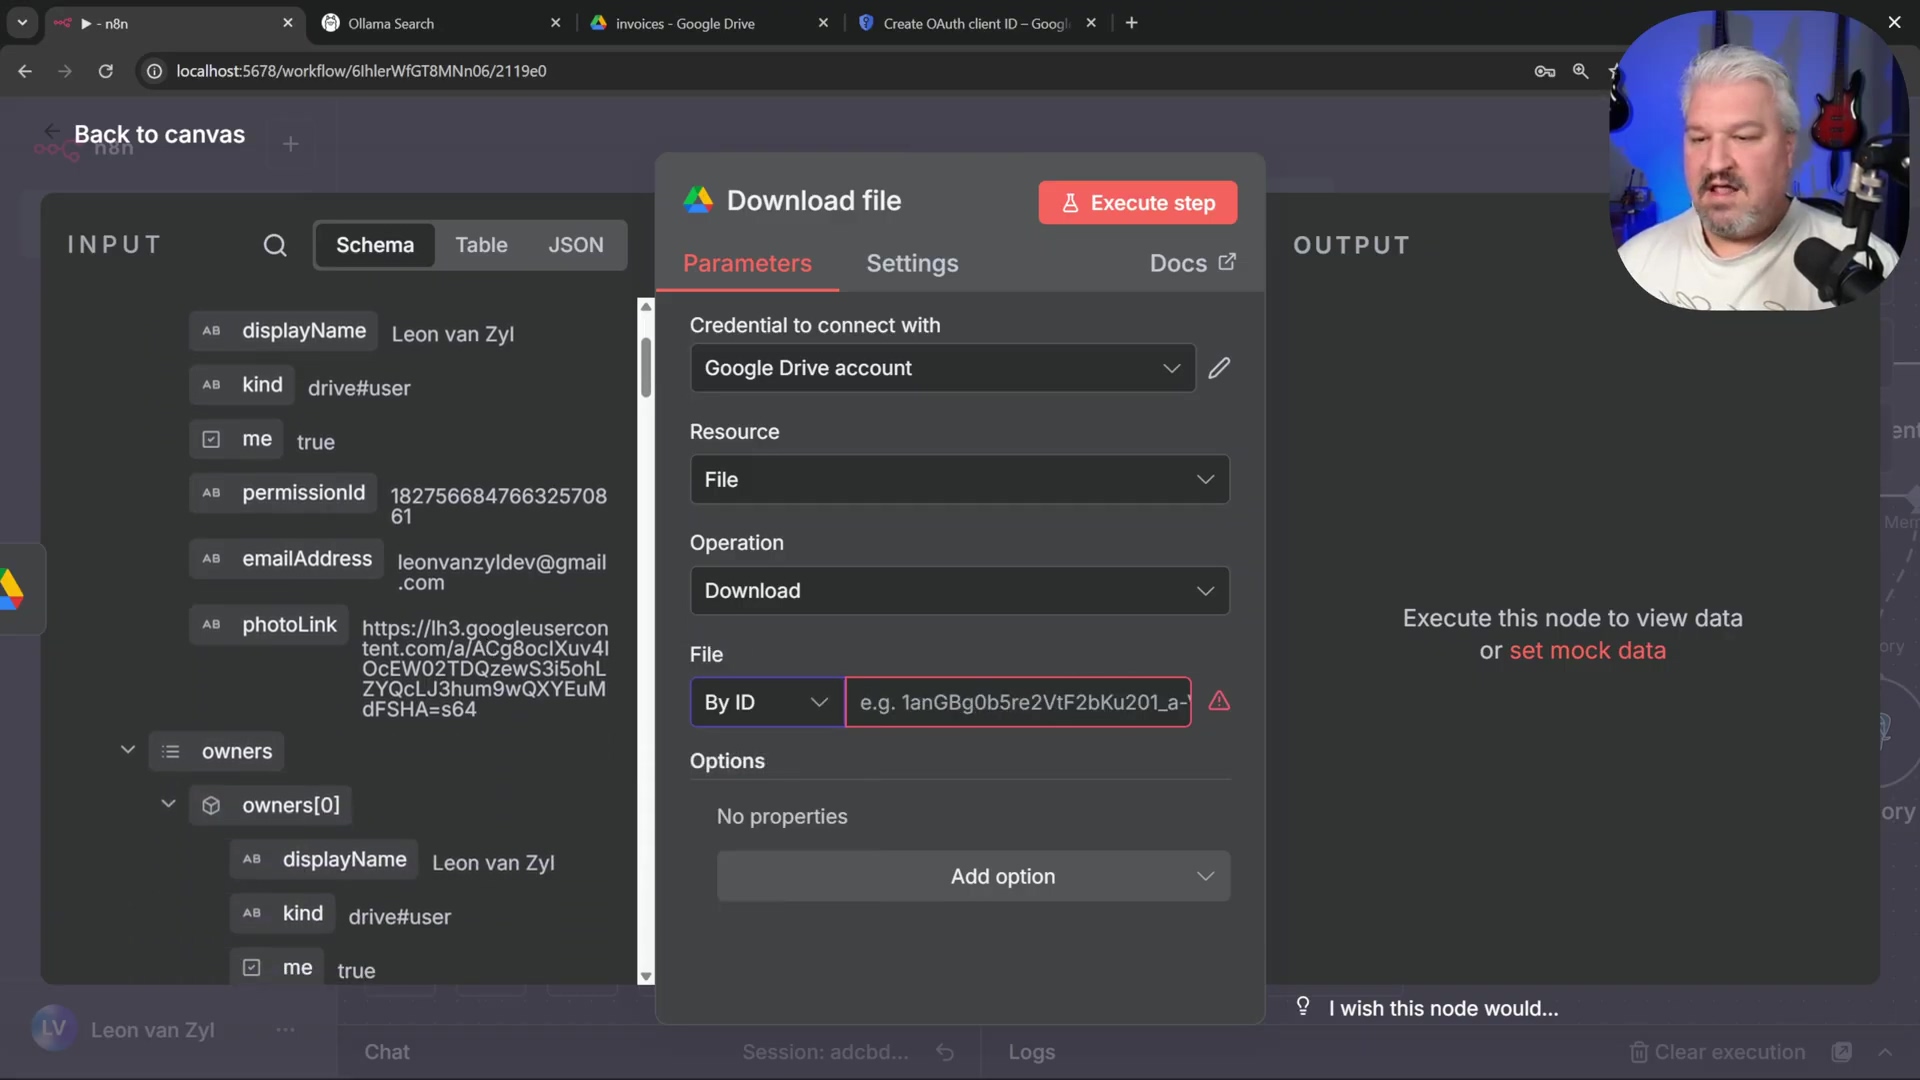
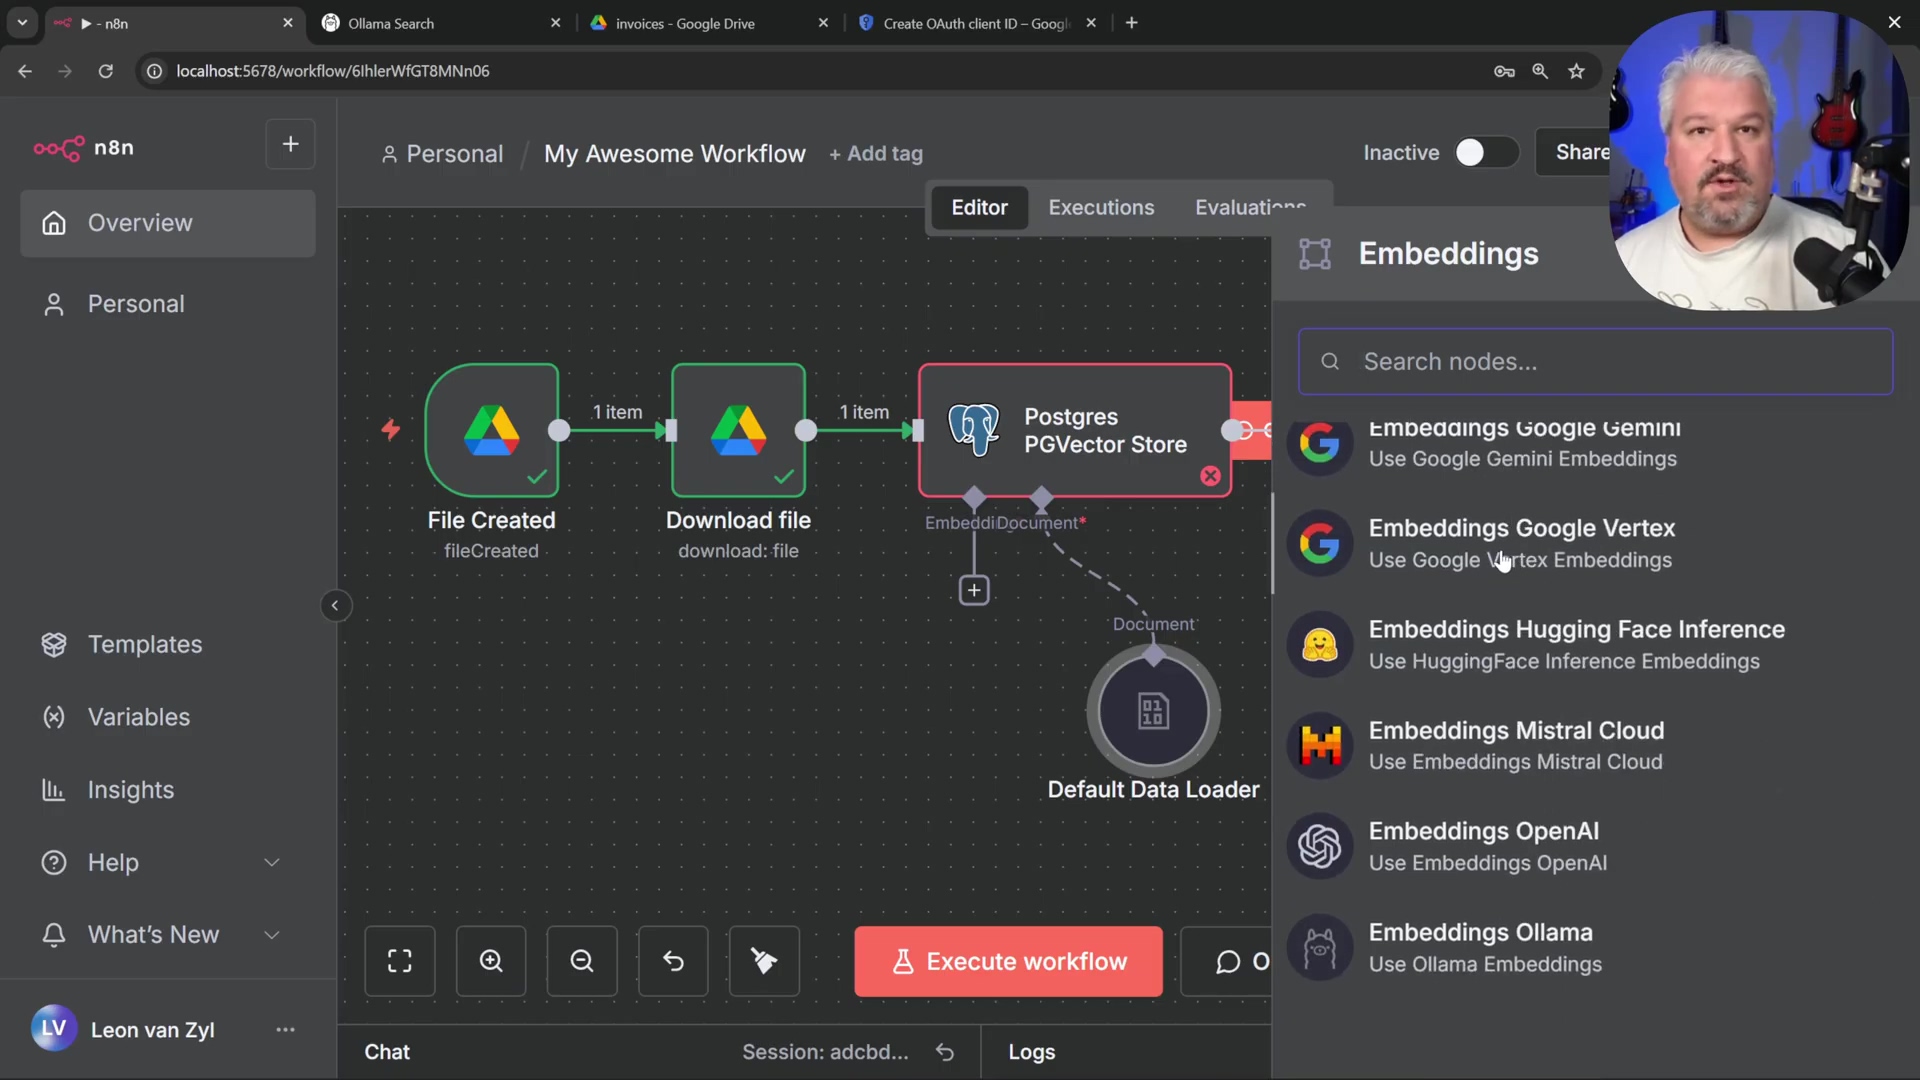
- PGVector Store Node: Add a ‘Postgres PG Vector Store’ node. Select ‘Add documents to vector store’ and use the same PostgreSQL credential. This is where the document gets processed and stored in your smart database.
- Document Loader: Connect a ‘Default Data Loader’ node set to ‘Binary’ data type, linked to the output of the ‘Download File’ node. This prepares the document for embedding.
- Embedding Function: Add an ‘Embeddings Ollama’ node. Download the
nomic-embed-textmodel via Ollama (ollama run nomic-embed-text) and select it in the embedding node. The n8n workflow interface shows embedding options from a menu. This model turns your document text into numerical vectors, which PGVector can understand and search efficiently.
Verification: Upload a document to your specified Google Drive folder. Execute the workflow. The document will be downloaded, embedded, and stored in your PostgreSQL knowledge base. You can then configure your ‘AI Agent’ to use this PGVector store as a tool to answer questions based on the stored documents. The n8n chat interface shows interaction with the AI workflow. Now your AI can answer questions based on your documents!
Exposing n8n Publicly with Ngrok for External Access
To integrate your local n8n instance with external services like WhatsApp or Telegram, it must be accessible via a public URL. Ngrok provides a secure and straightforward way to expose your locally running n8n to the internet, creating a temporary public endpoint without requiring complex network configurations. Think of Ngrok as a temporary wormhole that connects your local machine to the vastness of the internet!
Install and Authenticate Ngrok
Ngrok acts as a tunnel, allowing external requests to reach your local n8n instance. It’s like putting a public address on your private home.
- Sign Up for Ngrok: Create an account on the official Ngrok website (
ngrok.com). It’s quick and free for basic usage. - Download Ngrok: From your Ngrok dashboard, download the Ngrok client tailored for your operating system. It’s a small executable file.
- Authenticate Ngrok: Copy the authentication command provided in your Ngrok dashboard (e.g.,
ngrok authtoken <YOUR_AUTH_TOKEN>) and run it in your command prompt or terminal. This links your local Ngrok client to your Ngrok account. The Ngrok dashboard displays setup instructions and features.
Verification: A message confirming successful authentication will display in your terminal. You’ll see something like “Authtoken saved to configuration file.” This means Ngrok is ready to go!
Expose n8n via Ngrok
Once authenticated, you can create a public tunnel to your n8n instance. This is the moment your local n8n goes live!
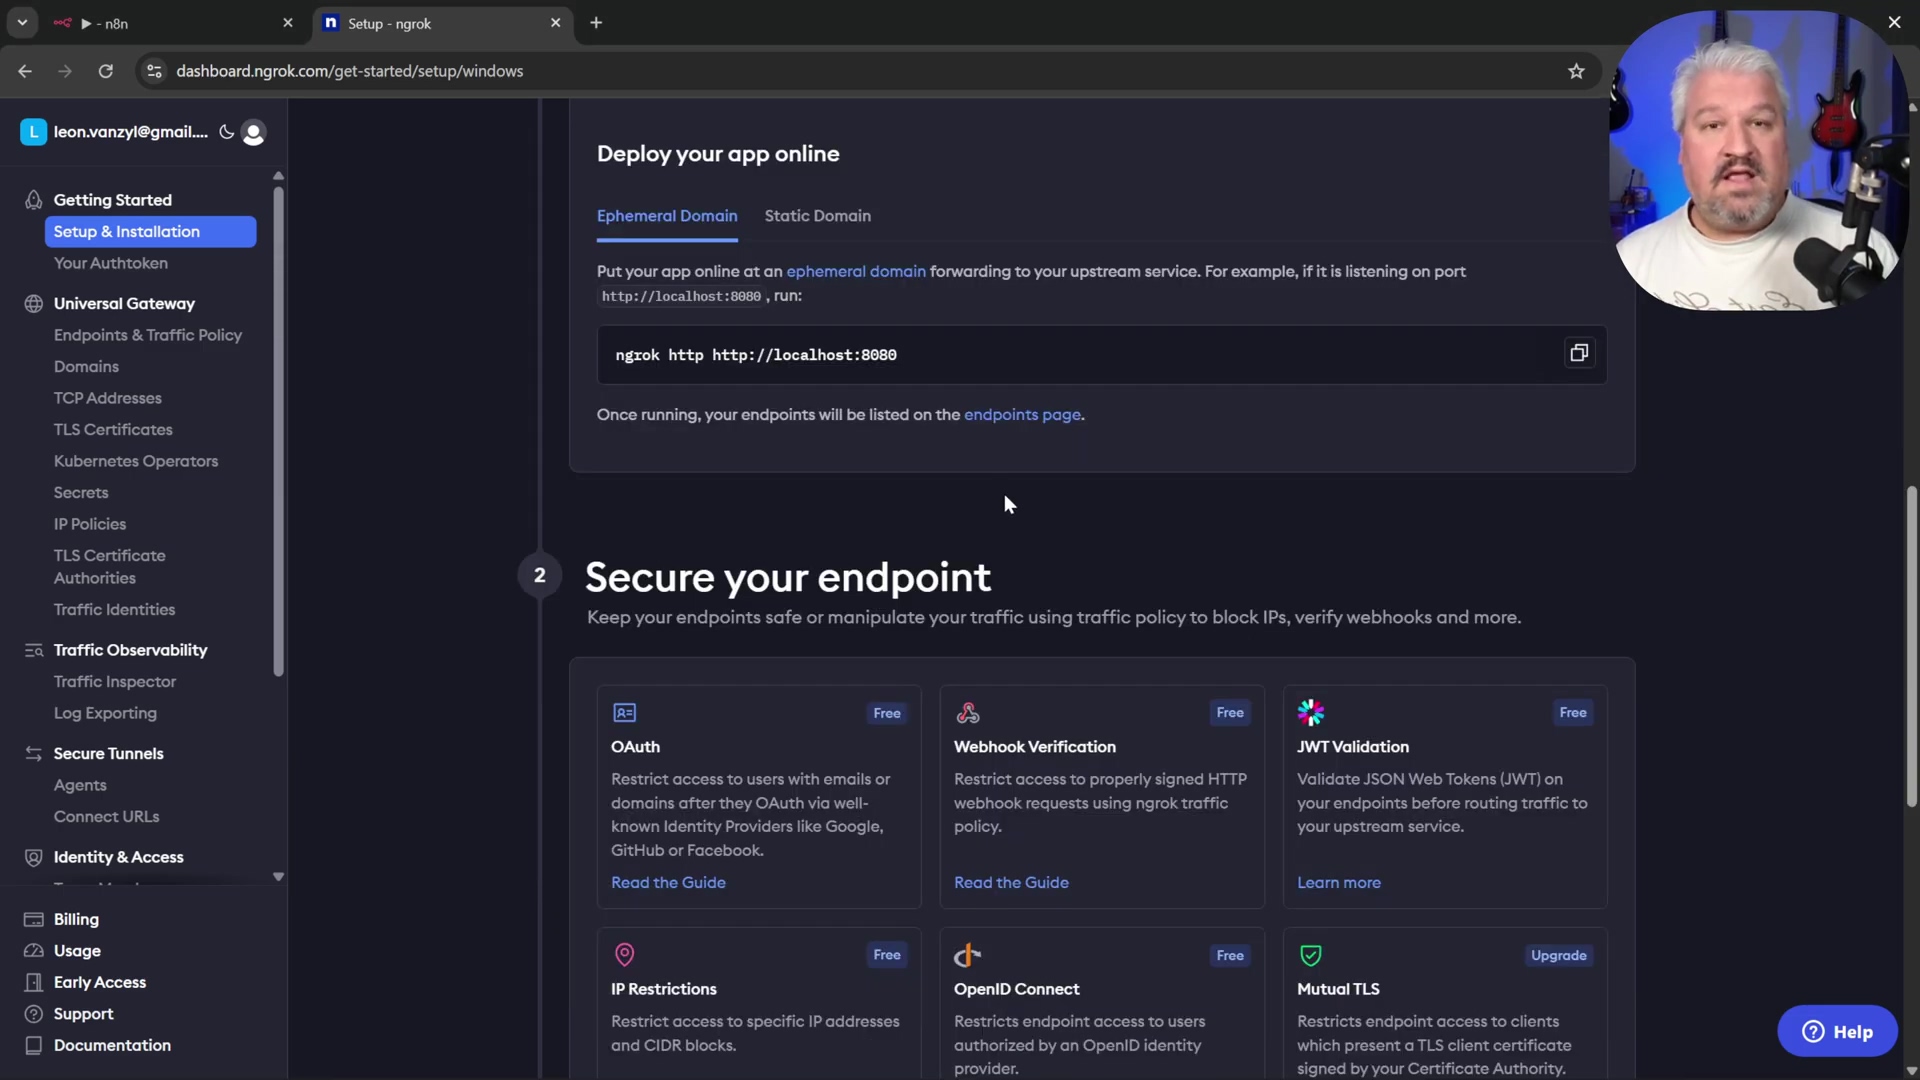
- Expose n8n Port: In your command prompt or terminal, execute the command
ngrok http 5678. Replace5678with the actual host port your n8n Docker container is running on. This tells Ngrok to create a tunnel to that specific port on your machine. The Docker Desktop and Ngrok command prompt show the Ngrok forwarding URL.
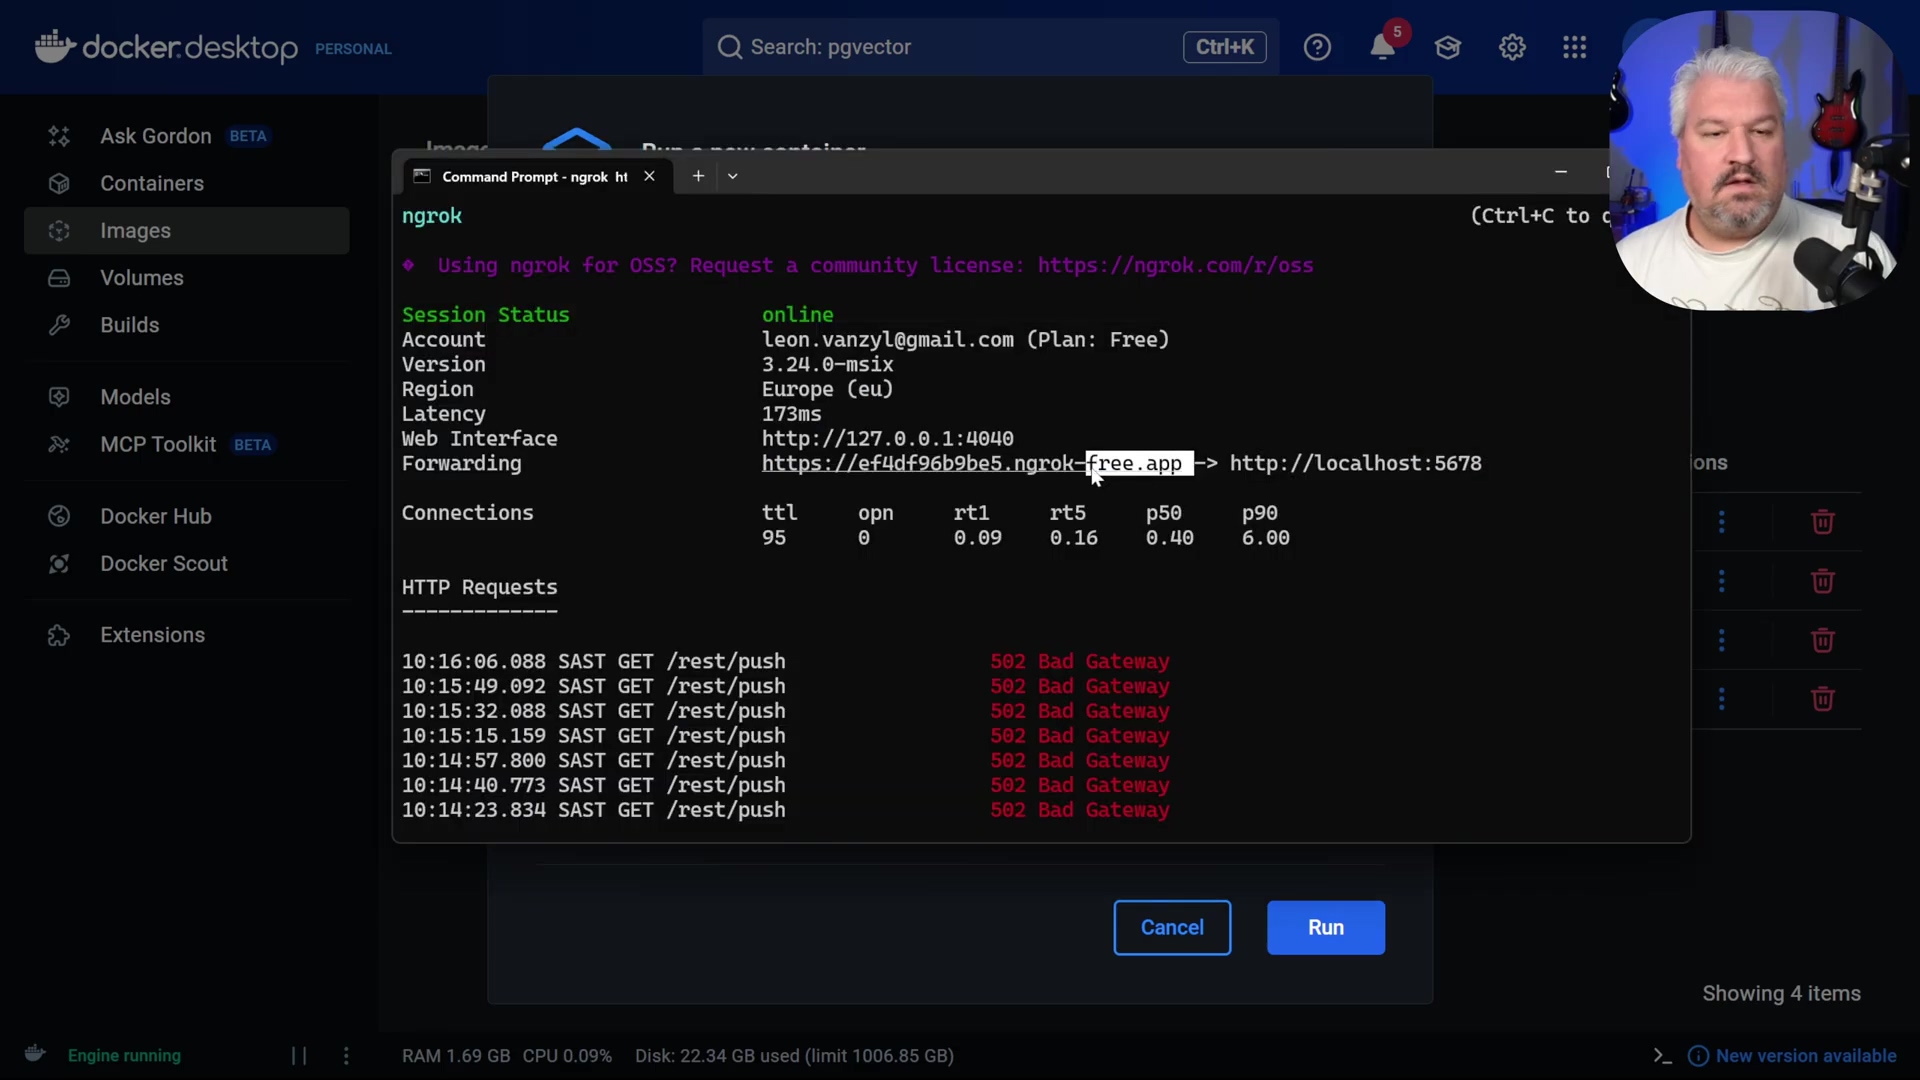
Verification: Ngrok will generate a public URL (e.g., https://<random_subdomain>.ngrok-free.app). Open this URL in your browser. You might see a warning page; click ‘Visit Site’ to proceed. You should then see your n8n login screen, confirming public access. If you see your n8n login, you’ve successfully punched a hole through the internet!
Configure n8n for Public Webhooks
While Ngrok exposes n8n, n8n itself needs to be aware of its public-facing URL for correct webhook behavior. This is like telling n8n, “Hey, you’re not just localhost anymore, you’re famous!”
- Stop n8n Instance: In Docker Desktop, stop your running n8n container. We need to restart it with a new setting.
- Create New n8n Instance (or Edit Existing): From the Docker ‘Images’ tab, run the n8n image again, or edit your existing n8n container. Editing is usually easier if you want to keep your volume mappings.
- Configure Environment Variable: In the ‘Environment variables’ section, add a new variable:
- Name:
WEBHOOK_URL - Value: Enter the public Ngrok URL you obtained in the previous step (e.g.,
https://<random_subdomain>.ngrok-free.app). This tells n8n what its public address is, so it can generate correct webhook URLs for external services.
- Name:
- Restart n8n: Start (or restart) the n8n Docker container with the new environment variable. Give it a moment to apply the changes.
Verification: After n8n restarts, refresh your n8n web interface. Open a ‘Chat Message’ node and toggle the ‘Make publicly available’ option. The generated webhook URL should now reflect your Ngrok public URL instead of localhost. This setup allows external services to interact with your n8n workflows through secure and publicly accessible endpoints. Now your n8n can truly talk to the outside world!
Advanced Integrations: Google Cloud and OAuth Clients
Integrating n8n with Google services requires careful configuration of OAuth clients within the Google Cloud Platform. This process secures access to powerful APIs like Google Drive, Gmail, or even Google’s AI models, ensuring that your n8n workflows can interact with these services on behalf of users. Think of OAuth as the secure handshake that allows n8n to politely ask Google for permission to do things.
Setting Up a Google Cloud Project
Every integration begins with a Google Cloud Project, which acts as a container for your application’s resources and API access management. It’s like creating a dedicated workspace for your n8n’s Google-related tasks.
- Access Google Cloud Console: Navigate to
cloud.google.comand sign in with your Google account. You’ll need a Google account for this, of course. - Create New Project: From the top navigation bar, click on ‘Select a project’ (or the project name if one is selected), then click ‘New Project’. The Google Cloud console shows the ‘New Project’ panel for project creation.
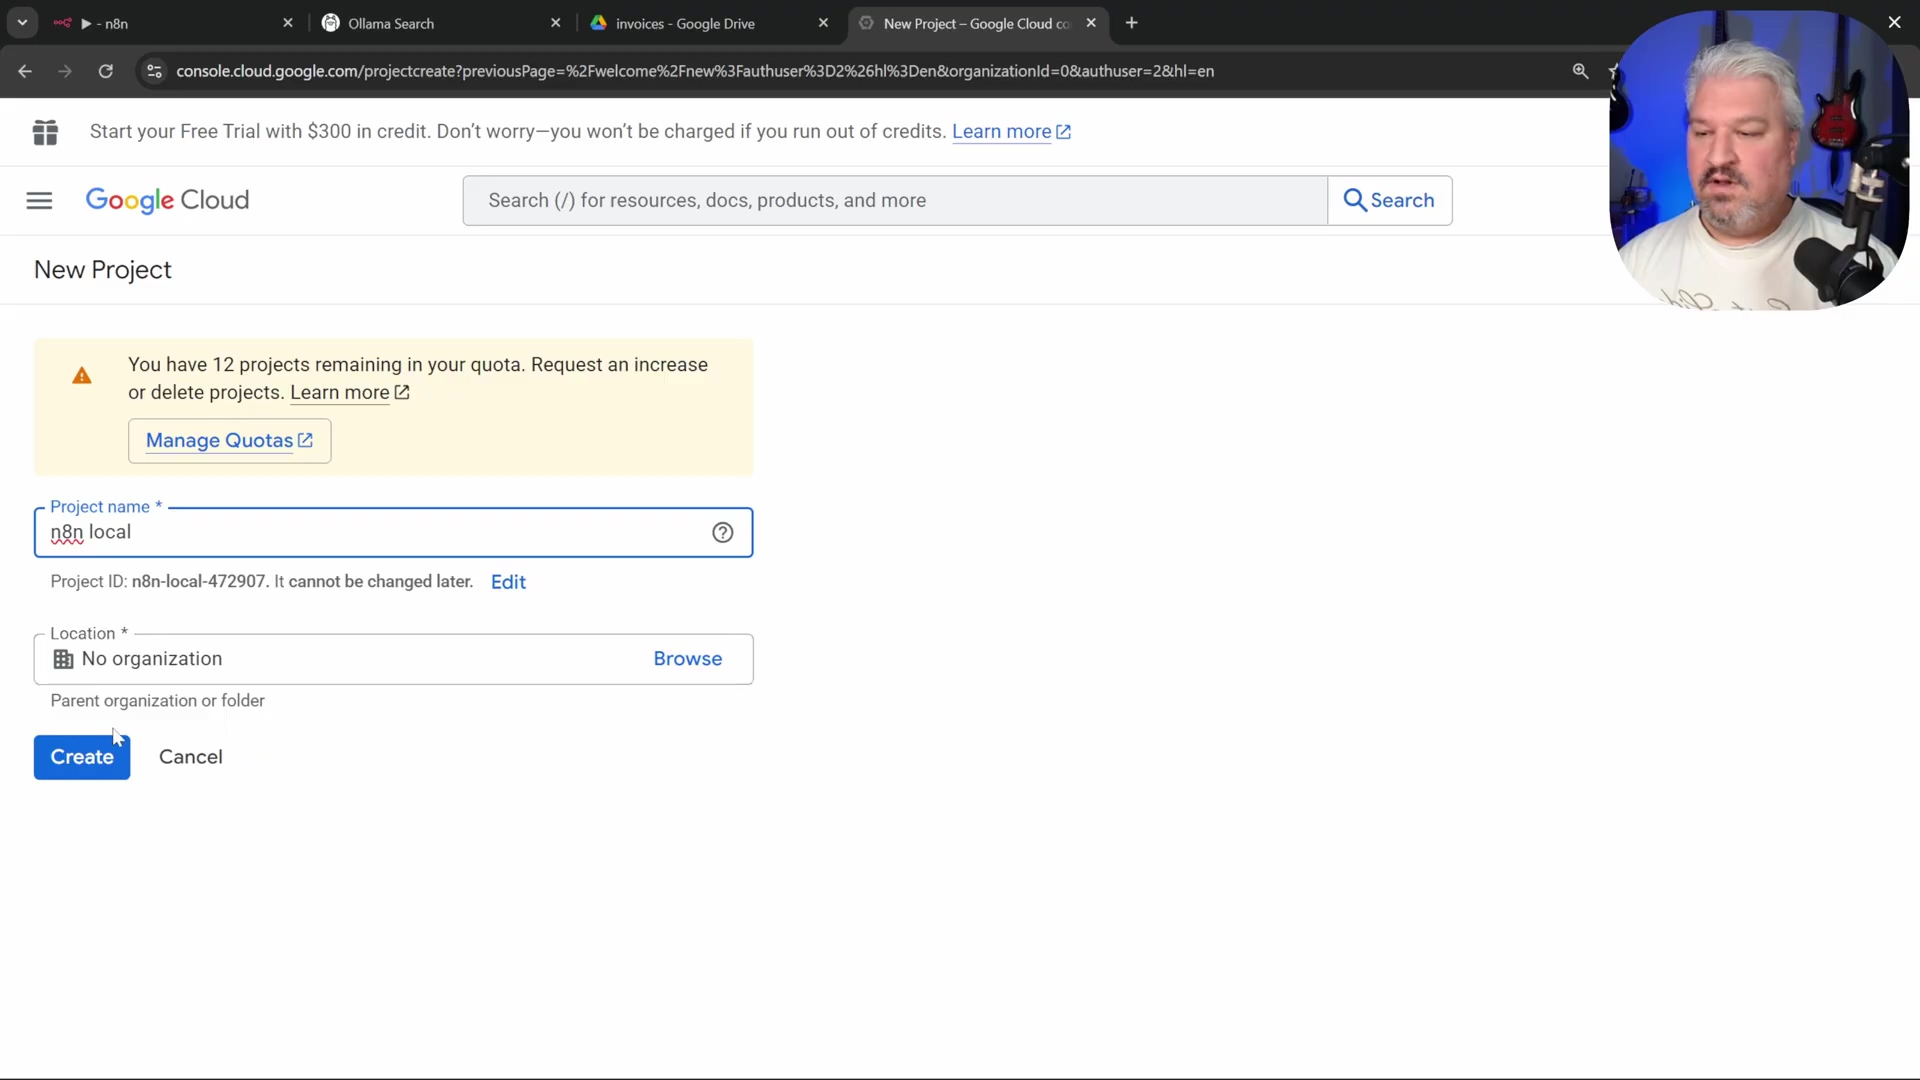
- Name Project: Assign a meaningful name (e.g.,
n8n Local) and click ‘Create’. Choose something descriptive so you know what it’s for. - Select Project: Once created, ensure your new project is selected in the project selector. This makes sure all subsequent actions happen within this project.
Verification: The Google Cloud Console dashboard will display your newly created project’s name, indicating it is active. You’ll see your project name at the top of the console.
Enabling Google APIs
To utilize Google services within n8n, you must explicitly enable the relevant APIs within your Google Cloud project. Think of APIs as specific tools or services that Google offers, and you need to tell your project which ones you want to use.
- Navigate to APIs & Services: In the Google Cloud Console, go to ‘Navigation Menu’ > ‘APIs & Services’ > ‘Library’. This is where you can browse and enable all of Google’s services.
- Search for API: Search for the desired API (e.g.,
Google Drive APIfor file management,Gmail APIfor email). Just type what you’re looking for. - Enable API: Click on the API from the search results and then click the ‘Enable’ button. This activates the service for your project.
Verification: The API will show an ‘API Enabled’ status, and it will appear under ‘Enabled APIs & Services’ in your project dashboard. A green checkmark usually means success!
Configuring OAuth Consent Screen
The OAuth consent screen is what users see when they grant your application permission to access their Google data. This step ensures that your application is compliant with Google’s OAuth policies. It’s the “Are you sure you want to let this app do X, Y, and Z?” screen.
- Go to OAuth Consent Screen: From ‘APIs & Services’, select ‘OAuth Consent Screen’. This is where you customize that permission request.
- User Type: Select ‘External’ (unless your n8n instance is only for users within your Google Workspace organization). Click ‘Create’. For most self-hosted setups, ‘External’ is the way to go.
- App Registration: Provide the following details:
- App Name:
n8n Local(or your chosen project name). This is what users will see. - User Support Email: Select your email address. For support inquiries.
- Developer Contact Information: Enter your email address. Again, for contact.
- App Name:
- Save and Publish: Click through the remaining steps, saving your configurations. Ensure you set the ‘Publishing status’ to ‘In production’ to make it publicly accessible. If it’s not in production, only test users can use it.
Verification: The OAuth consent screen will display a summary of your app registration, and its status will be ‘In production’. This means your app is ready to ask for permissions.
Creating OAuth Client ID Credentials
An OAuth client ID is what n8n uses to identify itself to Google’s authentication servers. This is crucial for obtaining user consent and tokens to access protected data. This is the actual ID card your n8n instance will show to Google.
- Go to Credentials: From ‘APIs & Services’, select ‘Credentials’. This is where you manage all your project’s access keys.
- Create Credentials: Click ’+ Create Credentials’ > ‘OAuth client ID’. We’re creating a new ID for our web application.
- Application Type: Select ‘Web application’. Since n8n is a web-based tool.
- Name: Enter
n8n Localfor the client name. Again, a descriptive name helps. - Authorized Redirect URIs: This is critical. In n8n, when configuring a Google service node, copy the provided redirect URI (typically found in the credential setup dialog for the Google node). Paste this URI into the ‘Authorized redirect URIs’ field in Google Cloud. This tells Google where to send the user back after successful authentication. If this doesn’t match exactly, the authentication will fail! The Google Cloud Platform console shows the ‘Create OAuth client ID’ section with Authorized Redirect URIs.
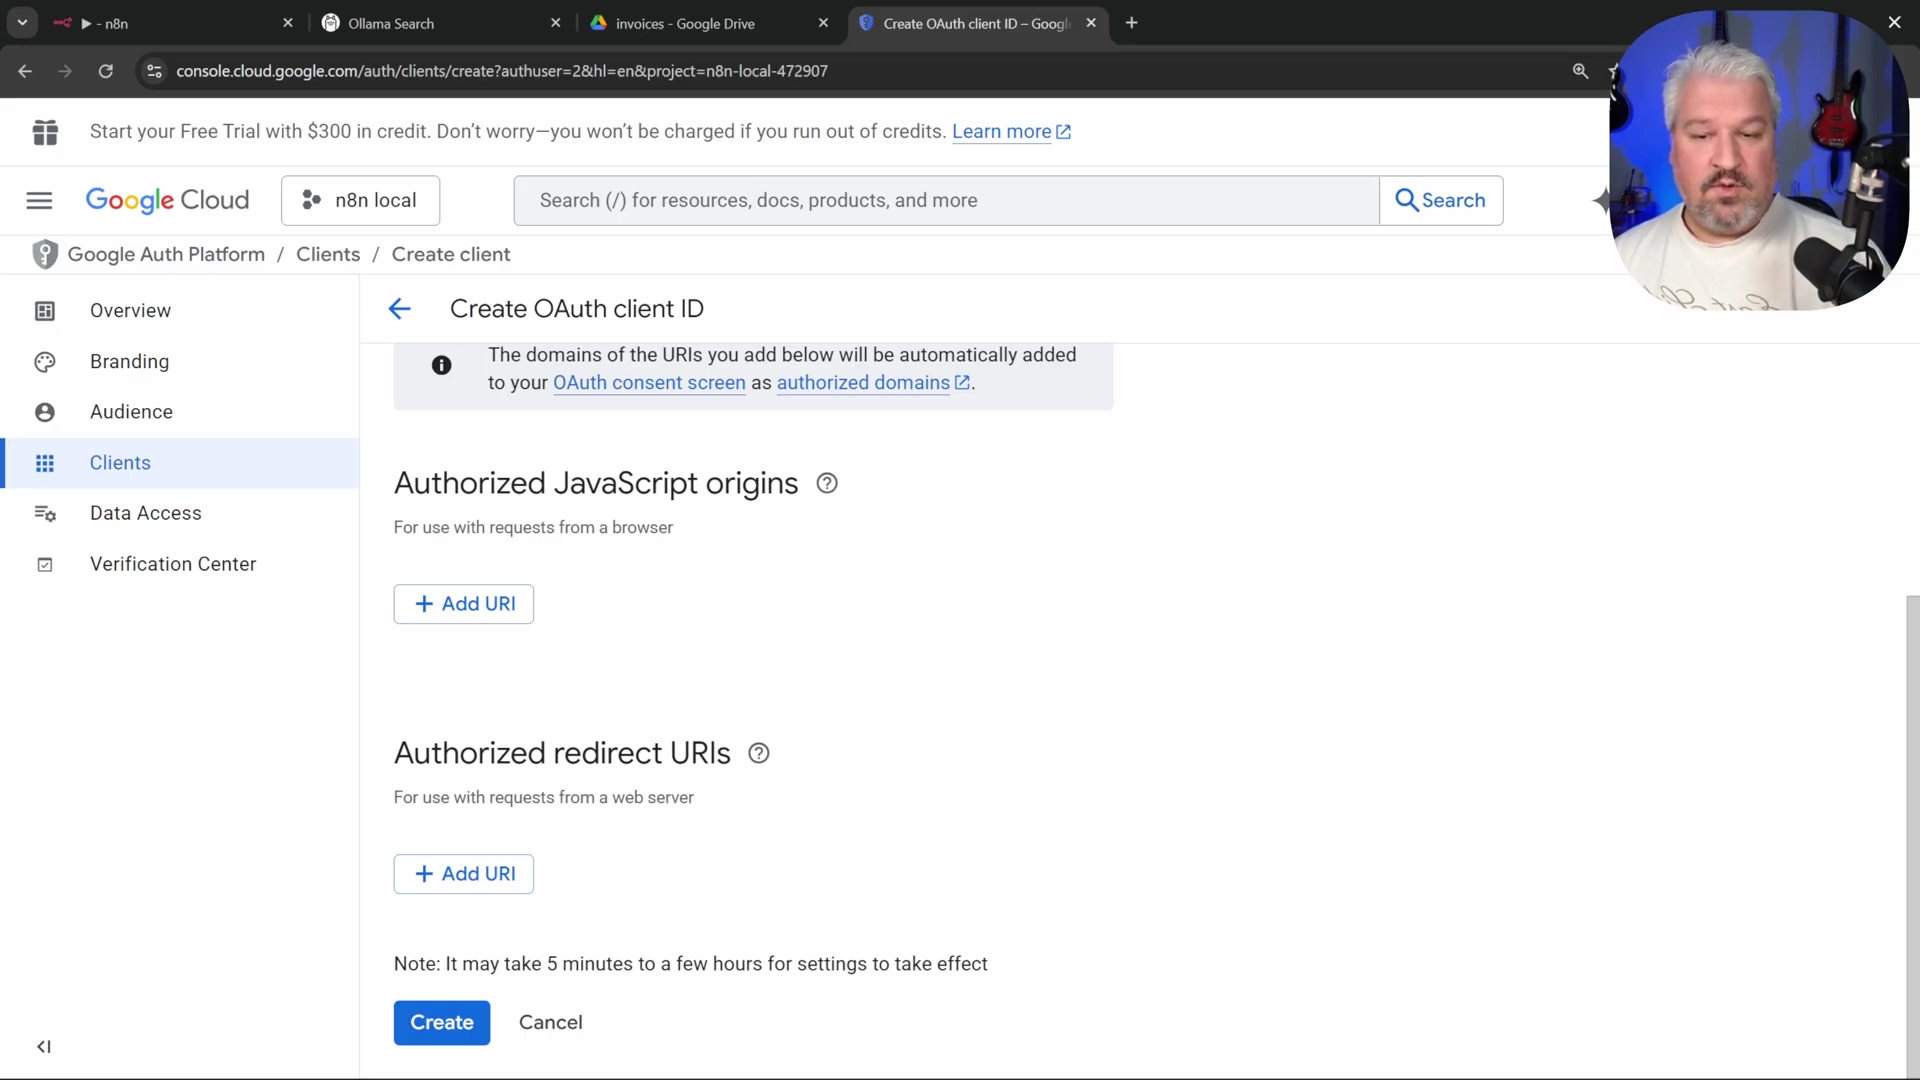
- Create Client: Click ‘Create’.
Verification: A dialog will appear displaying your Client ID and Client Secret. Copy these values. Treat these like passwords – keep them secret! In n8n, when configuring the Google API service credential, paste the Client ID and Client Secret, then click ‘Sign in with Google’ to complete the OAuth flow. Successful connection confirms correct setup. If you can connect, you’ve done it!
Credential Mapping for Google Cloud Integration
| Credential Type | Purpose | Configuration Location/Platform |
|---|---|---|
| Client ID | Identifies your n8n application to Google | Google Cloud Console > Credentials > OAuth Client ID |
| Client Secret | Shared secret for secure communication | Google Cloud Console > Credentials > OAuth Client ID |
| Redirect URI | Where Google sends authentication responses | n8n Credential setup & Google Cloud Console |
| OAuth Consent Screen | User-facing permission request for data access | Google Cloud Console > OAuth Consent Screen |
| API Keys | Public API access (less common for user data) | Google Cloud Console > Credentials |
Best Practices for Free n8n Implementations
Optimizing a free n8n setup involves careful planning and execution to ensure efficiency, security, and sustainability. While the free tier offers immense flexibility, adherence to best practices prevents common pitfalls and maximizes the value derived from your self-hosted instance, especially when integrating with AI and databases. Think of these as the golden rules for keeping your automation running smoothly and securely.
Efficient Resource Management
Running n8n, Ollama, and PostgreSQL locally consumes system resources. Efficient management is key to maintaining performance. We don’t want our computer to sound like a jet engine, do we?
- Monitor System Usage: Regularly check CPU, RAM, and disk usage via your operating system’s task manager or Docker Desktop diagnostics. This helps identify bottlenecks. For Windows, use the Task Manager (Ctrl+Shift+Esc); for macOS, use Activity Monitor. Keep an eye on those numbers!
- Allocate Docker Resources: In Docker Desktop settings (
Settings > Resources), configure appropriate CPU, memory, and disk space limits for your containers to prevent them from monopolizing system resources. Adjust based on your workload. Don’t let one container hog all the power! - Ollama Model Selection: Choose smaller Ollama models (e.g., 7B or 13B parameter models) unless your hardware can comfortably handle larger ones. Larger models consume significantly more RAM and VRAM. For example,
llama2:7brequires less memory thanllama2:70b. Start small, upgrade if you have the horsepower. - Workflow Optimization: Design efficient n8n workflows by minimizing unnecessary operations and consolidating nodes where possible. Use batch processing for large data sets to reduce individual execution overhead. Lean workflows are happy workflows!
Security Considerations for Self-Hosted n8n
Exposing n8n to the public Internet, even via Ngrok, introduces security risks. Implement robust measures to protect your instance and data. Security is paramount, even for free setups!
- Strong Passwords: Use unique, complex passwords for your n8n administrator account and all integrated services (e.g., PostgreSQL). Avoid default credentials like
postgres:postgresin production environments. Seriously, don’t usepostgres:postgresanywhere but a quick test! - Ngrok Security: Ngrok provides a temporary public URL. For more persistent and secure access, consider features like Ngrok’s IP whitelisting or using a custom domain with TLS if you move beyond purely experimental setups. For production, you might want something more robust than a temporary tunnel.
- Regular Updates: Keep Docker Desktop, n8n, Ollama, and your operating system updated. Updates often include critical security patches. Check for n8n updates via the Docker image
n8nio/n8n:latest. Staying updated is your best defense. - Backup Data Volumes: Regularly back up your n8n data volume (the local folder mapped to
/home/node/n8n). This prevents data loss from system failures or accidental deletion. Manually copy the contents of the mapped local folder. Don’t learn this lesson the hard way! - Firewall Configuration: Ensure your local firewall is properly configured to allow necessary inbound and outbound connections only. For Docker, specify only the required host ports (e.g.,
5678for n8n,5432for Postgres). Close off any unnecessary doors!
Checklist for a Robust Free n8n Setup
| Aspect | Best Practice | Verification/Action |
|---|---|---|
| Resource Allocation | Set Docker CPU/RAM/Disk limits. | Docker Desktop > Settings > Resources. Adjust sliders based on system capacity. |
| Ollama Model Size | Choose models appropriate for local hardware. | Run ollama list in terminal; monitor RAM/CPU during model inference. |
| n8n Workflow Efficiency | Streamline workflows, avoid redundant nodes. | Use n8n’s execution logs to identify slow steps; refactor and consolidate. |
| Password Security | Strong, unique passwords for n8n and database. | Change default postgres password; enable 2FA for n8n if available. |
| Ngrok Usage | Use WEBHOOK_URL for public facing n8n. | Confirm n8n’s webhook URLs show Ngrok domain, not localhost. |
| Software Updates | Keep all components updated (Docker, n8n, Ollama). | docker pull n8nio/n8n:latest, ollama pull <model>, OS updates. |
| Data Backup | Regularly back up n8n and database volumes. | Copy data folder mapped in Docker volumes (e.g., /your/local/n8n/data). |
| Firewall Rules | Restrict network access to essential ports. | Configure host OS firewall to only allow 5678 and 5432 access. |
Frequently Asked Questions (FAQ)
Navigating the world of free automation with n8n often leads to common questions, especially regarding capabilities, limitations, and troubleshooting. This FAQ addresses key concerns for users leveraging n8n with free AI and database integrations. Let’s tackle some common head-scratchers!
Q: Is n8n completely free to use?
A: Yes, n8n offers a free self-hosted version that you can run on your own machine using Docker. This version includes all core features and is suitable for personal use and small-scale automation. A license key is required, but it is provided free of charge for self-hosted instances. So, yes, you can absolutely use it for free!
Q: What are the hardware requirements for self-hosting n8n with AI models?
A: While n8n itself is relatively light, integrating AI models like Ollama requires significant RAM (at least 8GB, preferably 16GB or more) and a decent CPU, or even a GPU for faster inference. The requirements scale with the size and complexity of the AI models you choose to run. Tiny models (e.g., 1.5B parameters) may run on less powerful machines. Basically, the more powerful your computer, the smoother your AI will run.
Q: Can I run n8n on a cloud Free Tier (e.g., AWS, GCP)?
A: Yes, it’s technically possible, but often restrictive. Free tiers typically offer very limited CPU and RAM, which might struggle to run n8n efficiently, especially with Ollama and PostgreSQL co-located. Managed databases or a dedicated virtual machine might be required, which are often outside the free tier. Manual setup can also be more complex compared to local Docker deployments. My advice? Start locally, then consider paid cloud options if you outgrow your machine.
Q: Why use Ollama over other AI model runners?
A: Ollama provides an exceptionally user-friendly interface for downloading, managing, and running a vast selection of open-source models on your local machine. It generally offers more model choices compared to Docker Desktop’s built-in runners or cloud-based free tiers with usage limits like Groq. It’s just super convenient for local AI!
Q: What happens if my n8n instance or database restarts? Will I lose AI memory?
A: If you’re using ‘Simple Memory’ in n8n, yes, conversational history will be lost on restart. However, by integrating a persistent database like PostgreSQL, the conversation history is stored outside the n8n container, meaning it survives restarts of both n8n and the database container. That’s why we went through all the trouble of setting up Postgres – for that sweet, sweet persistent memory!
Q: How does the free Postgres setup compare to paid database services?
A: For self-hosted scenarios, free Postgres provides full control and no direct cost. It offers enterprise-grade features suitable for most automation tasks. Paid services offer managed infrastructure, automatic backups, scaling, and support. The free tier requires you to manage these aspects yourself. It’s a trade-off: free means more hands-on work, paid means convenience.
Q: Is using Ngrok secure for exposing n8n publicly?
A: Ngrok provides a secure tunnel with TLS encryption, making it safe for temporary public exposure. However, for continuous, production-level public access, consider more robust solutions like a reverse proxy with a custom domain and SSL certificate, or Ngrok’s paid features offering additional security controls. Always use strong authentication for your n8n instance. For quick tests and demos, Ngrok is fantastic, but for mission-critical stuff, you might want to level up your security.
Q: How do I ensure my Google Cloud credentials remain secure within n8n?
A: Google Cloud OAuth credentials (Client ID, Client Secret) should be treated as sensitive information. n8n encrypts these credentials when stored. Additionally, limit the OAuth consent screen’s scope to only the necessary Google APIs (e.g., only Drive, not all Google data) to minimize potential exposure. Regularly review your authorized URIs in Google Cloud. Think of it as giving your app only the keys it absolutely needs, and nothing more.
The Future of Free Automation with n8n
Harnessing the capabilities of n8n with free AI models and databases establishes a powerful, custom automation platform. This approach not only provides significant cost savings but also offers unparalleled flexibility and control over your workflows and data. The journey from setting up Docker to integrating sophisticated AI memory systems highlights the potential for anyone to build intelligent, autonomous systems. You’ve just built your own digital assistant, and the possibilities are endless!
Key Takeaways from Free n8n Automation
- Empowerment: Self-hosting n8n with free tools democratizes advanced automation and AI capabilities. You’re in control!
- Flexibility & Control: Full ownership over your automation processes, data, and infrastructure allows for deep customization. Build it exactly how you want it.
- Cost Efficiency: Eliminates recurring costs, making sophisticated automation accessible to individuals and small businesses operating on tight budgets. Smart automation doesn’t have to be expensive.
- Skill Development: Provides a rich learning environment for understanding Docker, n8n workflows, AI integration, and database management. You’ve learned a ton already, and there’s more to explore!
Future Possibilities and Next Steps
The foundation you’ve built with this free n8n setup opens doors to a multitude of advanced automation scenarios. Further exploration can expand your system’s intelligence and reach. What’s next on your automation journey?
- Explore More AI Models: Experiment with other large language models on Ollama, such as CodeLlama for code generation or Vision models for image analysis. These can enhance diverse automation tasks. The world of open-source AI is vast and exciting!
- Integrate More Tools: Leverage n8n’s extensive library of integrations to connect with other free services or local applications, such as local file system monitoring, advanced web scraping, or custom API endpoints. n8n connects to everything!
- Enhance Knowledge Base: Expand your PostgreSQL knowledge base with more diverse data sources. Consider automated ingestion of web pages, RSS feeds, or local document repositories to enrich your AI agent’s understanding. The more data, the smarter your AI.
- Community Engagement: Join the n8n community forums or Discord channels. Share your workflows, learn from others, and contribute to the collective knowledge base for more innovative solutions. We’re all in this together!
- Scaling and Reliability: For more critical or higher-volume applications, explore options for scaling your Docker setup (e.g., Docker Compose, Kubernetes) or migrating parts of your infrastructure to cost-effective cloud services. Consider implementing robust monitoring and alerting for your self-hosted services. When your automation becomes indispensable, you’ll want it to be rock-solid.
Final Summary
This guide provided a comprehensive approach to setting up n8n for free, integrating local AI via Ollama and persistent database memory with PostgreSQL, all exposed publicly using Ngrok. You’ve built a powerful, intelligent automation hub from the ground up! For your next step, explore n8n’s extensive library of nodes by clicking ‘Add node’ on your workflow canvas and searching for new integrations to expand your automation capabilities. Happy automating, my friend!