Watch the Video Tutorial
💡 Pro Tip: After watching the video, continue reading below for detailed step-by-step instructions, code examples, and additional tips that will help you implement this successfully.
Looking for a clear, step-by-step guide on how to install n8n on your device locally using Node.js? You’ve found it. Boyce here, and if you want the power of a self-hosted n8n instance without the complexities of Docker, the npm method is your golden ticket. It’s the most direct path to gaining full control over your data, ensuring privacy, and even unlocking advanced features like integrating with local AI models. In this guide, I’ll walk you through every command and click, from installing Node.js to launching your very own n8n server right from your terminal. Let’s get you set up!
Table of Contents
Open Table of Contents
- Why Self-Host n8n Locally with npm?
- Prerequisites: Installing Node.js
- Setting Up n8n with npm
- Accessing and Initializing Your Local n8n Instance
- Exploring the n8n Workflow Editor
- Advanced Usage and Integration with Local LLMs
- Troubleshooting Common Installation Issues
- Frequently Asked Questions
- Resource and Cost Comparison: DIY vs. Commercial n8n Cloud
- Tips for Maintaining Your n8n Local Setup
- Final Summary
Why Self-Host n8n Locally with npm?
Self-hosting n8n on a local machine offers significant advantages for developers, automation enthusiasts, and privacy-conscious users. The primary benefits include complete data control and privacy, ensuring that sensitive workflow data remains within your environment. This local setup also enables seamless integration with local Large Language Models (LLMs) like those accessible via Ollama, expanding automation capabilities without external API dependencies.
Compared to Docker, which is a preferred method for n8n self-hosting but can be complex for those unfamiliar with containerization, using npm simplifies the installation process. npm (Node Package Manager) provides a direct, code-free path to deploying a functional n8n instance, making it an ideal choice for quick local setups. The npm method ensures that your workflows and data remain persistent even after system reboots, unlike temporary npx installations. This method establishes a global installation, providing full access and stability.
Enhanced Data Privacy and Security
When n8n is self-hosted, all workflow execution data, credentials, and configurations reside on your local machine. This eliminates reliance on third-party cloud services for data storage and processing, significantly reducing the risk of data breaches or privacy concerns. For organizations handling sensitive information, local self-hosting is a critical security measure.
Integration with Local AI Models
The ability to integrate with local LLMs, such as those run through Ollama, is a powerful advantage of self-hosting. This setup allows n8n workflows to interact with advanced AI capabilities without sending data to cloud-based AI providers, which can incur costs and raise privacy questions. It opens up new possibilities for AI-driven automation directly from your desktop.
Simplified Management with npm
npm is a package manager for Node.js, making it suitable for JavaScript-based applications like n8n. The process of installing n8n via npm is designed to be user-friendly, with simple command-line instructions that abstract away many underlying complexities. This approach is particularly advantageous for users who prefer not to delve into Docker configurations or complex server setups, offering a streamlined path to a fully operational n8n instance.
Prerequisites: Installing Node.js
Before installing n8n using npm, Node.js must be present on your system. Node.js is a free, open-source, cross-platform JavaScript runtime environment essential for running server-side applications and command-line tools. npm, the Node Package Manager, is automatically installed with Node.js.
The installation process typically involves downloading an installer package specific to your operating system. Ensure you download the Long Term Support (LTS) version, as this offers the most stability and ongoing support.
Download and Install Node.js
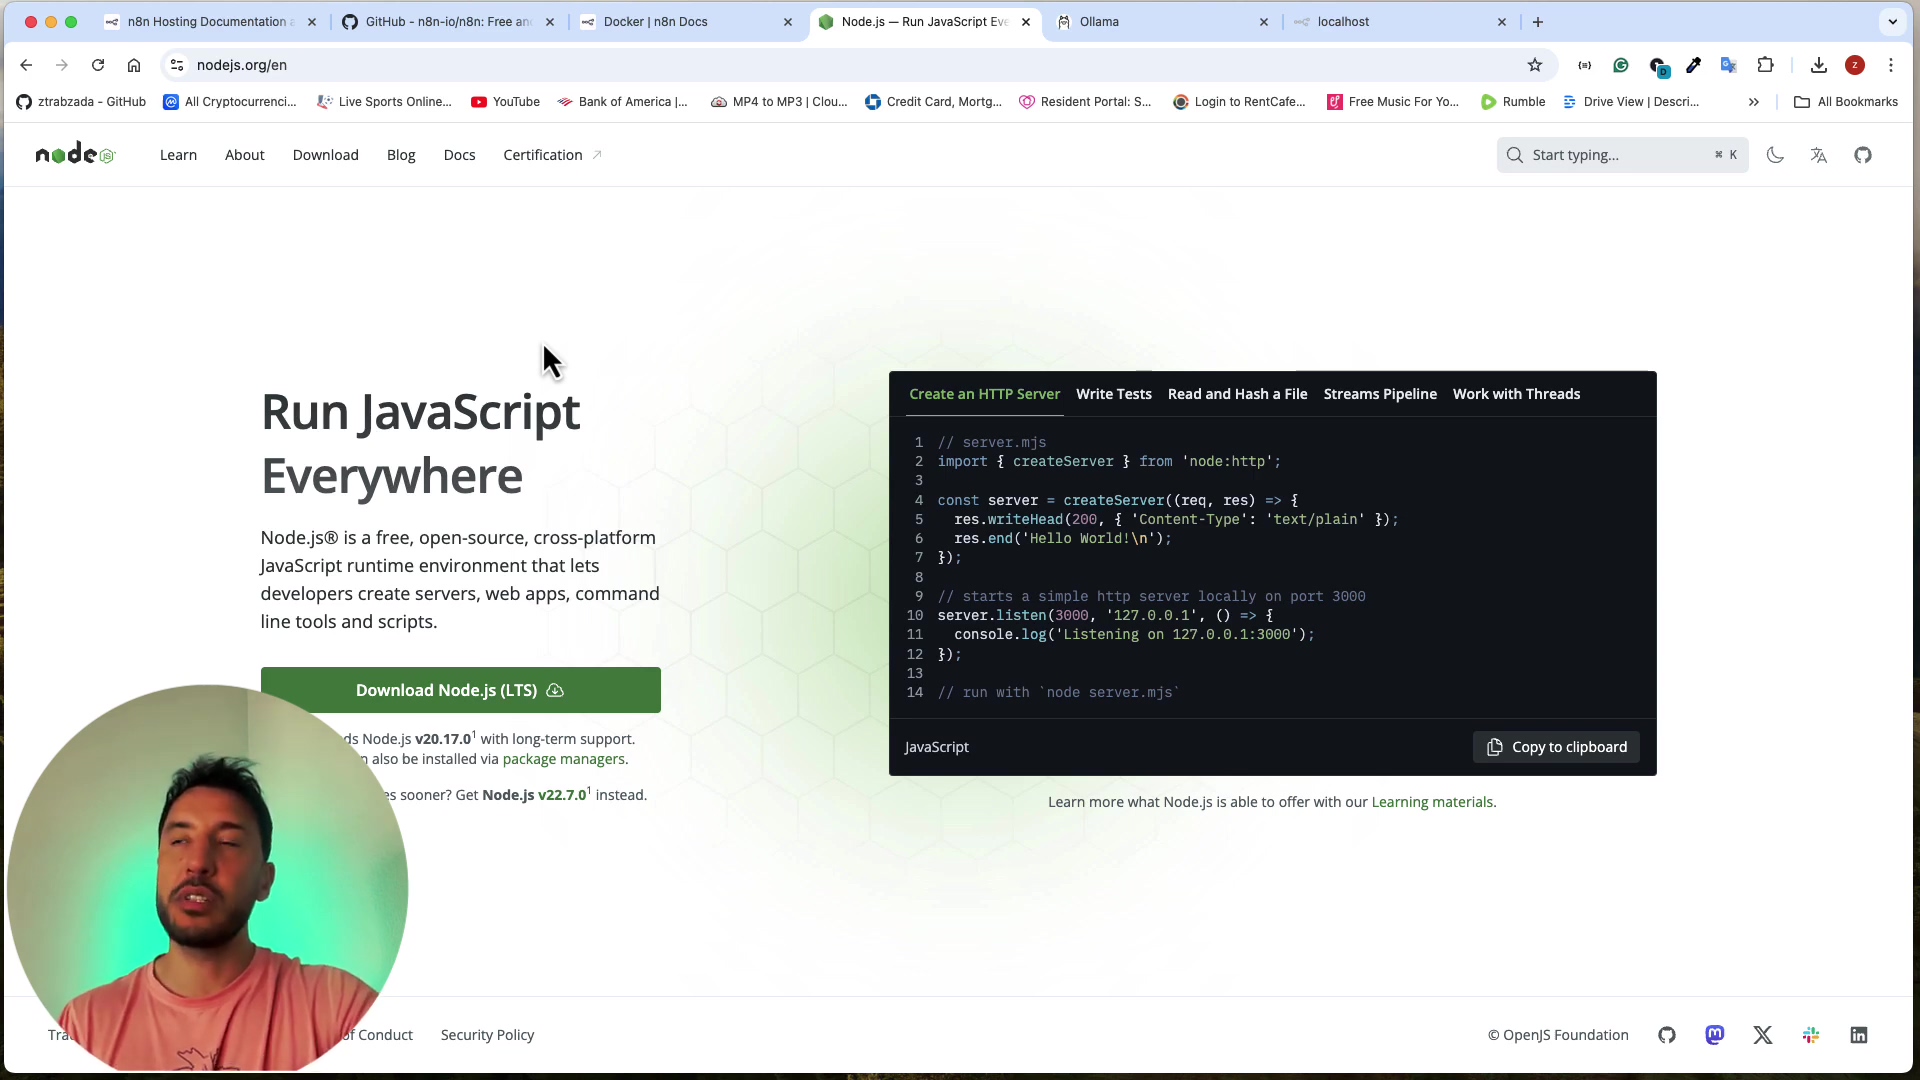
- Visit the official Node.js website: Navigate to nodejs.org on your web browser. It’s the mothership for all things Node.js!
- Select LTS Version: Download the recommended LTS version for your operating system (Windows Installer, macOS Installer, or Linux Binaries). LTS stands for Long Term Support, meaning it’s the most stable and will be supported for a longer period. Think of it as the reliable workhorse.
- Run the installer: Execute the downloaded installer and follow the on-screen prompts. Accept the default installation settings unless you have specific requirements. It’s usually pretty straightforward, just like installing any other application.
Verify Node.js and npm Installation
After installation, it’s crucial to verify that both Node.js and npm are correctly set up and accessible from your terminal. This is like checking if your tools are properly plugged in and ready to go.
- Open your terminal or command prompt:
- macOS: Search for “Terminal” in Spotlight (Cmd + Space).
- Windows: Search for “Command Prompt” or “PowerShell” in the Start menu.
- Linux: Open your preferred terminal application.
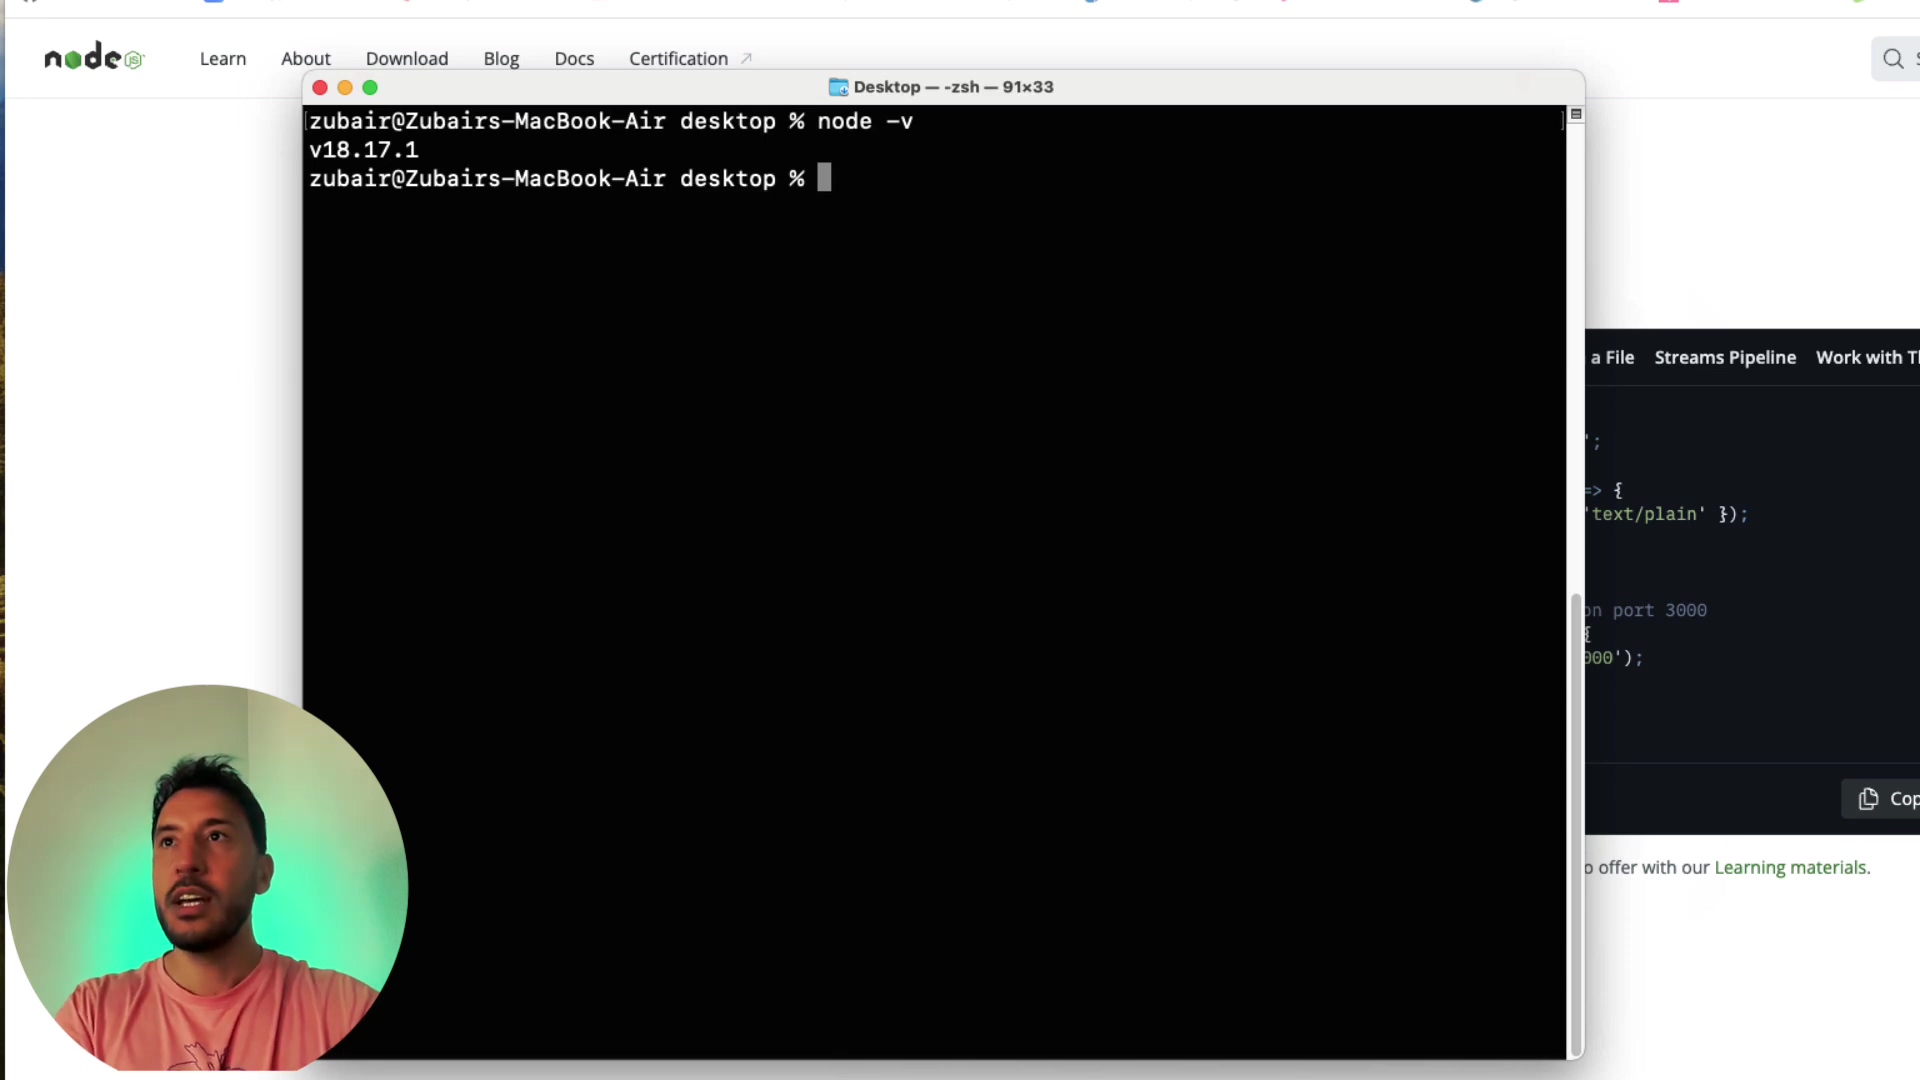
- Check Node.js version: Type
node -vand press Enter. The terminal should display the installed Node.js version (e.g.,v18.17.1). If you see a version number, you’re golden! - Check npm version: Type
npm -vand press Enter. The terminal should display the installed npm version (e.g.,9.6.7). Again, seeing a version number here means npm is ready for action.
If both commands return version numbers, Node.js and npm are successfully installed. You’ve nailed the prerequisite!
If you encounter errors, don’t sweat it! We’ll cover common hiccups in the troubleshooting section later.
Setting Up n8n with npm
Once Node.js and npm are successfully installed, the process of setting up n8n is streamlined. This method installs n8n globally, making it accessible from any directory in your terminal and ensuring persistence. It’s like installing a powerful new app that you can launch from anywhere.
Prepare a Dedicated Directory for n8n Data
While n8n can be installed globally, it’s good practice to create a dedicated directory for its data files, especially if you plan to manage workflows locally. Think of this as giving your n8n instance its own organized workspace.
- Open your terminal or command prompt.
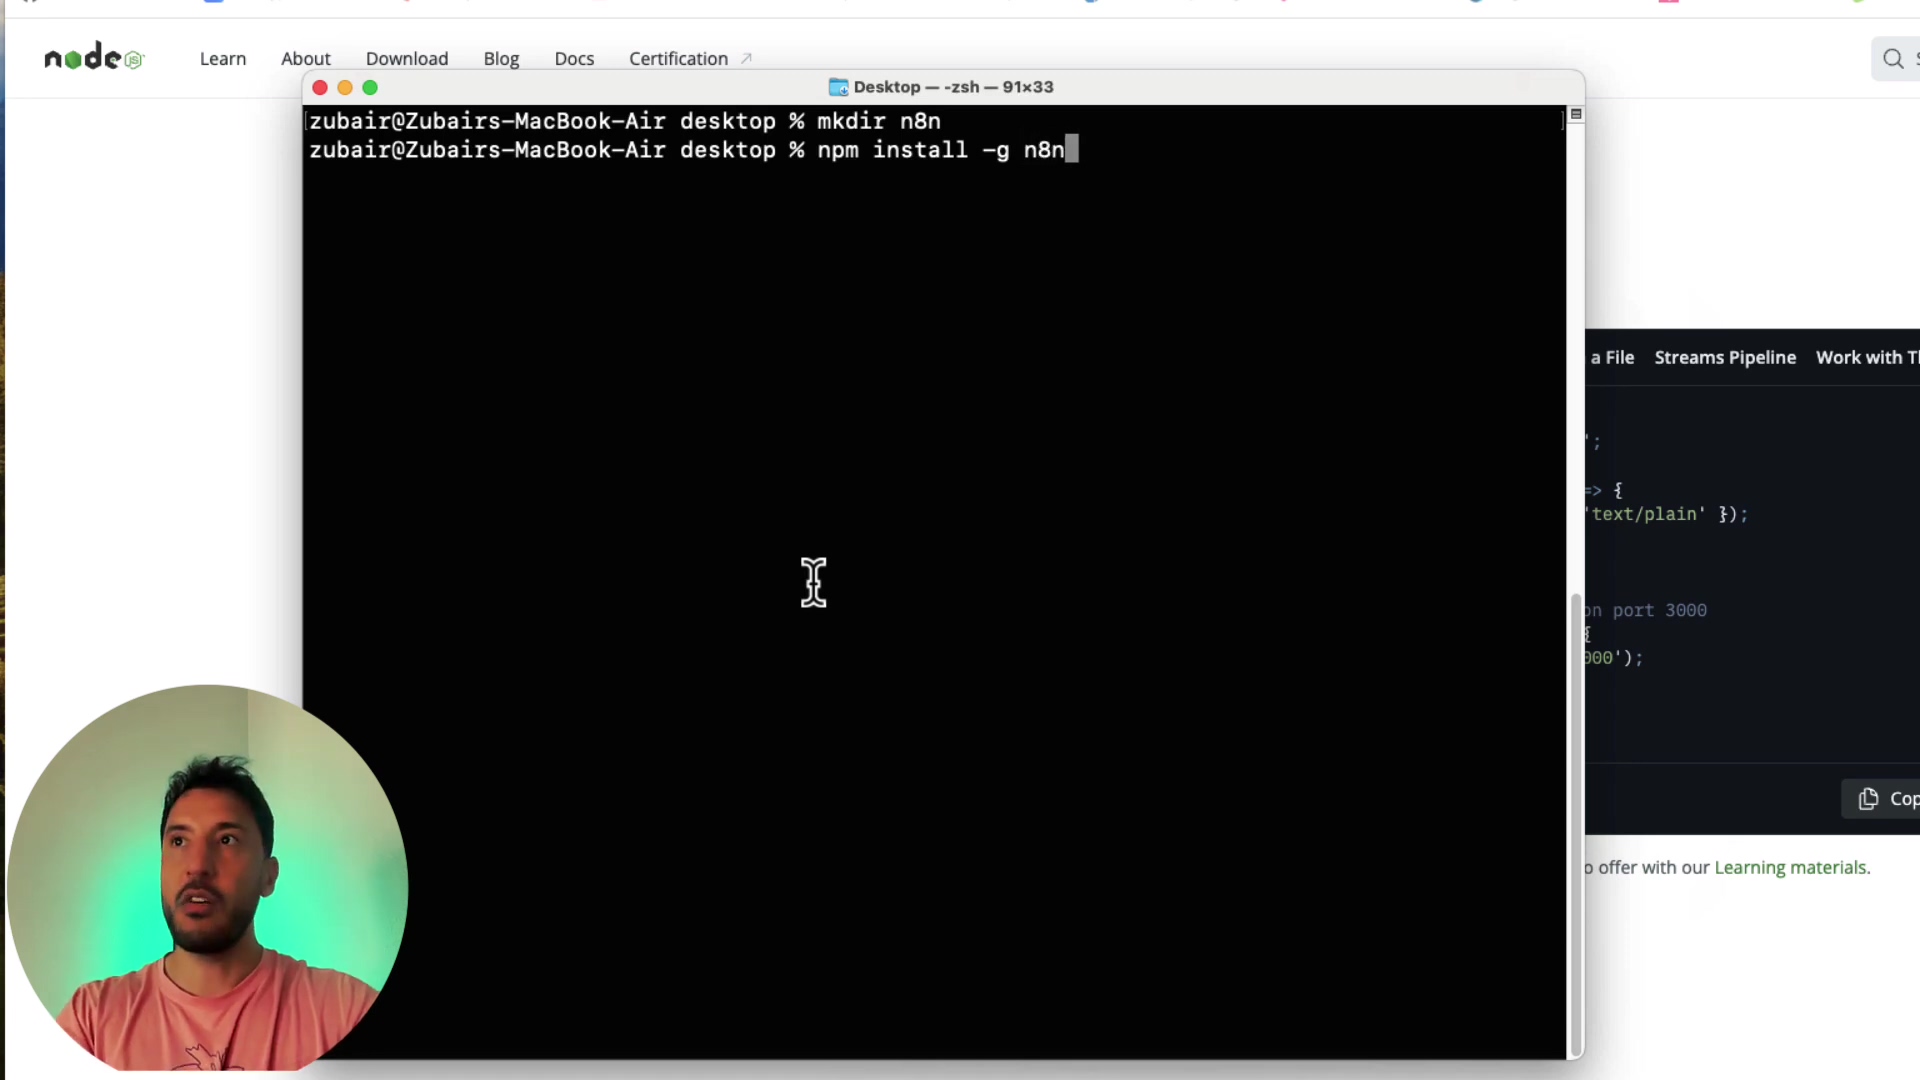
- Create a directory: Execute
mkdir ~/Desktop/n8n_localto create ann8n_localfolder on your desktop. You can adjust the path to your preferred location. Let’s keep things tidy!

- Navigate into the directory: Use
cd ~/Desktop/n8n_localto enter the newly created folder. This step is optional for global installation but helpful for organization. It’s like walking into your new workspace.
Install n8n Globally via npm
The global installation ensures that n8n commands are available system-wide. This means you can run n8n from any folder in your terminal, super handy!
- Execute the installation command: In your terminal, type
npm install -g n8nand press Enter. The-gflag is crucial here; it tells npm to install it globally.
- Monitor the installation: The process may take a few moments as npm downloads and installs all necessary n8n packages and dependencies. You will see progress messages in the terminal. Just let it do its thing!
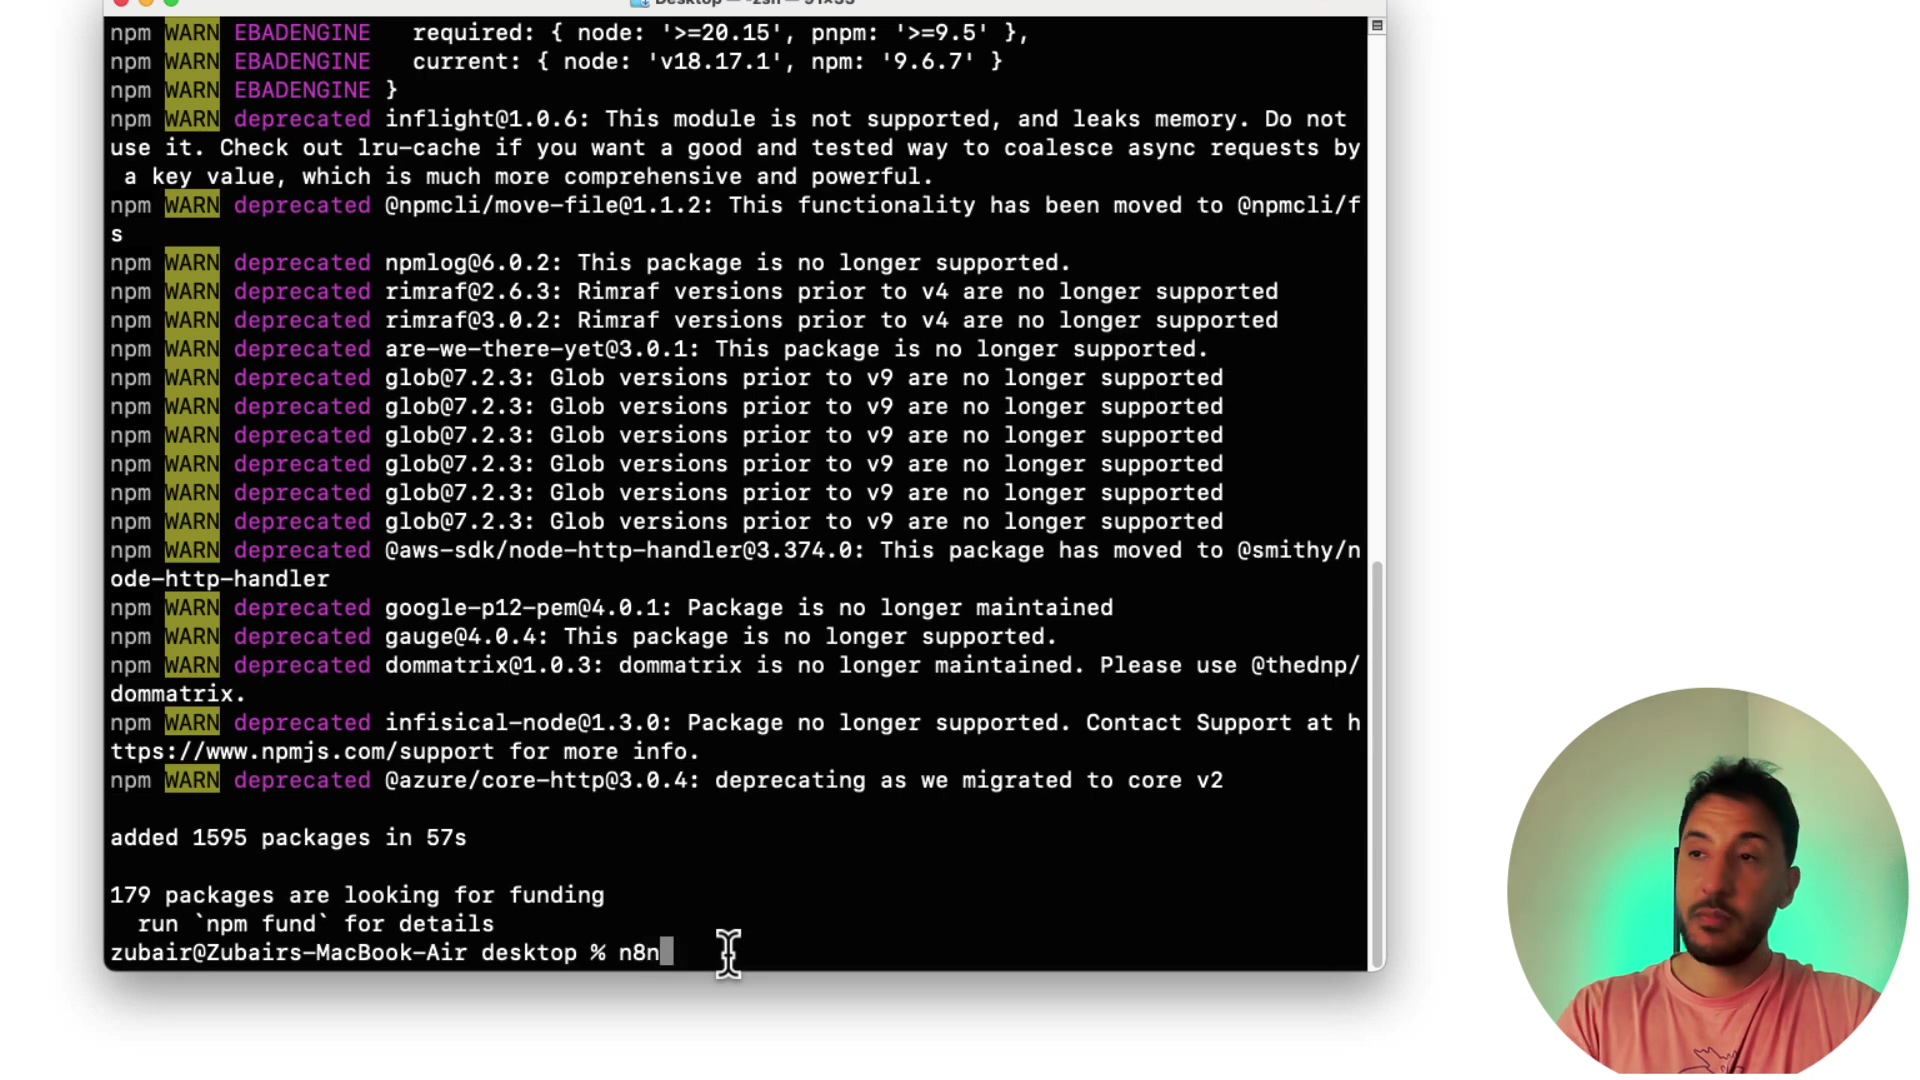
- Confirm completion: Once the installation finishes, the terminal will return to the command prompt, indicating successful installation. There won’t be a specific success message, but the absence of errors confirms it. You’ve successfully installed n8n!
This global installation is a one-time process. You will not need to reinstall n8n unless you wish to update its version or resolve significant issues. The installed instance will be accessible on your local host, typically on port 5678.
Accessing and Initializing Your Local n8n Instance
After successful installation, the next step is to launch n8n and access its web interface through your browser. This involves starting the n8n server from your terminal and then navigating to the specified local URL. It’s showtime!
Launching the n8n Server
- Open your terminal or command prompt.
- Start n8n: Type
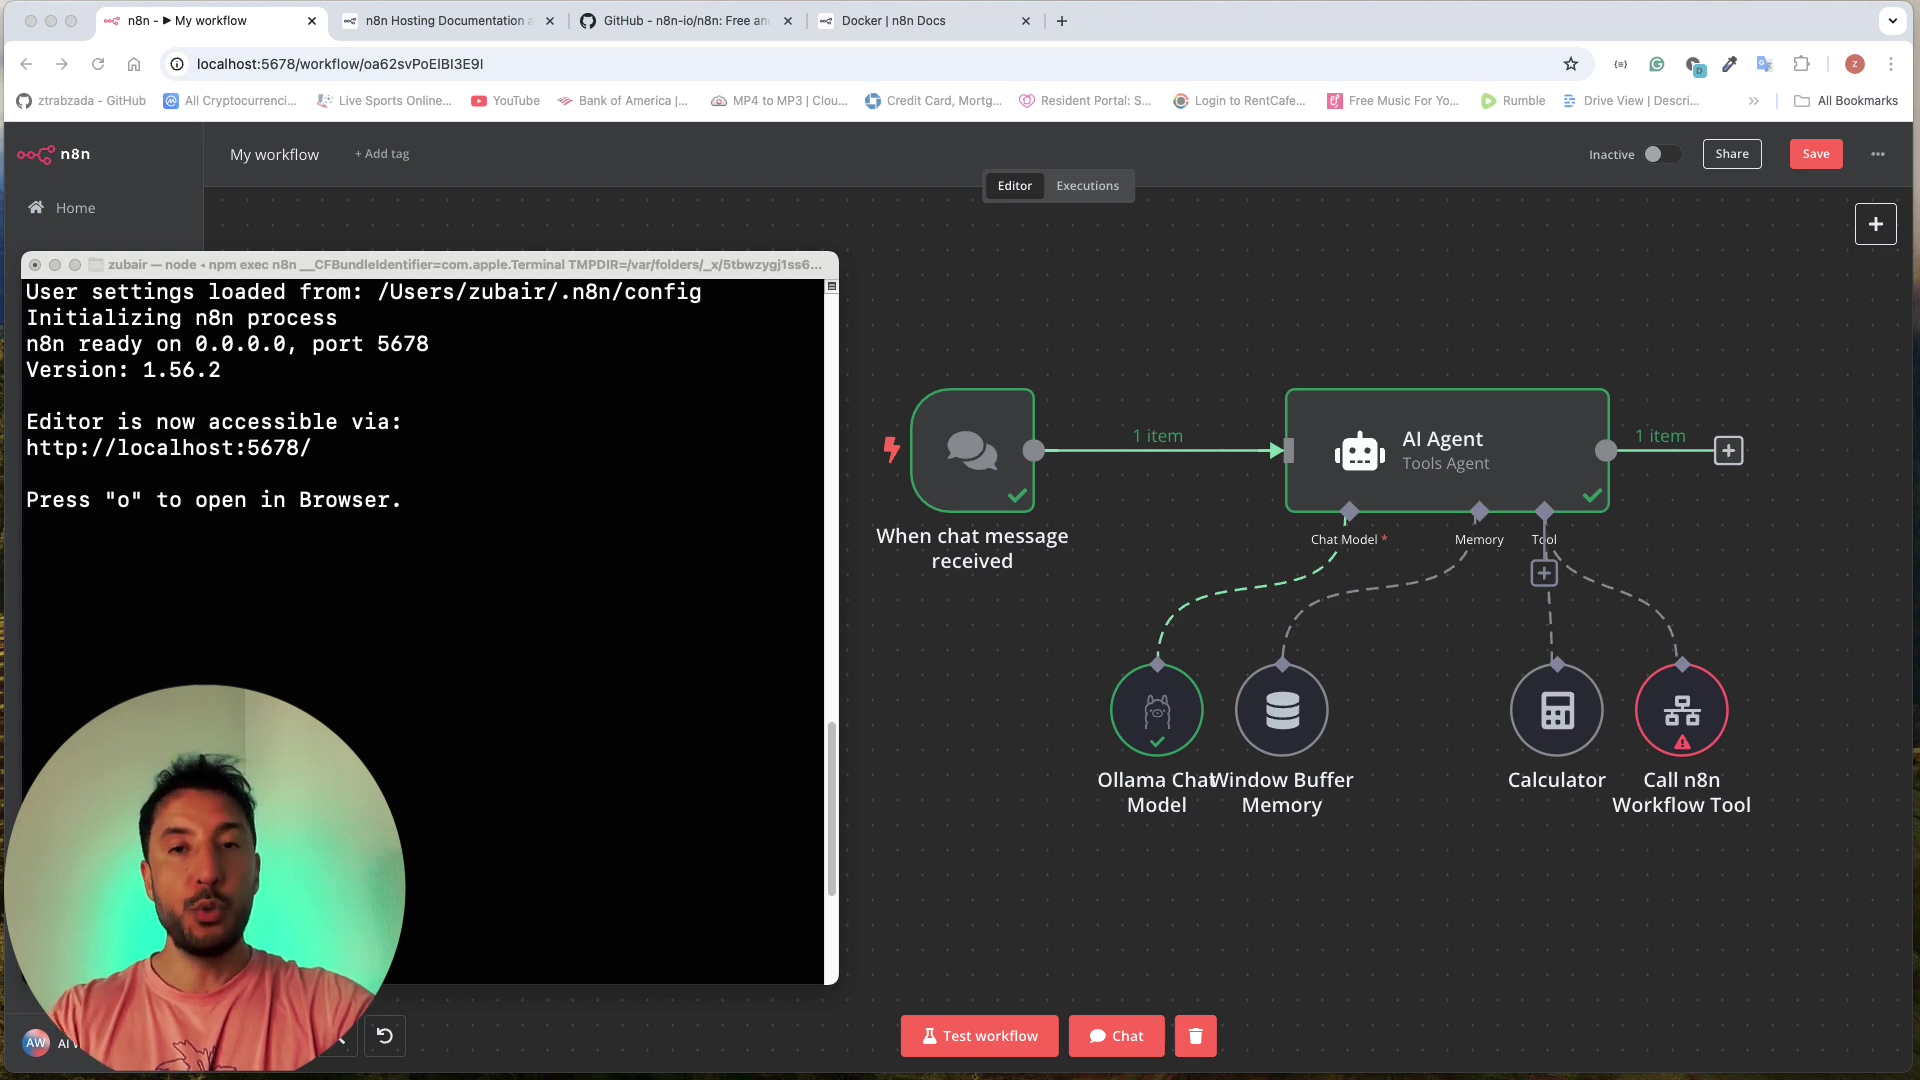
n8nand press Enter. This command fires up the n8n server. - Monitor server startup: The terminal will display messages indicating that n8n is starting up. It will specify the address where the editor is accessible, typically
http://localhost:5678. Keep this terminal window open; it’s like the engine room!
Accessing n8n via Browser
- Open your web browser. Any browser will do!
- Navigate to the n8n address: In the address bar, type
http://localhost:5678and press Enter.
- Automatic opening: The terminal might also offer to
open the URL automatically by pressing ‘o’. How cool is that?
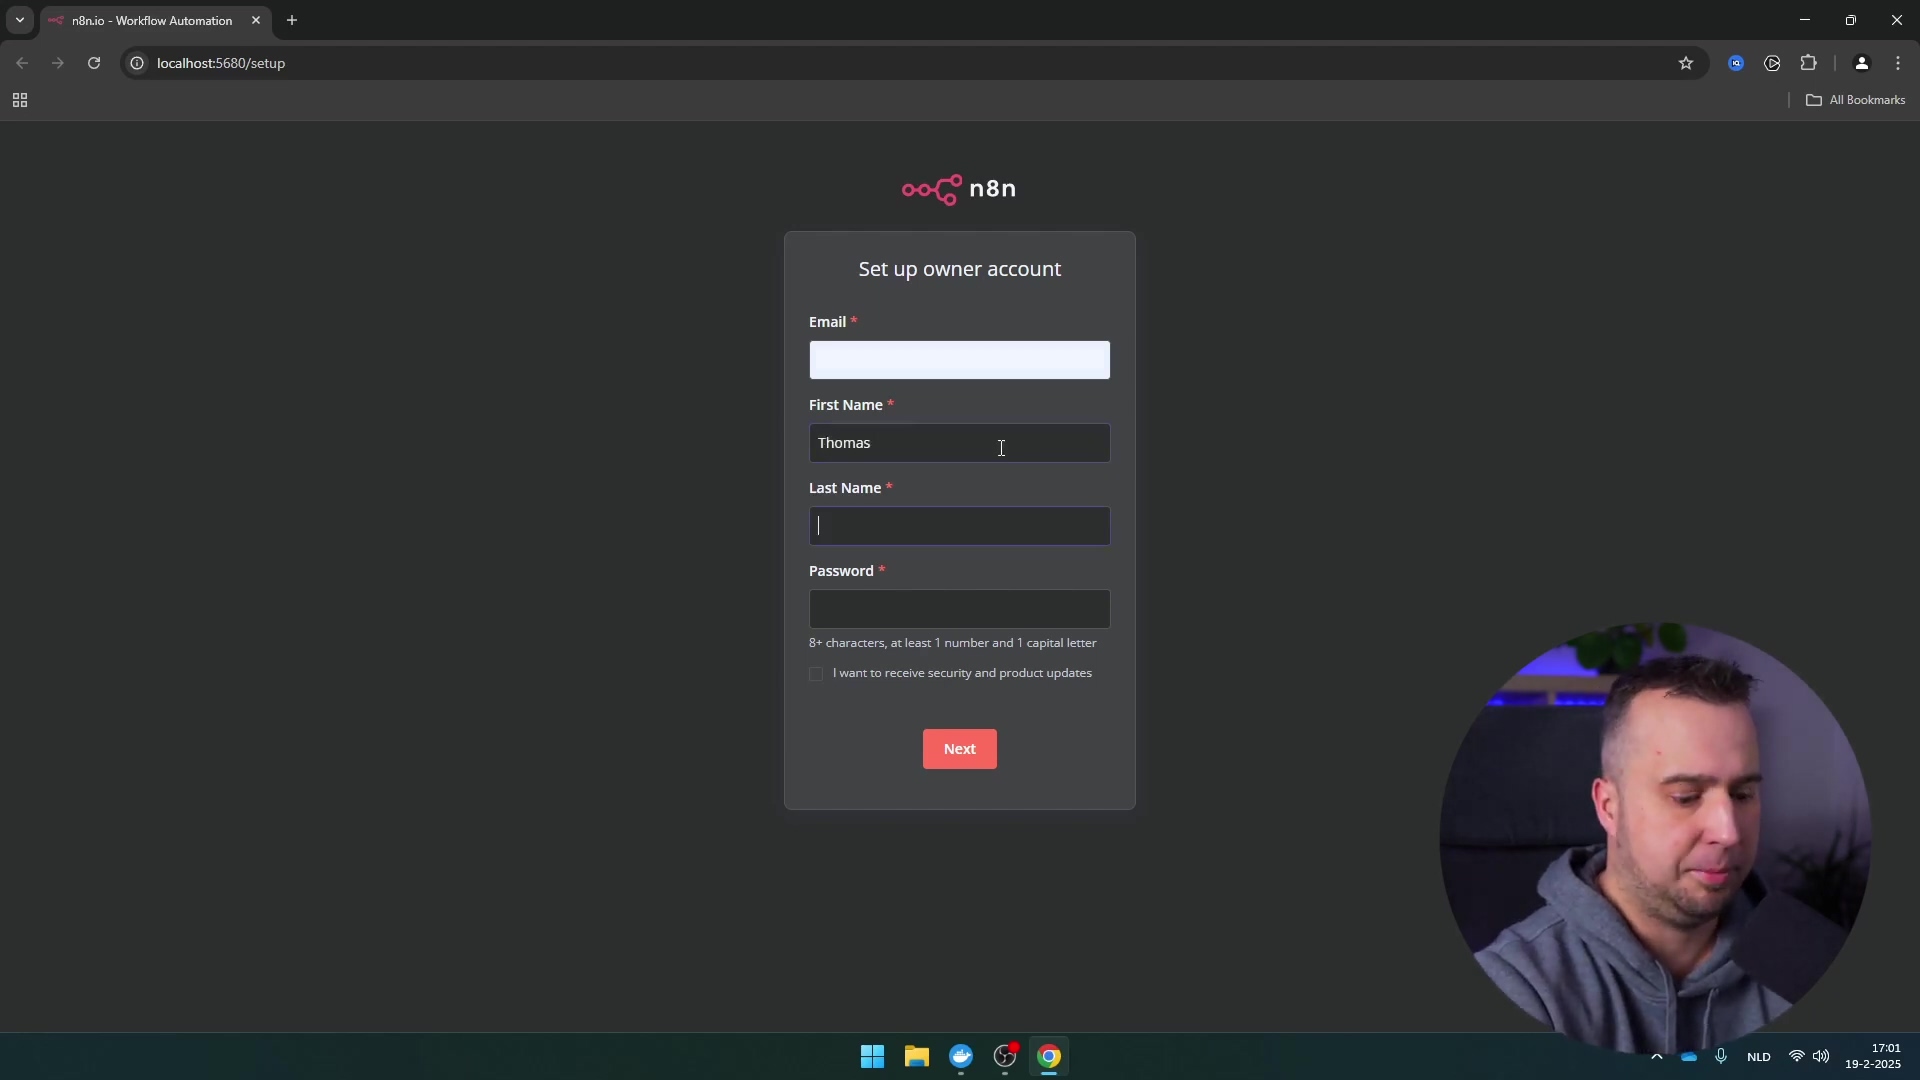
Initial Setup and Login Creation
If this is your first time accessing n8n on this local instance, you will be prompted to create new login credentials. This is your personal gateway to n8n.
- Create new credentials: On the initial login screen, enter a desired username and password. This account is specific to your local n8n instance and is separate from any n8n cloud accounts you may have. Make it something memorable but secure!
- Complete registration: Follow the prompts to finish the registration process. You’re almost there!
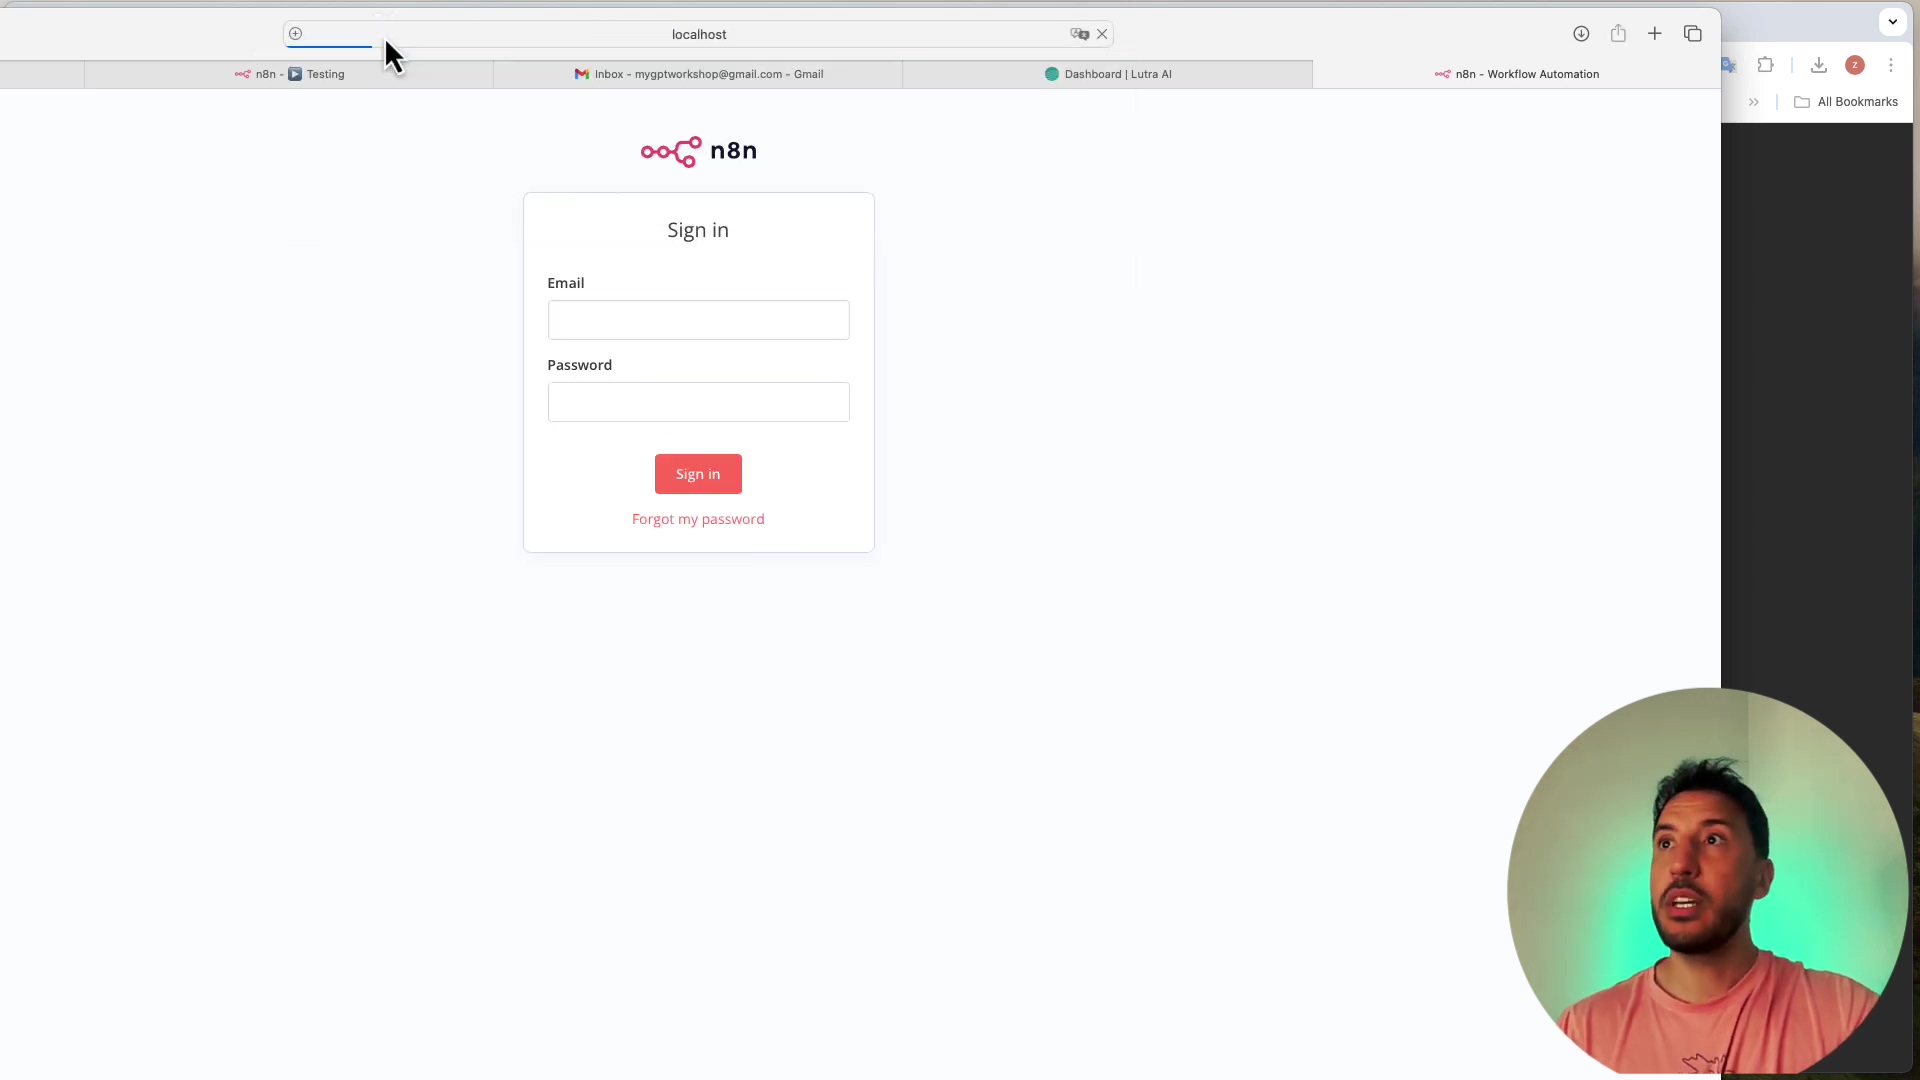
- Login: After creating credentials, you will be directed to the n8n workflow editor. For subsequent access, you will use these local credentials to log in. Welcome aboard!
Important: Your local n8n instance operates independently. Any credentials or workflows from an n8n cloud account will not be automatically transferred or recognized. It’s a fresh start!
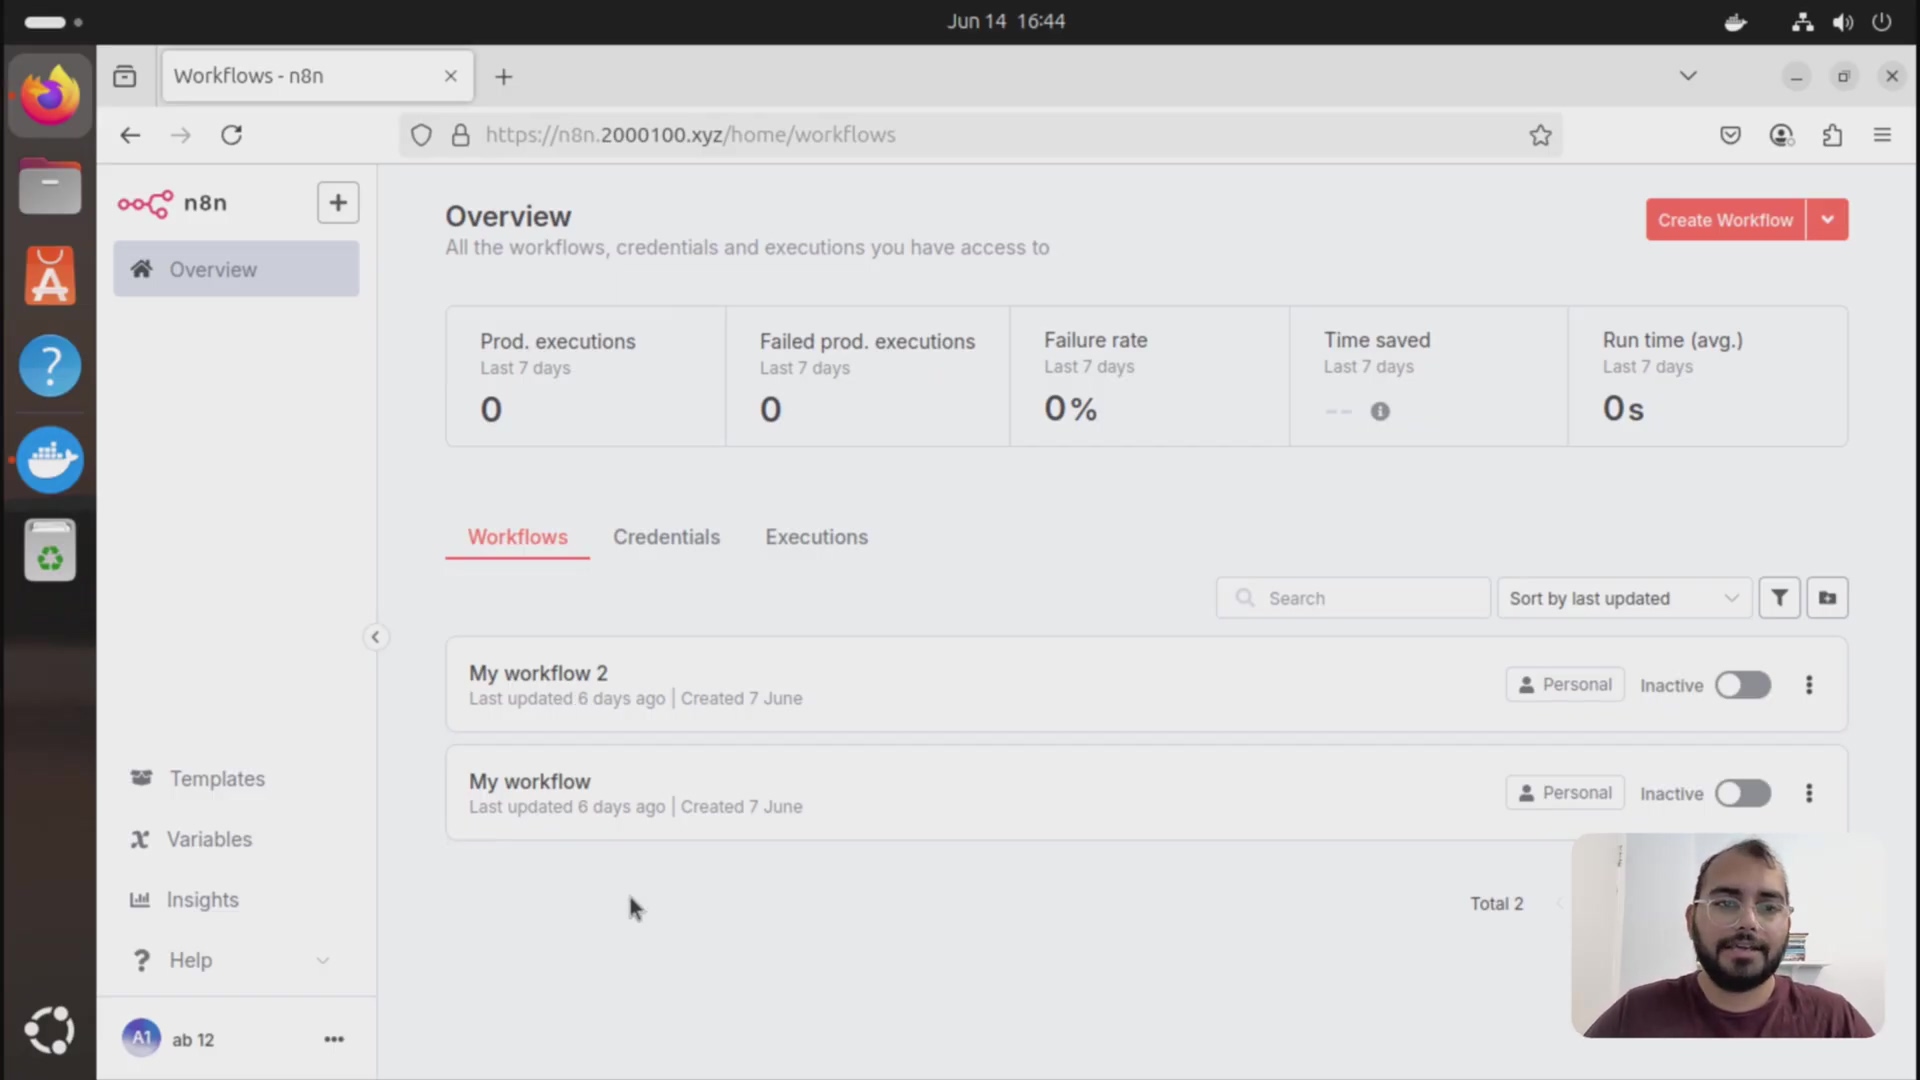
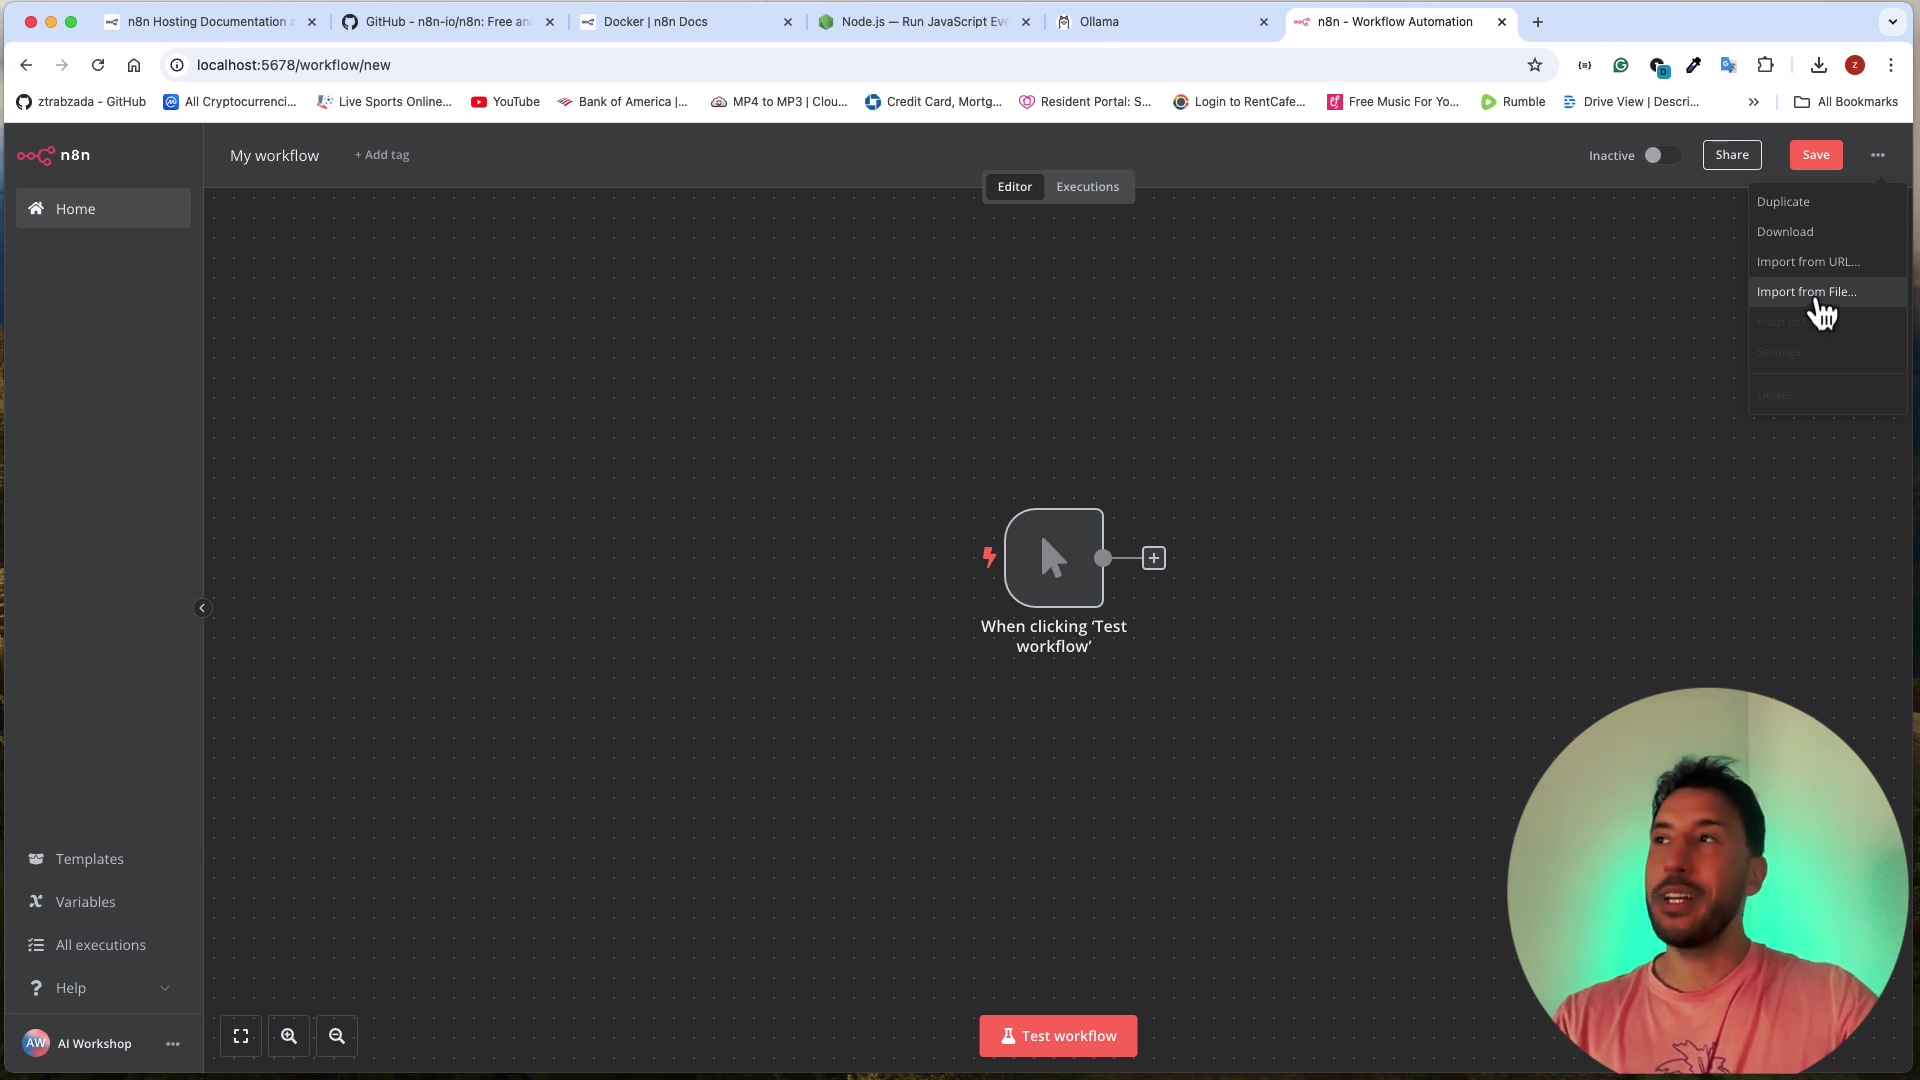
Exploring the n8n Workflow Editor
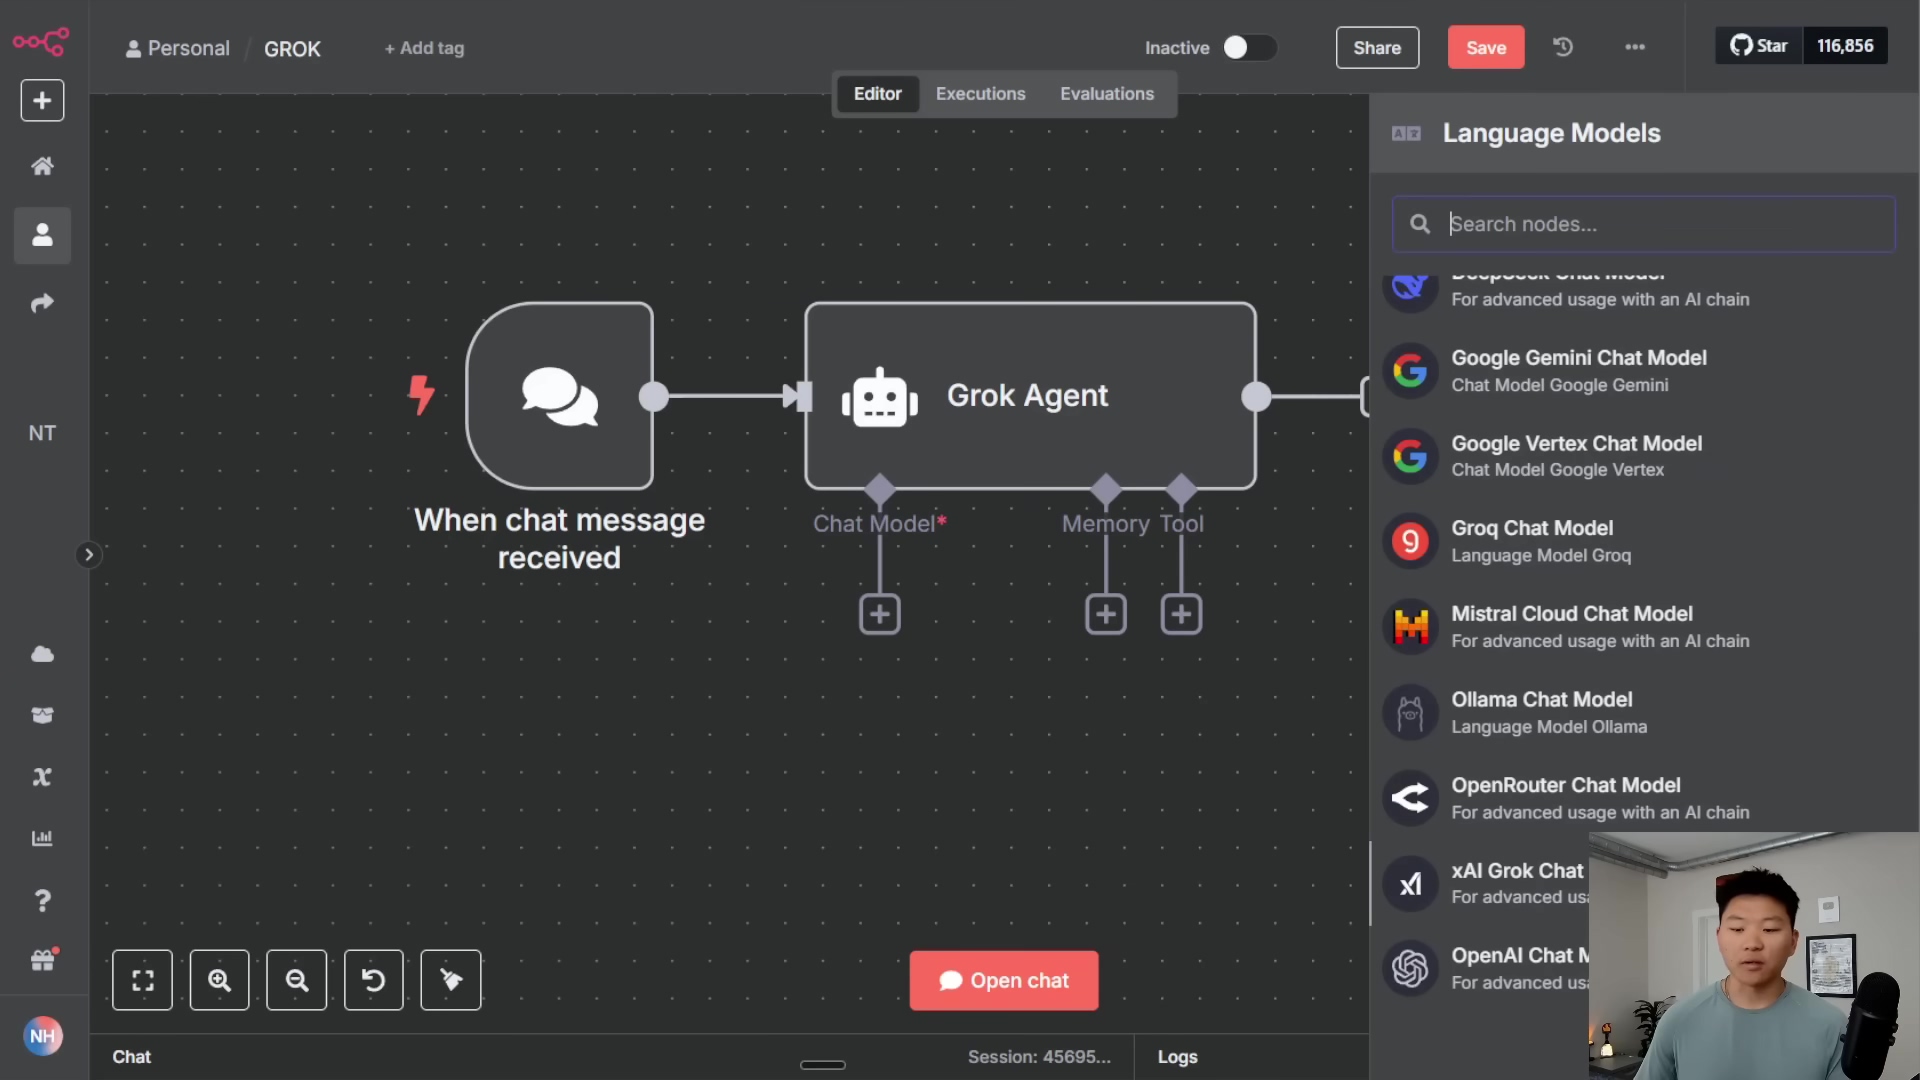
Once logged into your local n8n instance, you are presented with the workflow editor, the central hub for building and managing your automations. The interface is intuitive, designed to facilitate a low-code or no-code development experience. It’s your command center!
Navigating the Default Interface
Upon entering, you will typically see a blank canvas or a default ‘New Workflow’ screen. This is where you drag and drop nodes to construct your automation logic.
- Nodes panel: Located on the left side of the editor, this panel contains a vast library of pre-built nodes for various services, applications, and functionalities. You can search for specific integrations or browse categories like triggers, data manipulation, or AI services. Think of it as your toolbox.
- Canvas: The central area where you assemble your workflow. Nodes are connected graphically to define the data flow and execution order. This is where your automation magic happens.
- Properties panel: When a node is selected on the canvas, this panel (usually on the right) displays its configuration options, allowing you to customize behavior, credentials, and data mapping. This is where you fine-tune each component.
Key Features and Functionalities
- Trigger nodes: Workflows typically begin with a trigger node, which initiates the automation. Examples include webhooks, scheduled times, or new data entries in a connected service. This is the starting gun for your automation.
- Action nodes: These nodes perform specific operations, such as sending emails, updating databases, or making API calls. n8n offers a wide array of actions for various platforms. These are the workhorses that get things done.
- Conditional logic and branching: n8n supports complex workflows with conditional paths, allowing automations to adapt based on data values or external events. This is how you build smart, responsive automations.
- Data manipulation: Nodes are available for transforming, filtering, and combining data, ensuring it is in the correct format for subsequent steps. Essential for making sure your data is just right.
- AI integration: With local integration capabilities, you can incorporate AI models into your workflows for tasks like text generation, summarization, or image processing. This is where things get really futuristic!
Advanced Usage and Integration with Local LLMs
Self-hosting n8n unlocks advanced integration possibilities, particularly with local Large Language Models. This extends automation capabilities significantly by enabling on-device AI processing, which is beneficial for privacy-sensitive applications and custom AI workflows. It’s like giving your automation superpowers!
Integrating with Ollama for Local LLMs
Ollama is a fantastic platform that lets you run open-source large language models locally. Integrating Ollama with your self-hosted n8n instance provides a powerful combination for advanced AI automation workflows. It’s a match made in automation heaven!
- Install Ollama: Download and install Ollama from its official website. Choose models such as Llama 2 or Mistral to download after installation. Follow their instructions – they make it pretty easy.
- Run LLM via Ollama: Start your desired LLM through the Ollama CLI (e.g.,
ollama run llama2). This will make the LLM accessible via a local API endpoint, typicallyhttp://localhost:11434. This command essentially wakes up your AI model. - Configure n8n HTTP Request node: In n8n, add an “HTTP Request” node to your workflow. Configure it to send POST requests to the Ollama API endpoint (e.g.,
http://localhost:11434/api/generate). This node acts as your messenger to the AI. - Define Payload: Structure the request body (JSON) to include the model name and the prompt you wish to send to the LLM. You can dynamically generate prompts using data from previous n8n nodes. This is where you craft your AI’s instructions.
- Process Response: The LLM’s response will be received by the HTTP Request node. You can then use subsequent n8n nodes to parse, transform, and utilize this AI-generated content in your automation. This setup allows n8n to directly leverage local LLMs for tasks like content generation, summarization, or sentiment analysis, all within your local environment.
Custom Node Development and Extension
For specific needs not met by existing nodes, n8n supports custom node development. This allows you to create specialized integrations or functionalities tailored to your workflow requirements. Custom nodes can interact with unique local services, proprietary APIs, or advanced internal tools, further extending the versatility of your local n8n setup. It’s like building your own specialized tools!
Troubleshooting Common Installation Issues
Encountering issues during installation or initial setup is not uncommon. We’ve all been there! Here are some solutions to frequently faced problems when self-hosting n8n locally via npm.
Issue: node -v or npm -v commands not recognized
- Target: Confirm Node.js and npm are correctly installed and added to the system’s PATH. The PATH is like the system’s address book for commands.
- Path:
- Re-install Node.js: Download the installer again from nodejs.org and run it carefully, ensuring all default options (including adding to PATH) are selected. Sometimes a fresh install is all it needs.
- Verify PATH (Windows): Search for “Environment Variables,” click “Environment Variables…” in System Properties, find “Path” under System variables, and ensure Node.js installation directory (e.g.,
C:\Program Files\nodejs\) is listed. If it’s missing, you’ll need to add it manually. - Verify PATH (macOS/Linux): In terminal, type
echo $PATH. Check if/usr/local/binor your custom Node.js install path is included. If not, you might need to add it to your shell’s configuration file (e.g.,.bashrc,.zshrc,.profile). This is a bit more advanced, but totally doable!
- Validation: After re-installation or PATH adjustment, close and reopen your terminal, then re-run
node -vandnpm -v. This ensures the changes are loaded. - Rollback: If issues persist, consider using a Node.js version manager like
nvm(Node Version Manager) to manage different Node.js versions. This can help isolate environment issues and switch between versions easily.
Issue: npm install -g n8n fails or shows permission errors
- Target: Successfully install n8n globally without permission conflicts. This usually happens on Linux/macOS when you don’t have the right permissions.
- Path:
- Clear npm cache: Run
npm cache clean --forcefirst. Sometimes the cache gets corrupted. - Try
sudo(macOS/Linux): Executesudo npm install -g n8n. You will be prompted for your administrator password. This grants the necessary permissions for global installation. It’s like asking for admin rights. - Fix npm permissions (Windows): On Windows, permission issues are less common but can arise from restrictive user accounts. Try running your Command Prompt or PowerShell “as administrator.” Right-click the icon and select “Run as administrator.” This gives you the necessary privileges.
- Alternative install path: Configure npm to install global packages to a user-owned directory. Refer to the npm documentation on “Fixing npm permissions” for detailed steps. This is a more robust solution if
sudoisn’t ideal.
- Validation: After running the command, check for success messages and try launching n8n with
n8n. - Rollback: If
sudocauses further issues, you can revert by runningsudo npm uninstall -g n8nand then attempting the permission fix for non-sudo global installations.
Issue: localhost:5678 shows “Site can’t be reached” after running n8n
- Target: Access the n8n web interface successfully. This means the server isn’t accessible where you expect it.
- Path:
- Verify n8n server status: Ensure the terminal where you ran
n8nis still open and displaying “Editor is now accessible via http://localhost:5678”. If the terminal closed or shows an error, restart n8n by typingn8nagain. It needs to be running! - Check for port conflicts: Another application might be using port 5678. You can try running n8n on a different port using
n8n --port 8080(or any other available port) and then accesshttp://localhost:8080. This is like finding a different parking spot if yours is taken. - Firewall settings: Check your system’s firewall. Temporarily disable it to see if it’s blocking connections to
localhost:5678. If it works, add an exception for n8n in your firewall settings. This ensures your firewall isn’t being overly protective.
- Validation: The n8n login/workflow editor page should load in your browser. Success!
- Rollback: If you changed the port, revert by closing the n8n session (Ctrl+C in the terminal) and relaunching without the
--portflag to use the default port again.
Frequently Asked Questions
This section addresses common questions related to self-hosting n8n locally using npm, covering various aspects from setup to maintenance.
Q: Can I run n8n in the background after closing the terminal?
A: No, when you run n8n directly in the terminal, it runs as a foreground process. Closing the terminal will terminate the n8n server. For continuous operation, you would typically use process managers like pm2 (on Linux/macOS) or run it as a service (on Windows). Alternatively, consider headless mode for production deployments.
Q: How do I update my local n8n instance?
A: To update, stop your running n8n instance (Ctrl+C in the terminal) and then run npm update -g n8n. This will fetch and install the latest global version of n8n. After updating, restart n8n by typing n8n.
Q: Is my local n8n data secure?
A: Yes, all data stored by your local n8n instance (workflows, credentials, execution logs) resides on your machine. The security of this data primarily depends on the security of your operating system and local network. Regular backups are recommended.
Q: Can I access my local n8n from another device on my network?
A: By default, localhost only allows access from the same machine. To access n8n from another device on your network, you need to configure n8n to listen on your local IP address (e.g., n8n --host 0.0.0.0 --port 5678) and ensure your firewall allows incoming connections on the specified port. Then, access it using http://YOUR_LOCAL_IP:5678.
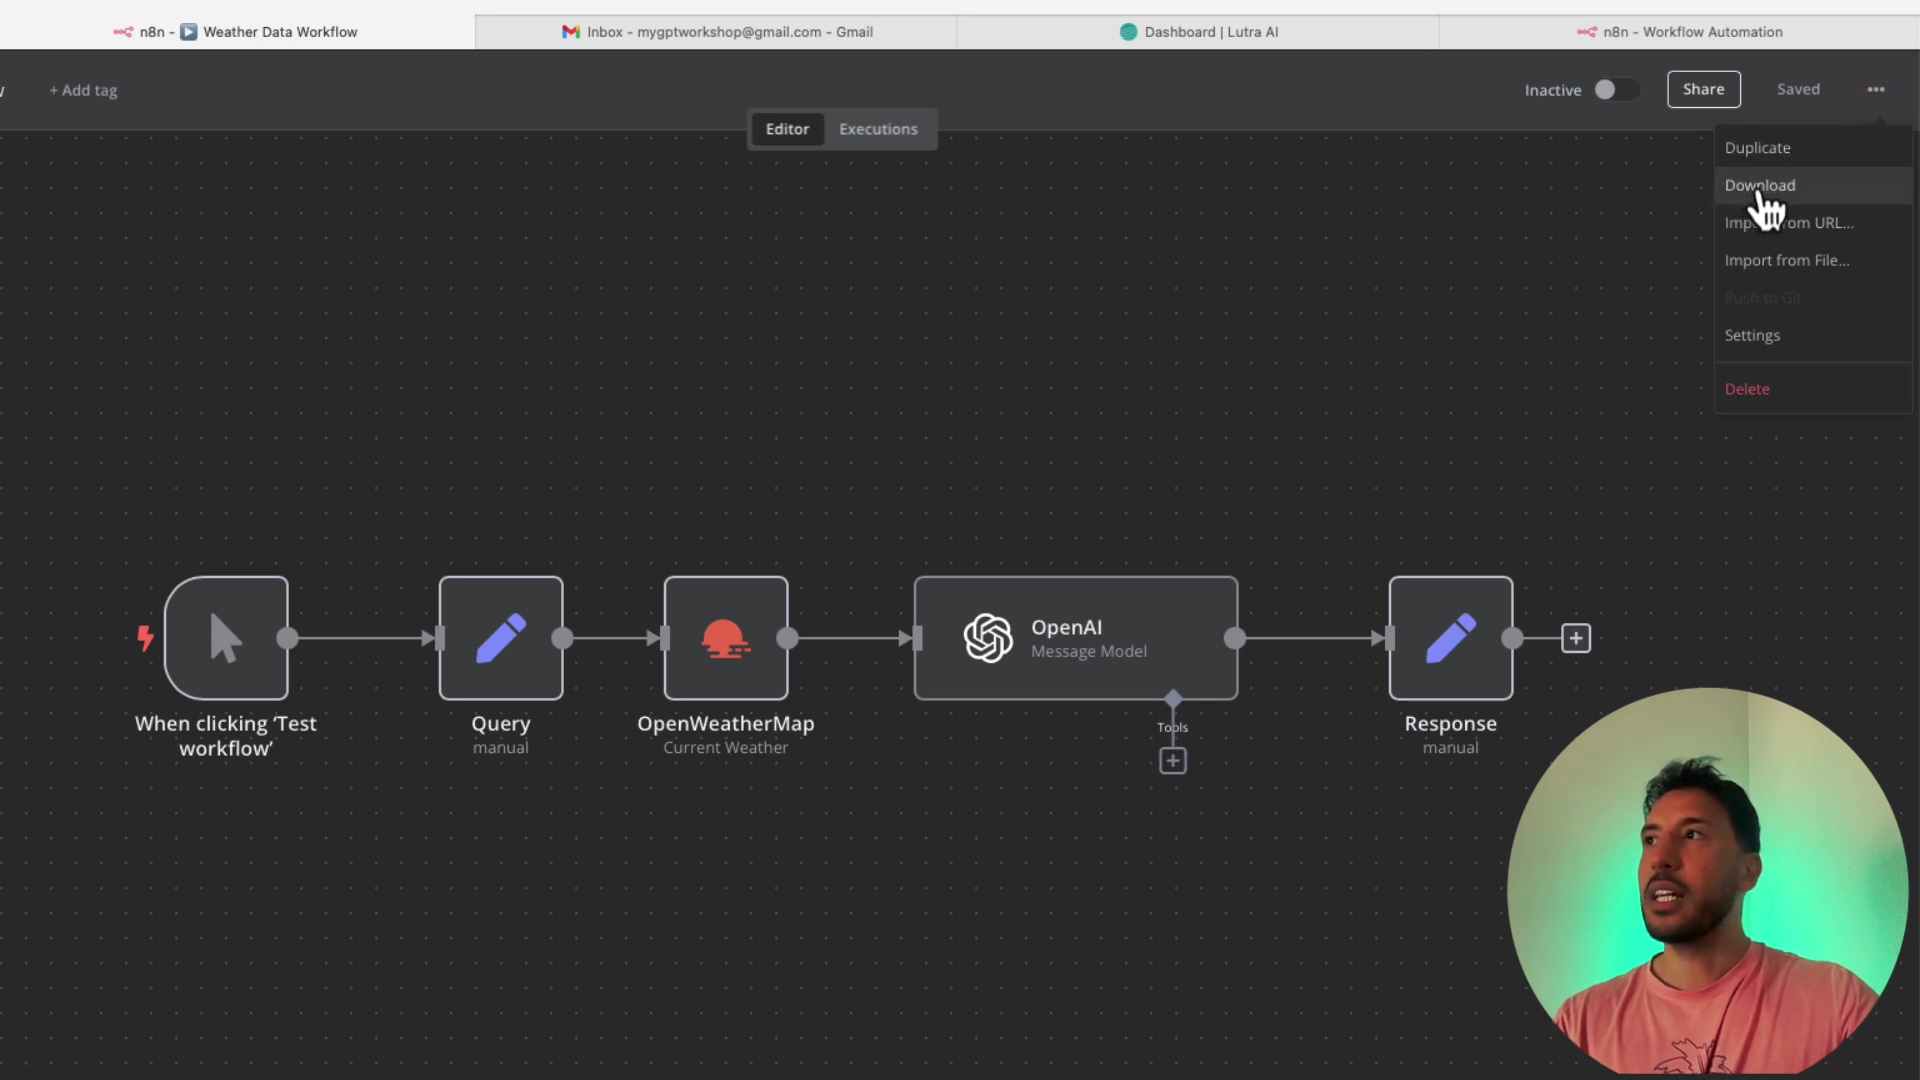
Q: How do I backup my n8n workflows?
A: Workflows are stored in a database managed by n8n. You can export individual workflows as JSON files from the n8n editor (... -> Download). For a full backup, you would need to back up the entire n8n user directory where its database and configuration files are stored. The exact location varies by OS but is typically ~/.n8n on Linux/macOS or %USERPROFILE%/.n8n on Windows.
Q: What if I forget my local n8n login credentials?
A: Since the credentials are local, you cannot reset them via a typical cloud password reset flow. You’ll likely need to locate and potentially reset the n8n database file. The exact method depends on the database n8n uses (often SQLite by default). You might need to delete or reset the user data within that database file. Refer to the n8n documentation for specific instructions on managing the local database.
Resource and Cost Comparison: DIY vs. Commercial n8n Cloud
Choosing between a self-hosted (DIY) n8n setup and a commercial n8n Cloud subscription involves trade-offs in cost, control, and convenience. Below is a comparison to help inform your decision.
| Feature | Self-Hosted (DIY) n8n via npm | Commercial n8n Cloud |
|---|---|---|
| Cost | Essentially free (hardware/electricity) | Subscription fees (tiered pricing) |
| Control | Full control over data, environment, and updates | Limited control; managed by n8n |
| Data Privacy | Maximum; data stays on your machine | Relies on n8n’s cloud security and privacy policies |
| Scalability | Limited by local hardware; manual scaling | Auto-scaling and infrastructure managed by n8n |
| Maintenance | User responsible for updates, backups, security | Managed by n8n; automatic updates and backups |
| Ease of Setup | Moderate (initial setup required) | Very easy (sign up and start) |
| Local LLMs | Direct integration with local models | Requires external LLM API keys |
| Uptime/Reliability | Depends on local machine uptime and internet stability | High (professional infrastructure) |
| Support | Community forums, documentation | Dedicated customer support, SLAs for higher tiers |
For users prioritizing data privacy and requiring deep integration with local resources like LLMs, the DIY self-hosted option via npm is highly advantageous. While it demands more initial effort and ongoing maintenance, the cost savings and ultimate control are significant. Commercial n8n Cloud, conversely, offers unparalleled convenience, automatic scaling, and professional support, making it ideal for those who prefer a hands-off approach to infrastructure management and can accommodate the recurring costs.
Tips for Maintaining Your n8n Local Setup
Maintaining a stable and efficient local n8n environment is crucial for continuous automation. These tips cover regular maintenance practices, security considerations, and performance optimization. Let’s keep your automation engine purring!
Regular Updates
Keeping both Node.js and n8n updated is vital for security patches, bug fixes, and new features. Aim to update regularly, especially after major releases.
- Node.js: Check the official nodejs.org website periodically for new LTS versions. Uninstall the old version or use
nvmto switch to a newer one. - n8n: Stop your n8n instance (Ctrl+C in terminal) and run
npm update -g n8nto update your global n8n installation. After the update, restart n8n.
Data Backup Strategy
Regularly back up your n8n configuration and workflow data to prevent loss in case of system failure. While individual workflows can be exported as JSON, a full backup of the n8n user directory is recommended.
- Locate n8n data directory: This is typically
~/.n8non Unix-like systems (Linux/macOS) and%USERPROFILE%/.n8non Windows. This directory contains your database and configuration files. - Backup interval: Implement a routine backup schedule, such as weekly or monthly, depending on the frequency of your workflow changes.
Resource Monitoring
Although local n8n instances are less resource-intensive than large server deployments, monitoring your system resources can prevent performance bottlenecks.
- CPU and RAM: Keep an eye on your CPU and RAM usage, especially when running complex workflows or integrating with resource-heavy local LLMs. If performance degrades, consider optimizing workflows or upgrading hardware.
Security Best Practices
Even on a local setup, security remains important, especially if you expose n8n to your network or store sensitive credentials.
- Strong Passwords: Always use strong, unique passwords for your local n8n instance.
- Firewall: Ensure your operating system’s firewall is active and correctly configured, especially if you enable network access to n8n.
- Credential Management: Store API keys and secrets securely within n8n’s credential management system. Avoid hardcoding sensitive information directly into workflow nodes.
Final Summary
This guide provided a comprehensive walkthrough for self-hosting n8n locally using npm, emphasizing enhanced data privacy and the integration of local LLMs. By following the detailed steps for Node.js installation, global n8n setup, and initial access, you can gain full control over your automation environment. Consider setting up regular backups for your n8n data directory and exploring advanced integrations with local AI models like Ollama for expanded capabilities. You’re now ready to automate like a pro!