Watch the Video Tutorial
💡 Pro Tip: After watching the video, continue reading below for detailed step-by-step instructions, code examples, and additional tips that will help you implement this successfully.
So, you’re ready to learn how to automate Shopify with n8n and reclaim hours of your valuable time? Awesome! Boyce here, and you’ve found the definitive starting point. Manually updating products, processing orders, and managing your store can be a real grind, but with n8n’s powerful no-code platform, you can build an AI-powered assistant to do the heavy lifting for you. In this step-by-step guide, I’ll walk you through the entire process, from securely connecting your Shopify store to n8n, to building your very first automation workflow. Let’s transform your e-commerce operations!
Table of Contents
Open Table of Contents
- Unlocking Shopify Automation with N8N
- What is N8N and Why It’s a Game-Changer for Shopify Stores
- Prerequisites for Connecting Shopify and N8N
- Establishing N8N Shopify Access Token
- Installing and Authorizing the Custom N8N App in Shopify
- Configuring the Shopify Node and Testing Connectivity in N8N
- Example Workflow: Automatically Retrieving Shopify Product Data
- Advanced Shopify Automations with N8N: Beyond Product Retrieval
- Troubleshooting Common N8N-Shopify Connection Issues
- N8N vs. Zapier vs. Make: A Comparison for Shopify Integrations
- Best Practices for Secure N8N-Shopify Integration
- Frequently Asked Questions (FAQ)
- Q: Is N8N-Shopify integration secure for handling sensitive data?
- Q: Can N8N handle large volumes of Shopify data (e.g., thousands of products)?
- Q: What kind of automations can I build beyond product management?
- Q: Do I need coding skills to use N8N with Shopify?
- Q: Can I use N8N to manage multiple Shopify stores?
- Future-Proofing Your Shopify Store with N8N Automation
- Final Summary
Unlocking Shopify Automation with N8N
Connecting Shopify to N8N delivers powerful workflow automation for e-commerce. This integration allows for the automation of various tasks, enabling store owners and developers to reclaim significant amounts of time. By leveraging N8N’s capabilities, users can implement custom AI agents without extensive coding, transforming how online stores operate. The focus is on automating repetitive processes, such as updating product listings or generating blog posts, to boost productivity.
Benefits of N8N for E-commerce Automation
- Streamlined Operations: Automate product updates, order processing, and customer communication, reducing manual effort.
- No-Code AI Agents: Build sophisticated AI-driven workflows without writing a single line of code, making advanced automation accessible.
- Time Savings: Free up to 10 hours weekly by automating routine tasks, allowing focus on strategic growth and customer engagement. This efficiency gain directly impacts business scalability and innovation.
What N8N Offers
N8N provides an extensible platform for connecting various services and building intricate workflows. Its open-source nature means flexibility and control over your automation infrastructure. For Shopify users, this translates into the ability to create highly customized solutions that directly address unique business needs, moving beyond the standard integrations offered by other platforms. The platform’s modular design ensures that workflows can be scaled and adapted as business requirements evolve.
What is N8N and Why It’s a Game-Changer for Shopify Stores
N8N stands as an open-source automation platform enabling the creation of AI agents without writing code . Its open-source nature distinguishes it from proprietary solutions, offering users greater flexibility and control over their data and workflows. For Shopify store owners, N8N acts as a game-changer by allowing the construction of bespoke automation solutions that align precisely with their operational needs, unlike generalist automation tools.
Open-Source Advantage and Deployment
N8N’s open-source model allows for deployment on local machines or cloud environments, providing cost-effectiveness and ownership . This capability ensures that businesses can host their automation infrastructure securely, tailoring it to specific compliance or performance requirements. Users can deploy N8N on platforms like Google Cloud, giving them dedicated resources and enhanced control over their automations.
Key Differentiators for Shopify
- Custom Agent Development: Build AI agents specifically designed to handle Shopify tasks, from inventory management to personalized customer interactions.
- Extensive Integration Capabilities: N8N’s wide array of nodes supports connections to numerous services, enabling complex, multi-platform workflows that extend beyond Shopify.
- Cost Efficiency: Avoiding subscription fees for advanced features often found in proprietary tools, especially when self-hosting, provides significant long-term savings.
This platform facilitates sophisticated automation for Shopify stores, such as the automatic generation of blog posts, a feature that can significantly boost content marketing efforts . The ability to pull detailed product data and perform operations like creating or deleting products empowers store owners to manage their inventory dynamically.
Prerequisites for Connecting Shopify and N8N
Before initiating the Shopify and N8N integration, ensure the following essential components and configurations are in place. These prerequisites establish a stable and secure foundation for your automation workflows. A properly set up environment prevents common connectivity issues and ensures smooth operation.
Required Accounts and Setup
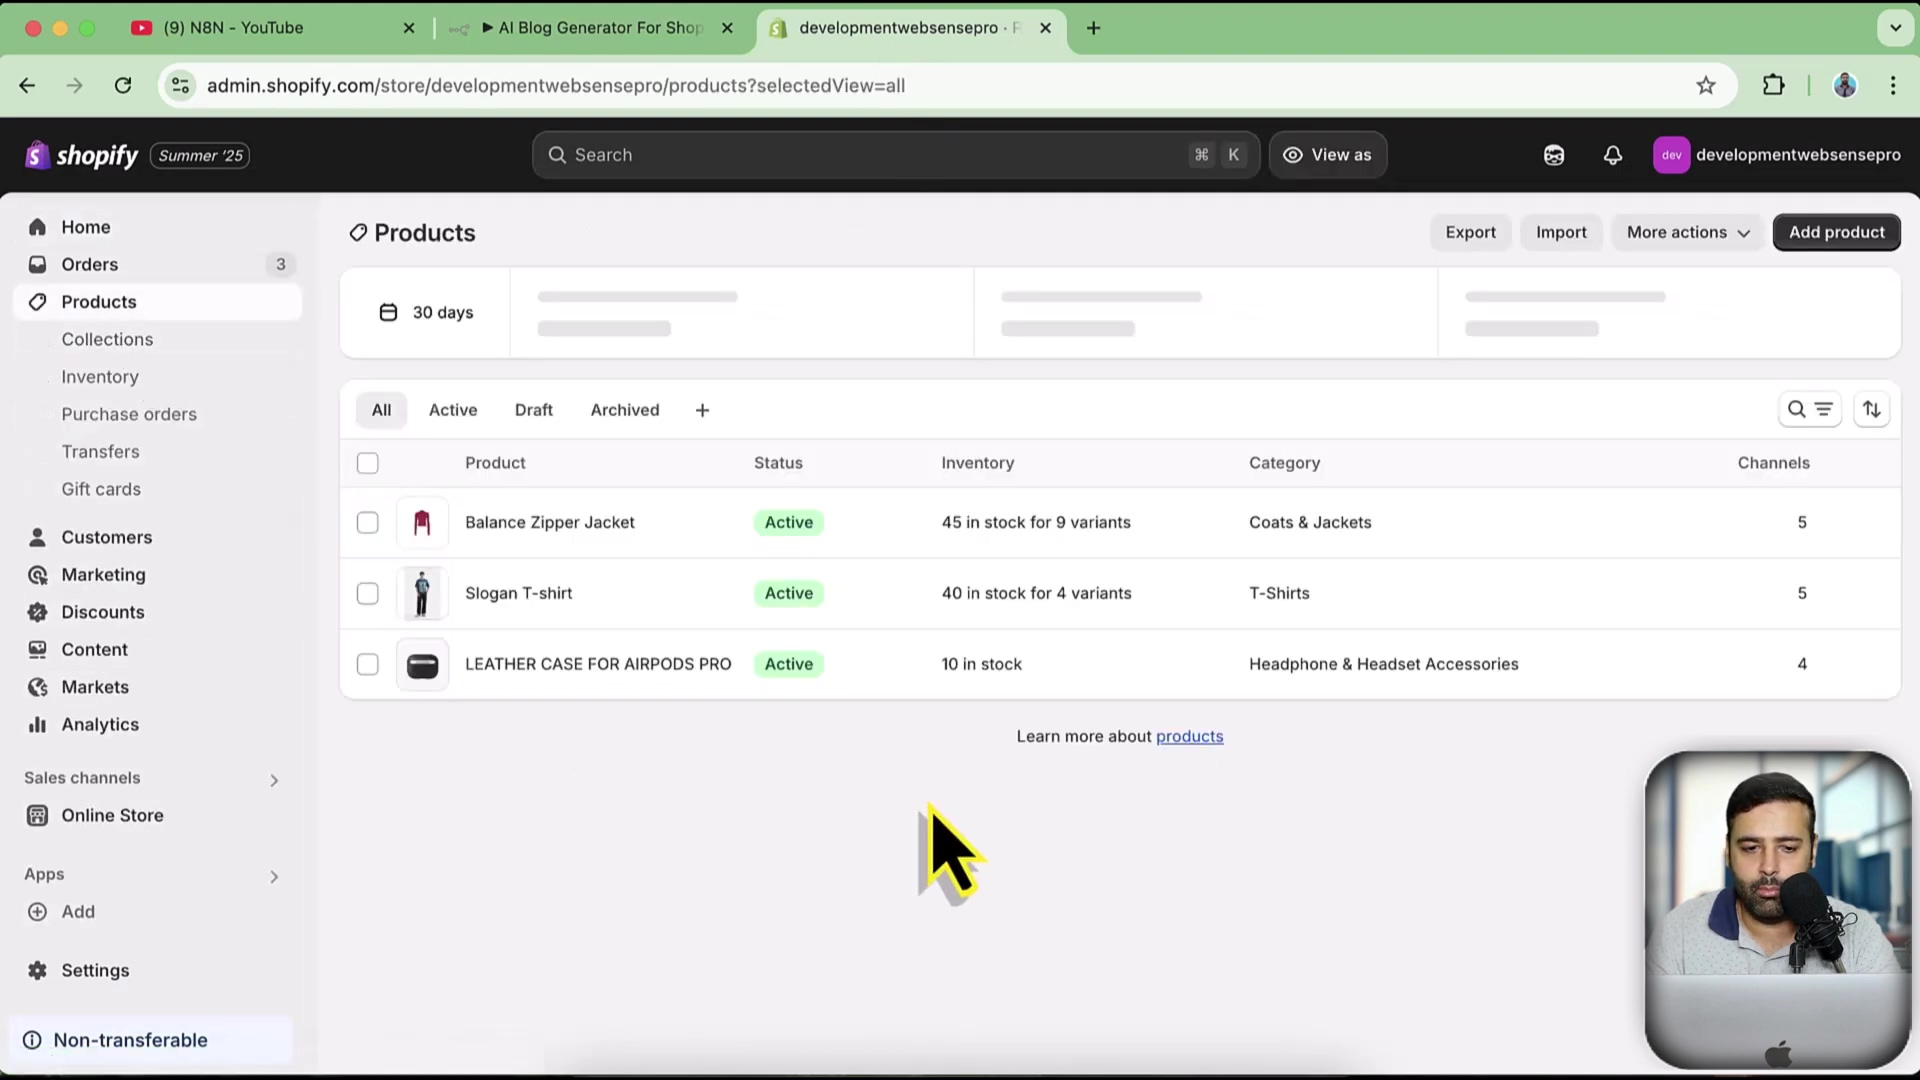
- Live Shopify Store or Development Store: You need an active Shopify storefront. For testing new automations without affecting live operations, a Shopify development store is highly recommended. These stores offer a sandboxed environment for experimentation.
- N8N Instance: A running N8N instance is necessary, whether self-hosted (e.g., on a local machine, Docker, or Google Cloud) or through a cloud provider. Ensure your N8N instance is accessible and operational.
- Shopify Admin Access: Full administrative access to your Shopify store is required to create custom apps and configure API scopes. This includes permissions to modify app settings and manage API credentials.
Ensuring these elements are ready simplifies the integration process, minimizing potential roadblocks and allowing for immediate workflow development. Having a dedicated development store is especially beneficial for iterative testing and refinement of N8N workflows before deployment to a live site.
Establishing N8N Shopify Access Token
To connect Shopify with N8N, you must generate an access token within your Shopify admin, then provide it to N8N. This token acts as a secure key, authorizing N8N to interact with your store’s data. This process ensures that N8N has the necessary permissions without requiring your full Shopify login credentials.
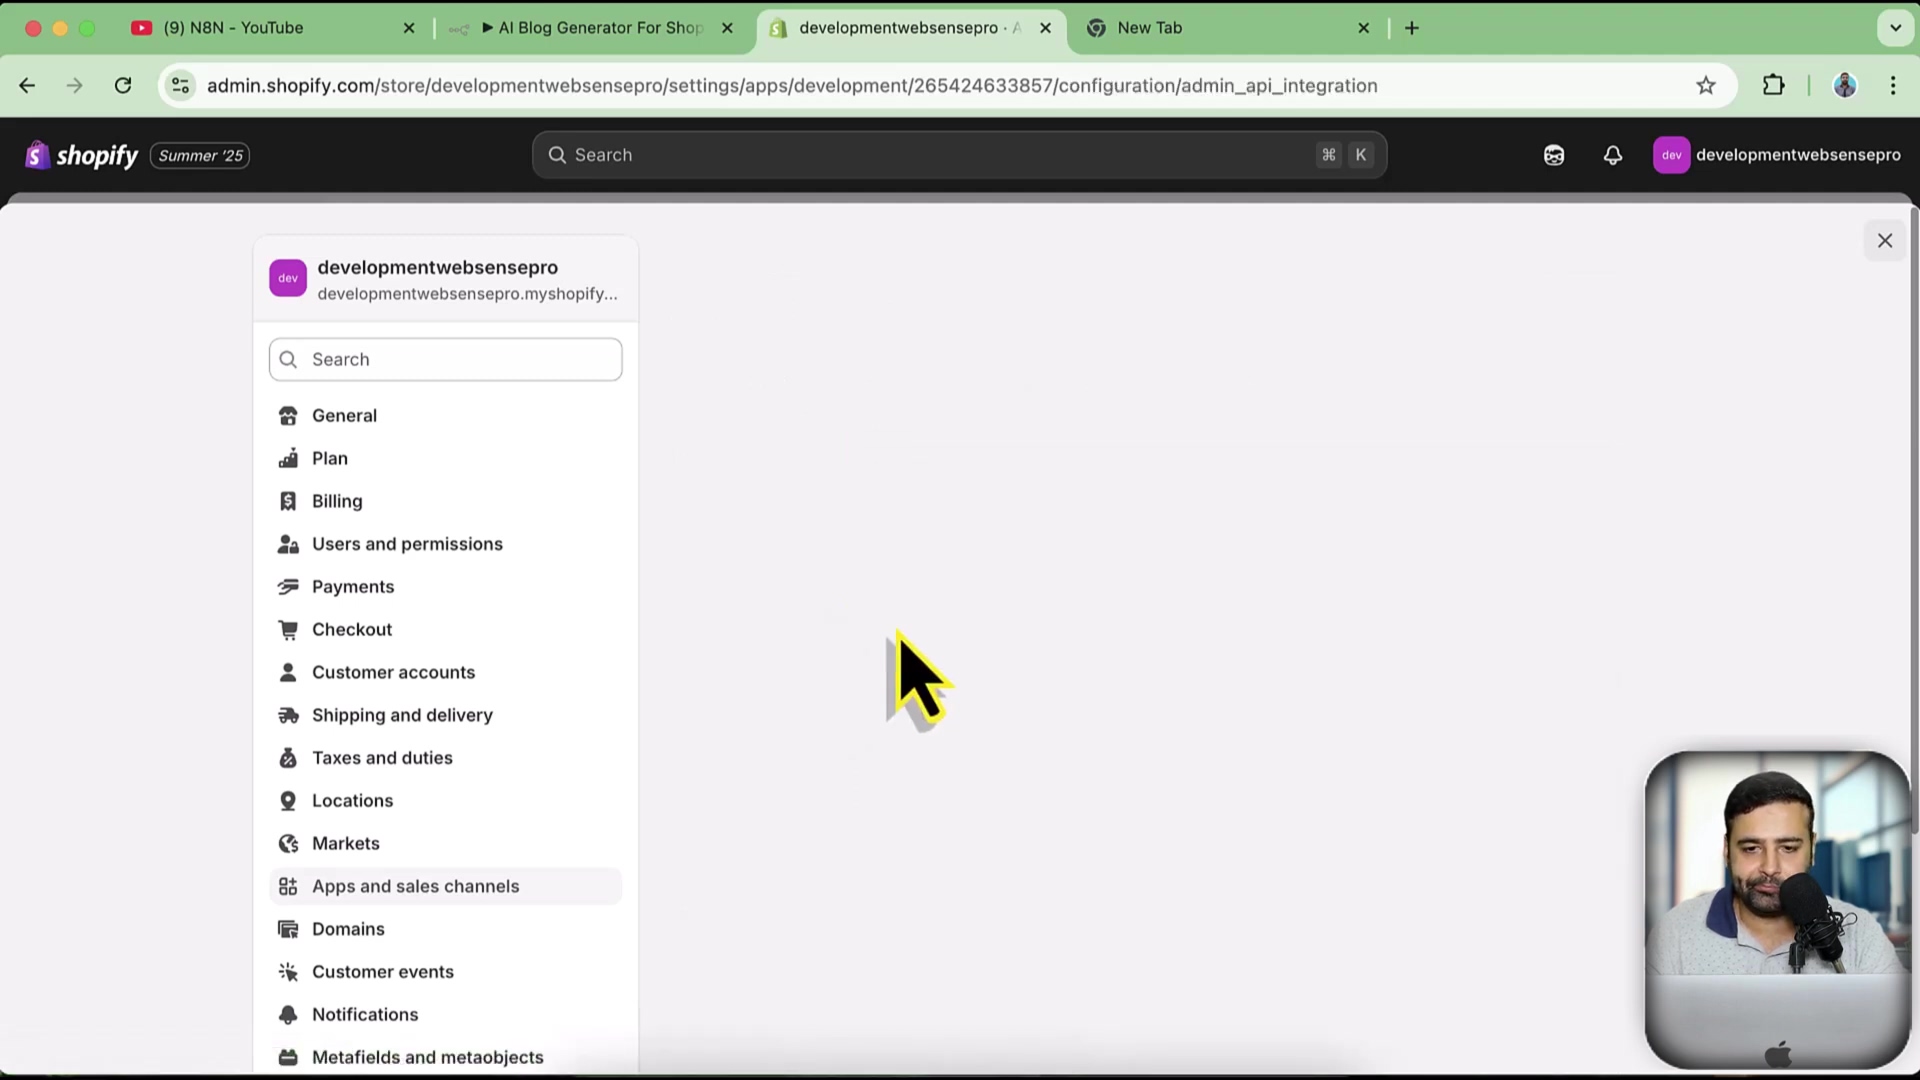
1. Access Shopify Admin Settings
- Goal: Navigate to the app development area within Shopify to create a custom application.
- Path: Log in to your Shopify admin dashboard. Click on ‘Settings’ in the bottom-left corner . Then, from the settings menu, select ‘Apps and sales channels’ .
- Verification: The ‘Apps and sales channels’ page should display a list of your installed apps and channel options.
2. Create a Custom App
- Goal: Initiate the creation of a new custom application specifically for N8N integration.
- Path: On the ‘Apps and sales channels’ page, click ‘Develop apps’ . Then, click the ‘Create an app’ button .
- Variant (Naming): You can name your app anything descriptive, such as ‘N8N Integration’ or ‘N8N Tutorial’ . After naming, click ‘Create app’ .
- Verification: A confirmation message stating the app has been created should appear, and you will be redirected to the app’s configuration page.
3. Configure Admin API Scopes
- Goal: Define the specific permissions N8N will have when accessing your Shopify store.
- Path: On your newly created app’s page, click ‘Configure Admin API scopes’ .
- Permissions Selection: Select the necessary scopes based on what N8N will automate. For example, if you plan to retrieve product data, check ‘read_products’. If you intend to create or delete products, select ‘write_products’ .
- Save Changes: After selecting all relevant permissions, click ‘Save’ to apply your chosen scopes .
- Verification: A success notification indicates that the API scopes have been updated.
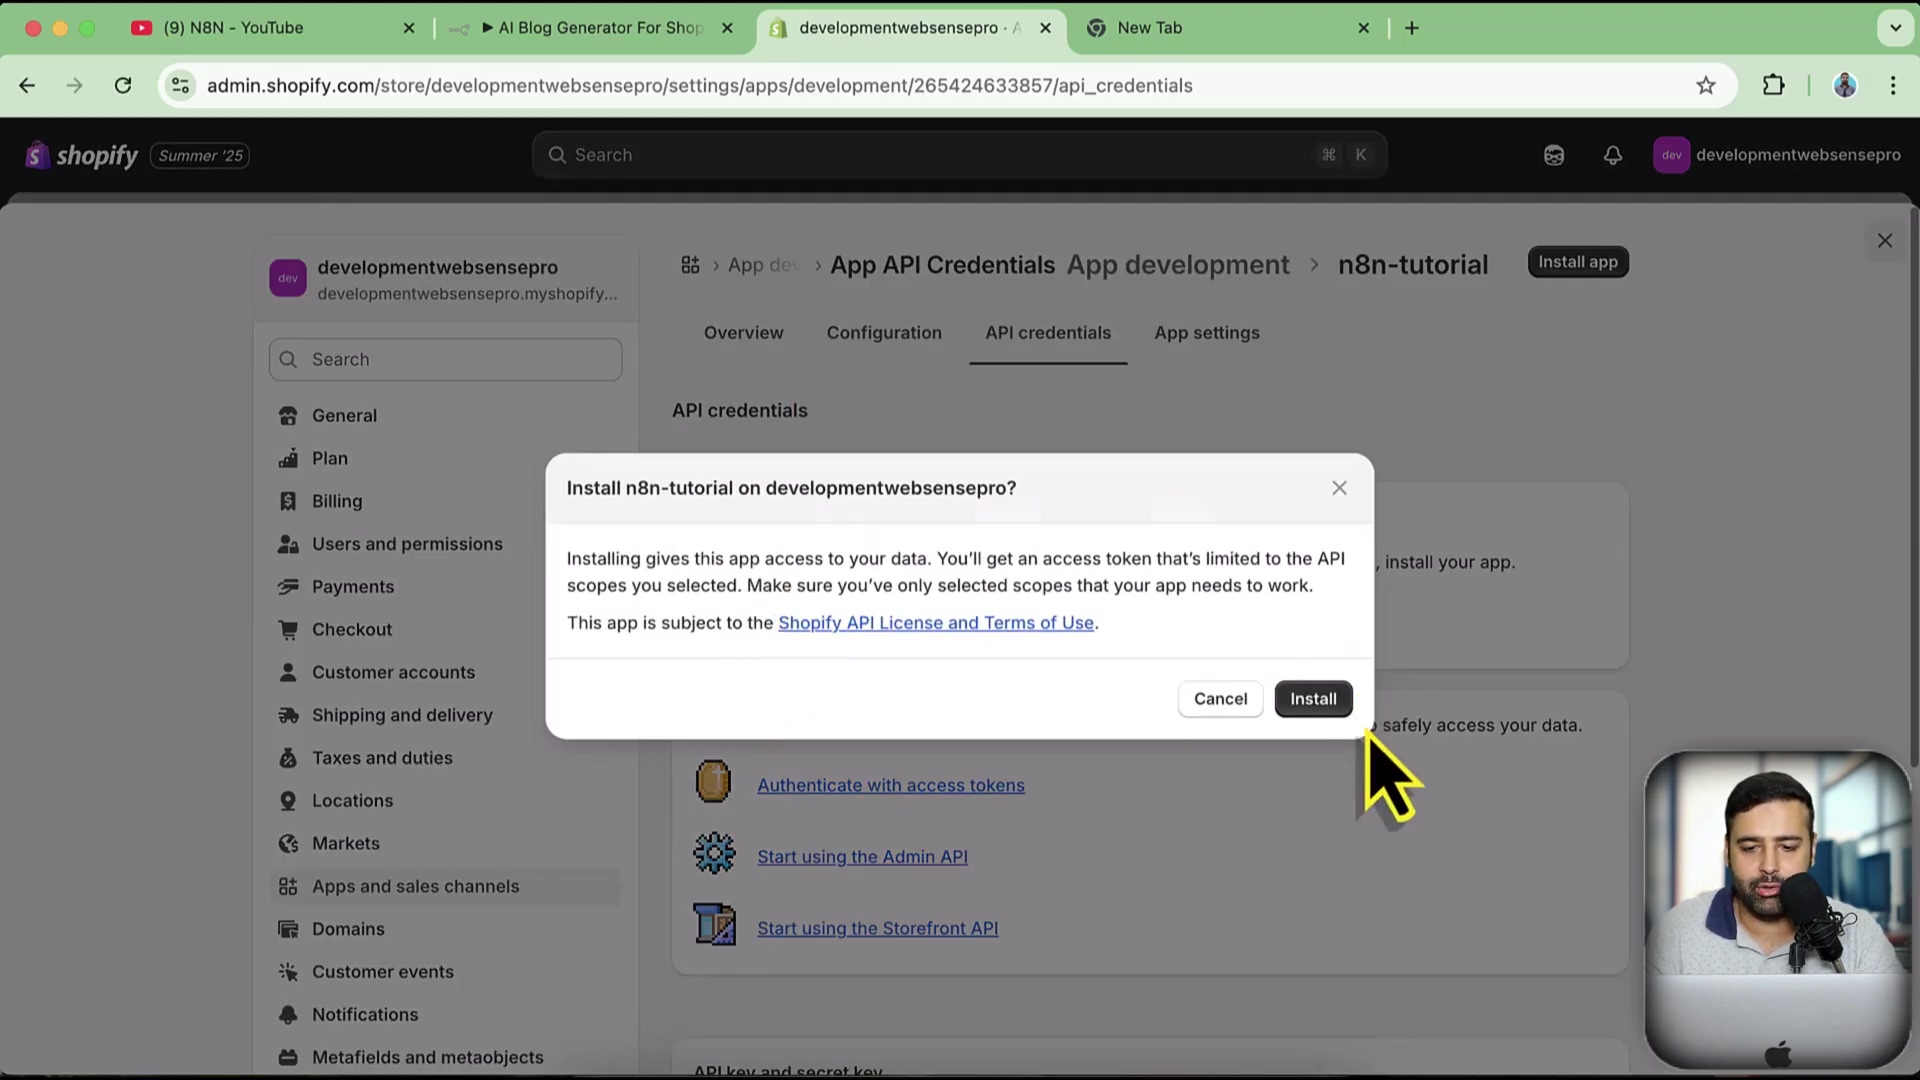
4. Install the Custom App
- Goal: Make the custom app active within your Shopify store to generate credentials.
- Path: Navigate to the ‘API credentials’ tab within your custom app’s configuration . Click the ‘Install app’ button .
- Confirmation: Confirm the installation when prompted by clicking ‘Install’ again .
- Verification: The ‘Admin API access token’ section will now be populated, displaying the generated token.
5. Retrieve the Admin API Access Token
- Goal: Obtain the unique access token required for N8N.
- Path: On the ‘API credentials’ page, locate the ‘Admin API access token’ section. Click ‘Reveal token once’ .
- Copy Token: Immediately copy the displayed token . This token is shown only once for security reasons, so it’s critical to save it securely .
- Risk: Failure to copy the token before leaving this page will require uninstalling and reinstalling the app to generate a new one.
- Verification: The copied token should be a long string of alphanumeric characters. Store it in a temporary secure location (e.g., a text file) before pasting it into N8N.
Installing and Authorizing the Custom N8N App in Shopify
After configuring the access token, the next step involves formally installing the custom app within your Shopify store and then authorizing N8N to use it. This process secures the connection and grants N8N the permissions defined in the previous steps.
1. Initiating the App Installation
- Goal: Confirm the installation of the custom app created in Shopify.
- Path: Within your custom app’s settings in Shopify admin, navigate to the ‘API credentials’ section. If you have just created the app, a prominent ‘Install app’ button will be visible .
- Confirmation: Click ‘Install app,’ then confirm the action by clicking ‘Install’ again on the subsequent prompt. This action activates the app within your store environment.
- Verification: Upon successful installation, the ‘Admin API access token’ field will become active, and the token will be ready for retrieval.
2. Retrieving the API Secret Key
- Goal: Obtain the API Secret Key, which complements the access token for secure communication.
- Path: Still within the ‘API credentials’ tab of your custom app, locate the ‘API secret key’ section. It is typically displayed below the access token information .
- Copy Key: Click the copy icon next to the API Secret Key to copy it to your clipboard .
- Verification: Ensure the key is successfully copied. This key, similar to the access token, is crucial for authenticating requests from N8N.
3. Entering Credentials into N8N
- Goal: Provide N8N with the collected Shopify credentials to establish the connection.
- Path: In your N8N workflow, add a Shopify node. If you haven’t already, click the ‘Credentials’ dropdown and select ‘Create New Credential’ .
- Input Details: Enter your Shopify subdomain (e.g.,
your-store-name), the copied Admin API Access Token, and the copied API Secret Key into the respective fields within the N8N credential setup . For example, if your store URL isyour-store-name.myshopify.com, your subdomain isyour-store-name.

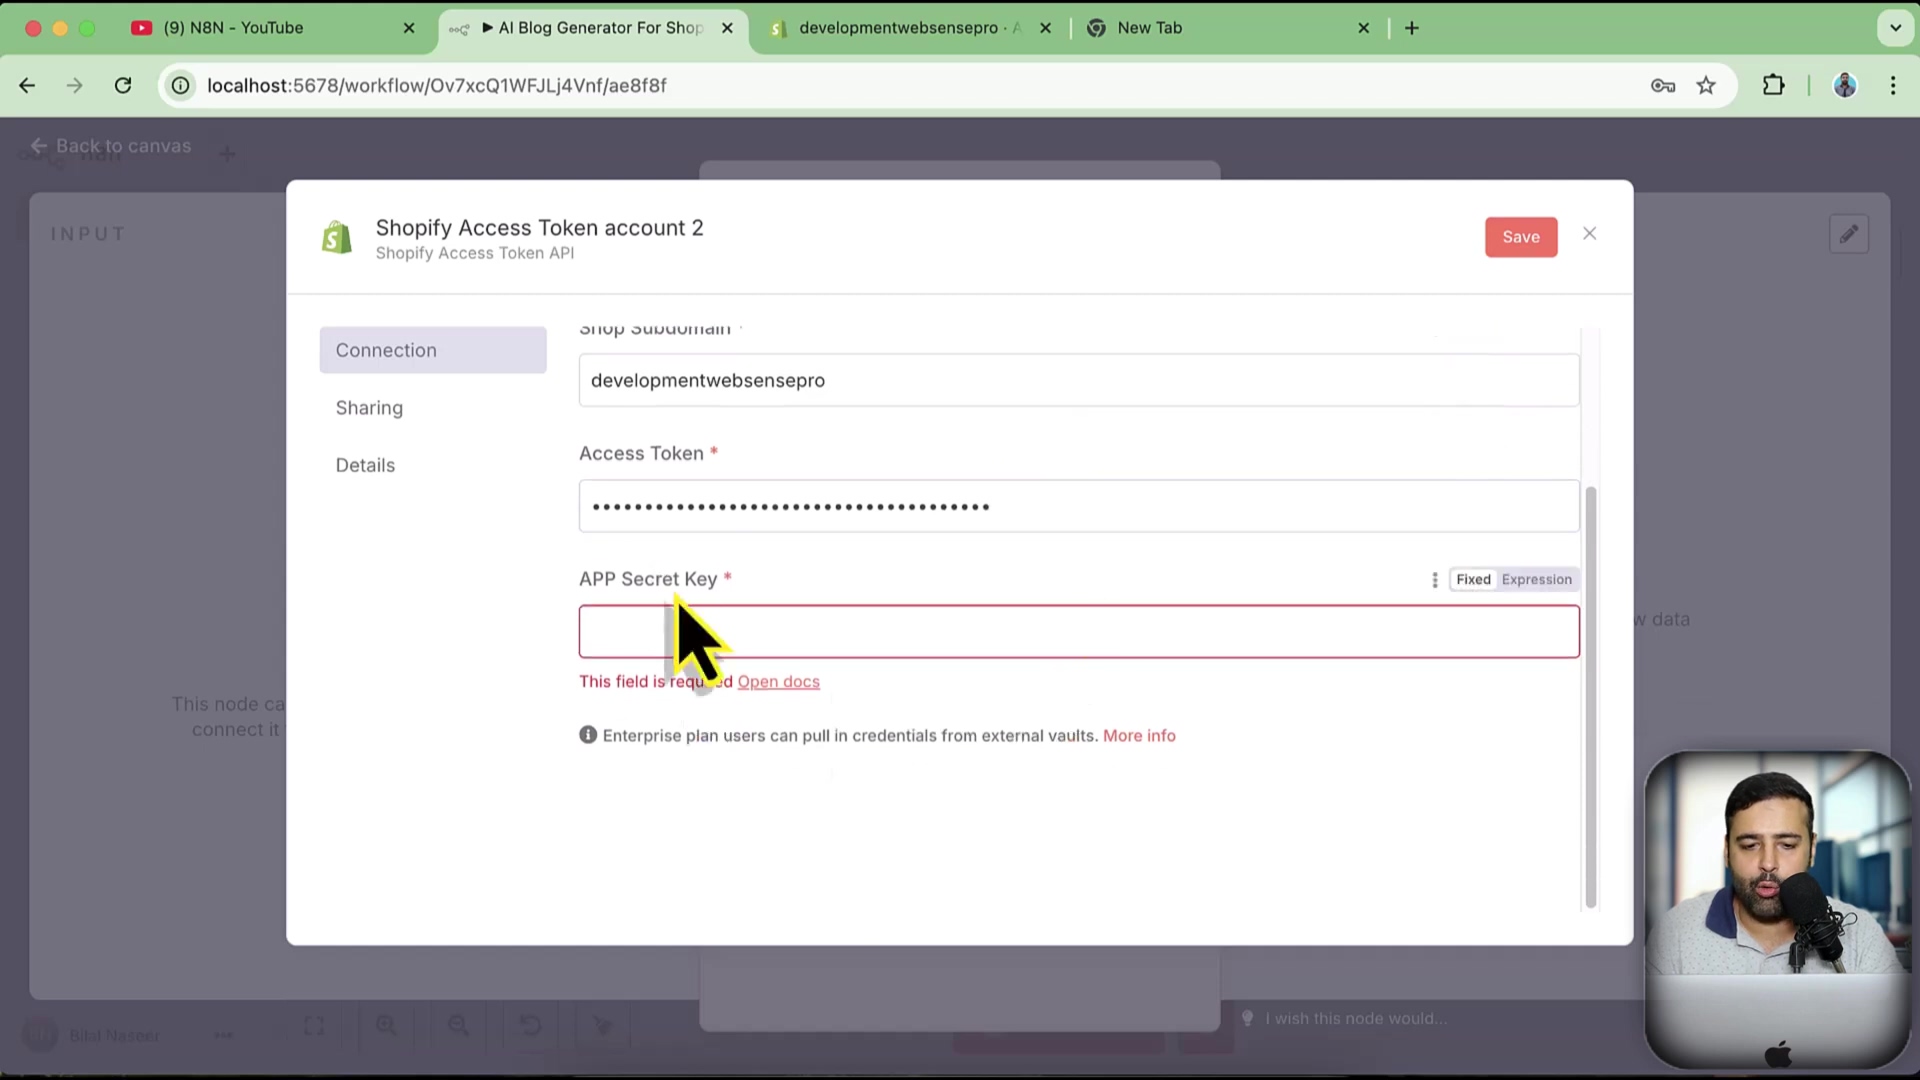
- Save Credentials: Click ‘Save’ in N8N to store these credentials. This action finalizes the link between N8N and your Shopify store, making it ready for automation tasks .
- Verification: After saving, N8N should indicate that the credentials were created successfully, typically showing them under a new account name (e.g., ‘Account 2’) .
Configuring the Shopify Node and Testing Connectivity in N8N
After obtaining your Shopify credentials, the next step is to configure the Shopify node within N8N and perform a test to ensure successful connectivity. This test validates that N8N can communicate with your Shopify store and retrieve data as expected.
1. Adding the Shopify Node to Your Workflow
- Goal: Integrate the Shopify interaction block into your N8N automation flow.
- Path: In your N8N workflow editor, click the ’+’ button to add a new node . In the search bar, type ‘Shopify’ and select the ‘Shopify’ node from the results .
- Verification: The Shopify node should now appear on your workflow canvas.
2. Selecting Operations and Credentials
- Goal: Define the action you want the Shopify node to perform and link it to your saved Shopify credentials.
- Path: Click on the newly added Shopify node. In the node’s configuration panel, select the desired ‘Operation’. For a basic test, ‘Get Many Products’ is a suitable choice .
- Credential Selection: From the ‘Credentials’ dropdown, choose the Shopify credentials you configured in the previous steps (e.g., ‘Account 2’) .
- Verification: The operation and credentials should be visibly selected in the node’s settings.
3. Testing the Step
- Goal: Confirm that N8N can successfully fetch data from your Shopify store using the configured node and credentials.
- Path: Within the Shopify node’s configuration, click the ‘Test Step’ button . This executes the defined operation (e.g., retrieving products) and displays the output.
- Expected Output: If successful, the ‘Output’ panel of the node will display data from your Shopify store, such as a list of products . If you have only a few products, these will be listed .
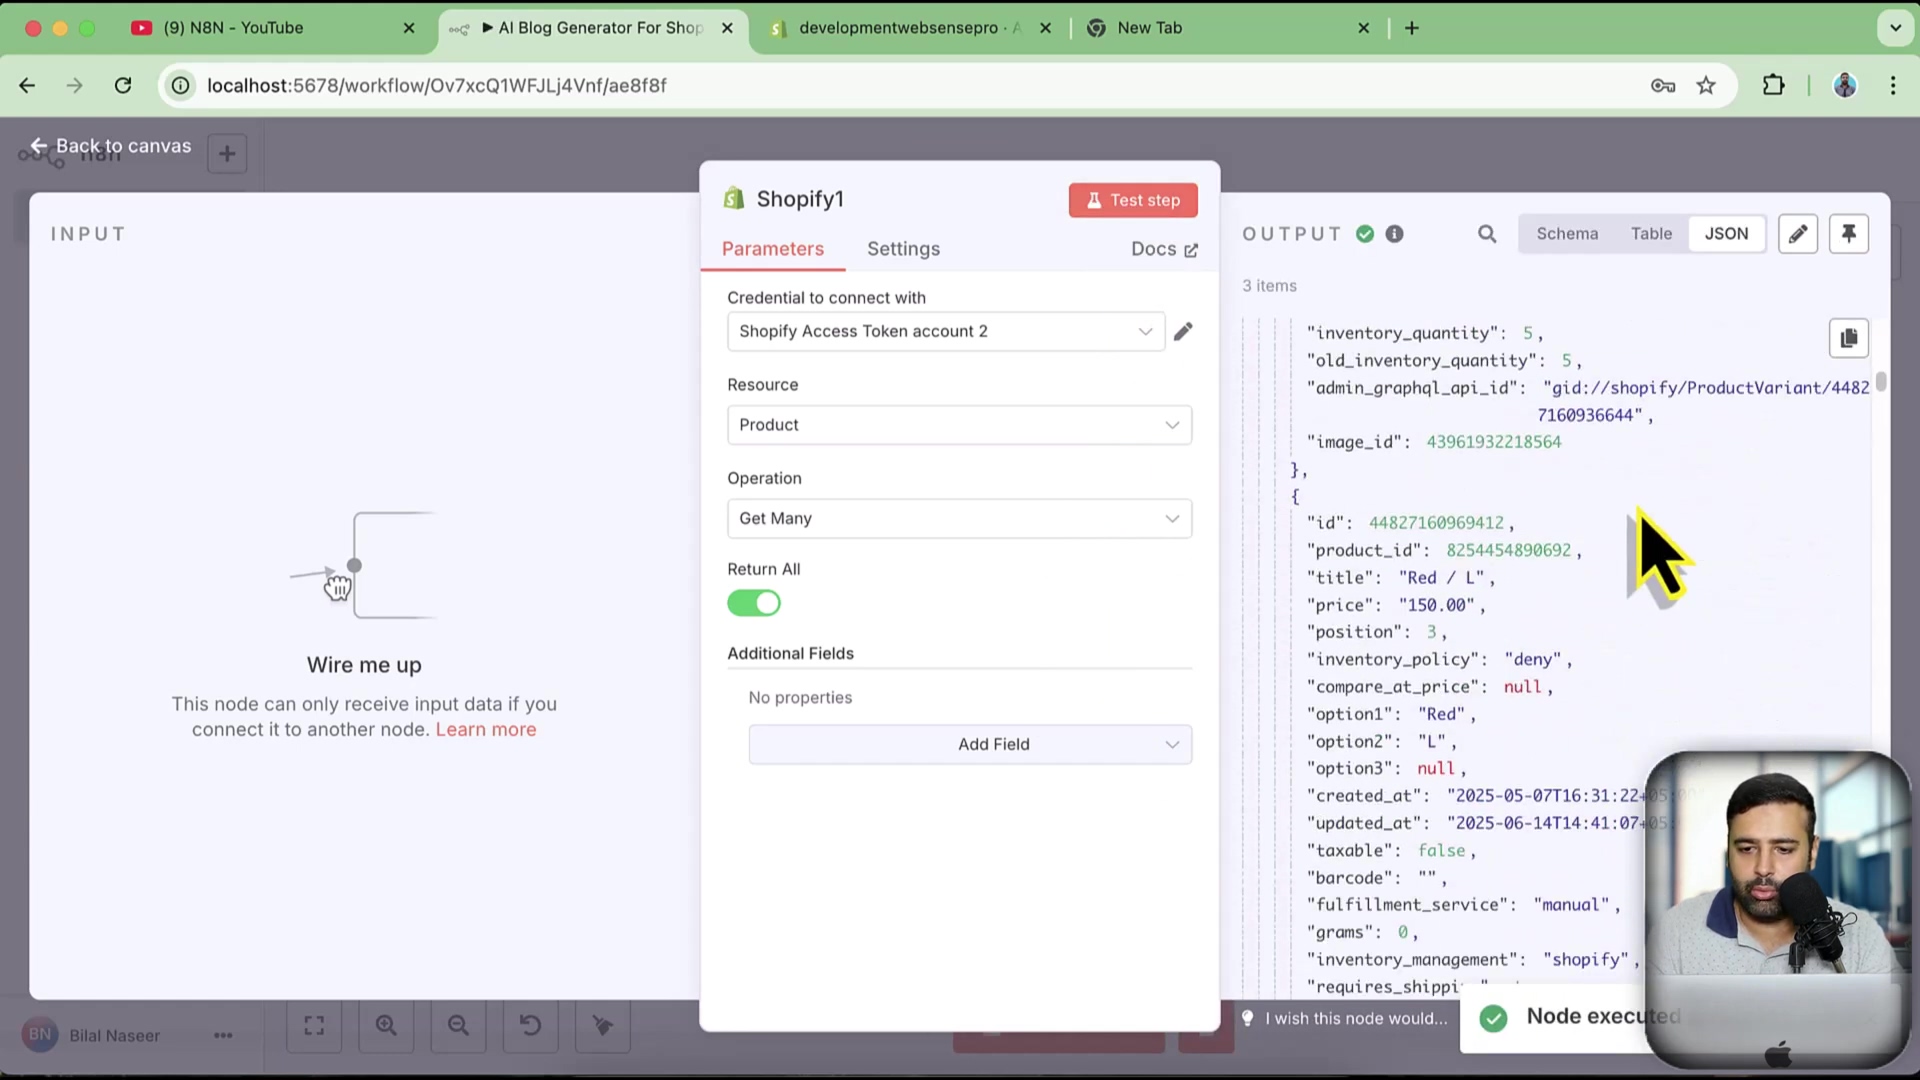
- Rollback (Troubleshooting): If the test fails, review the ‘Error’ message in the output panel. Common issues include incorrect access tokens, incorrect API scopes, or an invalid subdomain. Recheck your Shopify app credentials and selected scopes .
- Verification: The output should contain JSON data representing the requested Shopify resources (e.g., product details), confirming a successful connection and data retrieval.
Example Workflow: Automatically Retrieving Shopify Product Data
A fundamental application of the N8N-Shopify integration is automatically retrieving product data. This workflow demonstrates how to set up N8N to fetch product information from your Shopify store, providing a foundation for more complex automations.
1. Setting Up the Product Data Retrieval Workflow
- Goal: Create a simple N8N workflow to extract product listings from Shopify.
- Path: Start with an empty N8N workflow canvas. Add a ‘Shopify’ node . Configure this node to use your established Shopify credentials.
- Operation Selection: Set the ‘Operation’ field within the Shopify node to ‘Product’ and the ‘Resource’ field to ‘Get Many’. This combination instructs N8N to fetch multiple product entries .
- Optional: Limit Products: If you have a large inventory, you can set a ‘Limit’ on the number of products retrieved (e.g.,
50). Alternatively, to retrieve all products, select ‘Return all’ .
2. Executing and Reviewing the Workflow
- Goal: Run the workflow and inspect the retrieved product data.
- Path: After configuring the node, click ‘Test Step’ on the Shopify node .
- Verification: The output pane of the Shopify node will display a JSON array containing details of your products . Each object in the array represents a product, with fields like
id,title,price, andvariants.
This basic workflow validates your N8N-Shopify connection and serves as a starting point. From here, you can extend the workflow to filter products, integrate with other services, or trigger subsequent actions based on the retrieved data.
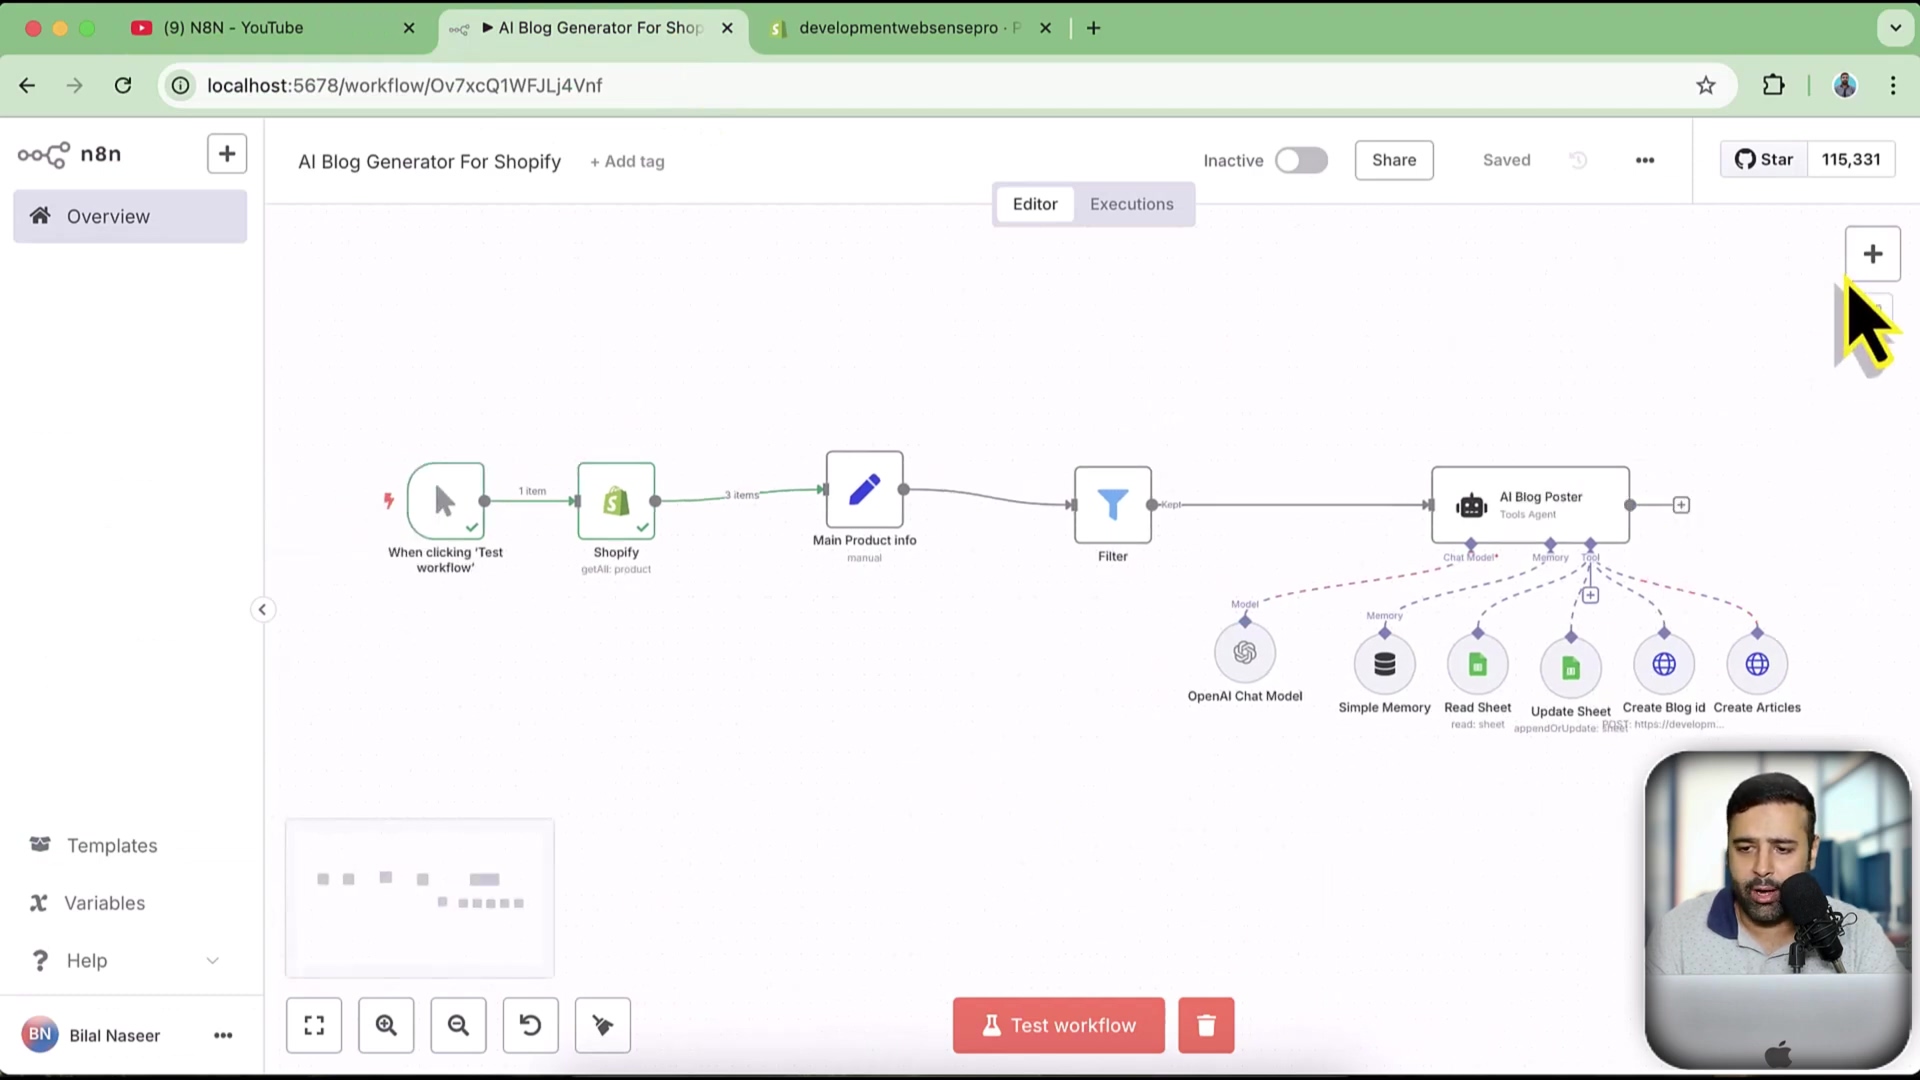
Advanced Shopify Automations with N8N: Beyond Product Retrieval
The N8N-Shopify connection extends far beyond simple product retrieval, unlocking a spectrum of advanced automations. By combining Shopify data with N8N’s versatile capabilities and AI agents, businesses can transform their operational efficiency, customer engagement, and content strategy.
AI-Powered Content Generation
- Automated Blog Posts: Integrate N8N with AI writing tools to automatically generate blog posts based on product launches, seasonal trends, or SEO keywords. This can drastically reduce the manual effort in content creation .
- Product Descriptions: Leverage AI to craft compelling product descriptions, ensuring consistency and optimizing for search engines across your entire catalog. New products can have descriptions automatically generated upon creation.
Enhanced Customer Relationship Management
- Personalized Email Campaigns: Trigger targeted email campaigns in response to customer behaviors (e.g., abandoned carts, product views) using N8N’s email integration nodes. Personalize content based on purchase history or browsing patterns.
- Automated Support Workflows: Route customer support inquiries to the appropriate team members or generate automated responses for common questions, improving response times and customer satisfaction.
Streamlined Order Processing and Inventory
- Smart Order Fulfillment: Create workflows that automatically alert fulfillment centers or drop shippers when orders are placed, updating order statuses in real-time.
- Dynamic Inventory Management: Monitor stock levels across multiple platforms and automatically adjust inventory in Shopify when sales occur or new stock arrives. Implement alerts for low stock to prevent overselling.
- Fraud Detection: Integrate with fraud detection services, using N8N to flag suspicious orders for manual review or automatic cancellation, protecting your business from financial losses.
Comprehensive Data Synchronization
- Multi-Platform Sync: Synchronize product data, customer information, and order details between Shopify and other CRM, ERP, or accounting systems. Ensure data consistency across your entire business ecosystem.
- Reporting Automation: Generate custom sales reports or performance dashboards by pulling data from Shopify and other sources, then compiling them into easily digestible formats for business analysis. This can include daily or weekly summaries delivered directly to stakeholders.
Troubleshooting Common N8N-Shopify Connection Issues
When connecting N8N to Shopify, users may encounter various issues. Addressing these common problems systematically can expedite the troubleshooting process and restore smooth operation.
1. Invalid Access Token or API Key Errors
- Goal: Resolve issues related to incorrect or expired access tokens or API keys.
- Path: Re-access your Shopify Admin > ‘Settings’ > ‘Apps and sales channels’ > ‘Develop apps’ > [Your N8N App] > ‘API credentials’ . Ensure the ‘Admin API access token’ was correctly copied at the time it was revealed . The token is shown only once, so re-installation of the custom app might be necessary if it was not saved.
- Verification: Confirm that the token pasted into N8N matches exactly the one generated in Shopify.
- Rollback: If the token is lost or compromised, uninstall the N8N custom app from Shopify, then reinstall it to generate a new token. Update the credentials in N8N with the new token.
2. Permission Issues (Insufficient Scopes)
- Goal: Grant the N8N app all necessary permissions to perform desired actions.
- Path: In Shopify Admin > ‘Settings’ > ‘Apps and sales channels’ > ‘Develop apps’ > [Your N8N App] > ‘Configure Admin API scopes’ . Verify that all required read and write permissions (e.g., ‘read_products’, ‘write_products’, ‘read_orders’) are checked for the operations your N8N workflow performs . For example, if you want to create products, ‘write_products’ must be enabled . Click ‘Save’ after making changes .
- Verification: Re-run the N8N workflow ‘Test Step’ to see if the permission error persists. The error message will often specifically indicate a scope issue.
3. Incorrect Shop Subdomain
- Goal: Ensure the Shopify subdomain entered in N8N is accurate.
- Path: In the N8N Shopify node credentials, double-check the ‘Shop Subdomain’ field . This should be the first part of your Shopify store URL (e.g., for
mystore.myshopify.com, the subdomain ismystore) . - Verification: The subdomain should precisely match your store’s URL prefix, excluding
.myshopify.comor other domain extensions if you are using a custom domain. Usingmystore.myshopify.comdirectly in the subdomain field will result in an error; onlymystoreis sufficient.
4. N8N Instance Connectivity Problems
- Goal: Verify N8N’s ability to reach external services, including Shopify.
- Path: Check your N8N instance’s network configuration. Ensure there are no firewall rules or proxy settings blocking outgoing HTTP requests to Shopify’s API endpoints. If self-hosting, verify your server’s internet connection.
- Verification: Try connecting N8N to another simple external API (e.g., a public weather API) to determine if the issue is specific to Shopify or a general N8N connectivity problem.
N8N vs. Zapier vs. Make: A Comparison for Shopify Integrations
Choosing the right automation platform for Shopify integrations depends on specific business needs, technical expertise, and budget. N8N, Zapier, and Make (formerly Integromat) are prominent players, each offering distinct advantages.
Feature Comparison: N8N, Zapier, and Make
| Feature | N8N | Zapier | Make |
|---|---|---|---|
| Type | Open-source, self-hostable | SaaS, cloud-based | SaaS, cloud-based |
| Pricing Model | Free (self-hosted), paid cloud options | Tiered subscriptions (task-based) | Tiered subscriptions (operation-based) |
| Flexibility | Highly customizable, JavaScript support | Pre-built integrations, less custom code | Highly visual, more complex logic |
| Control | Full data ownership (self-hosted) | Data managed by Zapier | Data managed by Make |
| Ease of Use | Moderate (requires setup) | High (ready-to-use templates) | Moderate (visual flow builder) |
| Complexity | Handles complex, custom workflows | Best for simple, linear workflows | Designed for complex, branching scenarios |
| AI Integration | Native AI nodes, custom integrations | Integrates with AI services | Integrates with AI services |
N8N’s Advantage for Shopify
N8N’s open-source nature provides unparalleled control and cost efficiency for Shopify, particularly for self-hosting. This makes it ideal for businesses seeking deep customization or those with strict data privacy requirements. The ability to manage resources directly can lead to significant cost savings compared to the task-based pricing models of Zapier and Make, especially for high-volume operations.
When to Choose Alternatives
- Zapier: Best for users who prioritize ease of use and require quick, straightforward integrations without significant customization. Its vast library of pre-built integrations allows rapid deployment for common use cases.
- Make: Suitable for users who need to build more complex, multi-step workflows with visual logic. It offers greater flexibility than Zapier but still operates within a managed service framework, making it a middle ground between N8N’s freedom and Zapier’s simplicity.
Best Practices for Secure N8N-Shopify Integration
Maintaining a secure N8N-Shopify integration is critical to protect your store’s data and operations. Adhering to best practices minimizes risks associated with API access and automated workflows.
1. Principle of Least Privilege
- Goal: Grant only the minimum necessary permissions to your N8N custom app.
- Practice: When configuring Admin API scopes in Shopify, select only the specific ‘read’ and ‘write’ permissions required for your N8N workflows . For instance, if N8N only retrieves product data, avoid granting write permissions or access to customer information.
- Benefit: Reduces the attack surface; if your N8N instance is compromised, unauthorized access is limited by restricted permissions.
2. Secure Access Token Management
- Goal: Protect your Shopify Admin API access tokens from unauthorized disclosure.
- Practice: Treat your access token like a password. Do not hardcode it directly into workflows or share it publicly. Store it securely within N8N’s credential management system. Rotate tokens periodically, especially if there’s any suspicion of compromise .
- Recommendation: Avoid displaying tokens in logs or debugging output. Delete the Shopify custom app from your store if the token was compromised or after the integration is no longer needed .
3. Regular Workflow Audits
- Goal: Ensure N8N workflows are performing as intended and are free from vulnerabilities.
- Practice: Periodically review your N8N workflows to confirm they are still meeting business requirements and that no unnecessary nodes or actions are present. Verify that data flows are secure and that sensitive information is handled appropriately.
- Benefit: Helps identify and mitigate potential security loopholes or inefficiencies over time, ensuring continued secure operation.
4. Environment Hardening for Self-Hosted N8N
- Goal: Secure the N8N infrastructure itself if it’s self-hosted.
- Practice: Implement strong authentication for your N8N instance. Keep N8N and its underlying operating system/dependencies updated to patch known vulnerabilities. Use firewalls to restrict access to the N8N server only from trusted IP addresses.
- Recommendation: Run N8N in a containerized environment (e.g., Docker) to isolate it from other system components and simplify security management.
Frequently Asked Questions (FAQ)
This section addresses common questions regarding the integration of N8N with Shopify, covering aspects from data handling to scalability.
Q: Is N8N-Shopify integration secure for handling sensitive data?
A: Yes, when configured correctly. By implementing the principle of least privilege and securely managing your Shopify Admin API access tokens—as detailed in our best practices—you can significantly mitigate security risks. N8N’s self-hosted option also allows for complete control over your data, addressing privacy concerns.
Q: Can N8N handle large volumes of Shopify data (e.g., thousands of products)?
A: Absolutely. N8N is designed to handle scalable workflows. For large datasets, you can use features like ‘Return all’ or set ‘Limits’ on product retrieval within the Shopify node to manage API call volumes efficiently . This prevents overwhelming your API limits and ensures smooth processing.
Q: What kind of automations can I build beyond product management?
A: Beyond product management, N8N enables various automations, including:
- Order Processing: Automate order fulfillment, status updates, and notification triggers.
- Customer Management: Segment customers, send personalized follow-ups, and manage loyalty programs indirectly.
- Content Generation: Create and publish AI-generated blog posts or product descriptions directly to Shopify .
- Data Synchronization: Integrate Shopify data with CRM, accounting, or ERP systems.
Q: Do I need coding skills to use N8N with Shopify?
A: Not necessarily. N8N is a no-code/low-code platform. While basic understanding of logic helps, its visual workflow builder allows users to create complex automations by dragging and dropping nodes and configuring their settings without writing code . For advanced customizations, JavaScript can be used within certain nodes.
Q: Can I use N8N to manage multiple Shopify stores?
A: Yes. You can configure separate Shopify credentials and nodes for each of your stores within N8N. This allows you to build centralized workflows that interact with multiple Shopify accounts, streamlining multi-store management from a single N8N instance.
These FAQs highlight the robustness and flexibility N8N offers for enhancing Shopify operations, ensuring users can leverage its power effectively and securely.
Future-Proofing Your Shopify Store with N8N Automation
Integrating N8N with Shopify is a strategic move that future-proofs your e-commerce operations. By embracing automation, businesses can adapt to evolving market demands, enhance customer experiences, and maintain a competitive edge. This integration offers a scalable and flexible solution for continuous growth.
Embracing Automation for Growth
- The ability to automate repetitive tasks like product updates, order processing, and content generation frees up resources, allowing businesses to focus on innovation and strategic initiatives. This efficiency is critical for scaling operations without proportional increases in manual labor.
- N8N’s open-source nature ensures that your automation infrastructure remains adaptable and can integrate new technologies, such as advanced AI models, as they emerge. This flexibility is vital in a rapidly changing digital landscape.
Continuous Improvement and Scalability
- With N8N, workflows can be continuously refined and expanded to meet new business needs, supporting everything from a small startup to a large enterprise. The modular design makes it easy to add new integrations or optimize existing processes.
- Investing in N8N automation for your Shopify store is an investment in long-term efficiency and resilience. It empowers you to build a more agile and responsive e-commerce presence, capable of navigating future challenges and opportunities effectively.

Final Summary
Connecting N8N to Shopify unlocks powerful automation for e-commerce, enabling tasks like product data retrieval and AI-powered content generation. This integration begins with creating and securely managing a custom app’s access token and API secret key within Shopify, then configuring the N8N Shopify node with these credentials for testing. Your next step should be to explore N8N’s template library or add a ‘HTTP Request’ node after your Shopify node to send data to another service.